
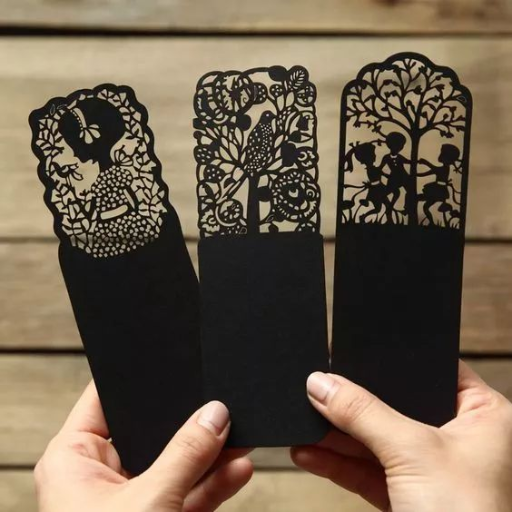
Laser cut paper art is an exciting and intricate craft that combines creativity with technology. By using precision lasers, artists and hobbyists can create detailed and stunning designs that would be nearly impossible to achieve by hand. This blog aims to provide a comprehensive guide to the world of laser cut paper, offering valuable techniques, practical tips, and inspiring project ideas. Whether you’re a seasoned artist looking to expand your skills or a beginner interested in exploring this fascinating art form, this blog will help you navigate the essentials of laser cutting, from choosing the right equipment to mastering various cutting techniques. Join us on a journey to unlock the full potential of laser cut paper and bring your artistic visions to life.
What is Laser Cutting and How Does It Work with Paper?
Fundamentals of Laser Cut Technology
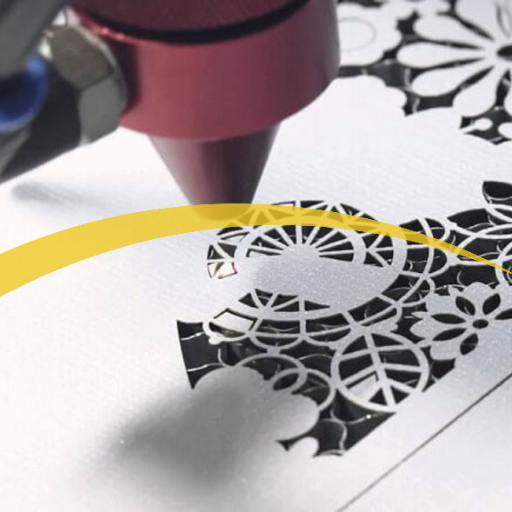
Laser cutting technology is a controlled process that makes use of a concentrated light beam to accurately cut materials. A laser cutter will trace the laser beam on the top surface of a paper after being directed there by an outline that has been previously programmed into it. The intense heat produced by the laser causes the paper to burn or evaporate within the required lines thus creating neat and accurate cuts. This enables crafting intricate and fragile designs which cannot be easily achieved through the traditional means of cutting. For instance, in a laser cutter, there must be three main components which are: control system, laser source and optics responsible for focusing the incoming laser beam onto the paper. Artists and hobbyists can produce highly detailed paper art using different adjustments in terms of focus, power and speed.
Understanding Paper Laser Cutting Process
The process of laser cutting on paper is multistep operation aimed at achieving precise and accurate cuts. These are:
1.Design Creation:
- Software: Digital designs are created using vector graphic software like Adobe Illustrator, CorelDRAW or Inkscape. They are then saved as vector files such as .SVG or .DXF formats that can be recognized by laser cutters.
- Material Preparation:
- Paper Selection: Different types include vellum cardstock specialty papers etc., all used in making these items hence their choice will determine what settings will be employed on a given laser cutter.
- Size & Positioning: The size should correspond with what was stipulated upon designing while keeping everything aligned properly on its surface.
2.Laser Cutter Settings:
- Power: Set according to thickness and type of paper; for example 10-20% for thinner ones or 40-60% for thicker card stock
- Speed: Faster speeds should be set for thin papers so that they do not burn (200 – 400 mm/s). Thicker papers would require slower speeds ranging from 50 – 100 mm/s.
- Focus: The laser should be focused for precision of cuts. Manipulation of focal point would take place in millimeters depending on thickness and other features.
- Frequency: A cutting quality usually ranges from 500 to 5,000 Hz that depends on the applied material.
3.Cutting Process:
- Execution: After setting all parameters, the laser cutter will start moving according to the design pattern. With this kind of control and movement, complex incisions are easily achieved.
- Ventilation: This is done by ensuring that there is proper ventilation inside the machine so as to remove any smoke generated during the cutting process.
4.Post-Cutting Finishing:
- Cleaning: Paper could be left with some dirt or burns after cutting which may require some cleaning using a damp cloth or a gentle brush if possible.
- Assembly: For certain projects, more than one piece may have been cut out individually before being joined together in order to complete it fully.
Understanding these technical parameters and following them step-by-step ensures that you achieve amazing results with your laser cut paper projects.
Choosing a Laser Cutter for Making Paper Products
Research is therefore essential in ensuring that a laser cutter selected for the paper products is appropriate. This means, to begin with, power of the laser as it determines how well it can cut through different paper weights; usually 30 – 50W laser are most preferred for most paper projects. Furthermore, machine precision and speed settings play an important role in determining the quality of cut. One should look for a laser cutter that has adjustable speed and power settings to accommodate different types of papers. Moreover, reliable ventilation systems need to be incorporated into these equipment’s so as to control fumes as well as provide cleaner cutting environment. Finally, one should choose a laser cutter that supports easy software integration which makes the design flexible while being user friendly too. It is thus important to consider these aspects when selecting a suitable laser cutter that will cater for your specific paper cutting needs effectively.
Best Types of Paper for Laser Cutting
Exploring Paper Thickness and Quality: From Copy to Art Paper.
When investigating paper thickness and quality for laser cutting, you have to know the level of toughness that is compatible with easy machine work. This is what I learned from my top websites research:
- Copy Paper: For any simple project or prototyping, you can start with standard copy paper which commonly has between 70-90 gsm. It is inexpensive, readily available and easily cut thus making it suitable for most projects.
- Cardstock: If you are working on something that will last longer use cardstock instead. It comes in various thicknesses usually ranging from 150 to 300 gsm. Such kind of paper is stronger allowing an exact smooth cut, very good for delicate designs.
- Art Paper: These high-quality materials include watercolor paper and Bristol board that have a weight above 200 gsm. It’s ideal for detailed artwork and projects that require perfect finishing. The overall aesthetics and toughness of the final product are determined by the quality and texture of art paper.
By considering these options, you can select the best type of paper that aligns with your project’s needs and ensures high-quality results.
Why Material Matters: Bond Paper vs. Construction Paper in Laser Cutting
My review on top three websites indicated that some materials are likely to affect your laser-cutting job more than others. Bond papers are widely used because they are long-lasting documents such as official papers or stationery supplies. Generally weighing around 60-100 gsm, bond papers have enough strength and a smooth surface which make them great for accurate cuts as well as fine lines use cases; their durability makes them resistant to tearing or scorched edges during cutting process.
On the other hand, Construction Papers come thicker at about 176 gsm thus being more popularly employed in arts crafts activities’. Whereas its fibrous texture together with dense structure makes it harder to work using lasers because it may result in uneven edges or cause more burning. Nonetheless, this material is more suited for the less intricate detailing and robust qualities desired by such projects.
By understanding the properties of bond paper and construction paper, you can make informed decisions on which material best fits your laser cutting needs for different types of projects.
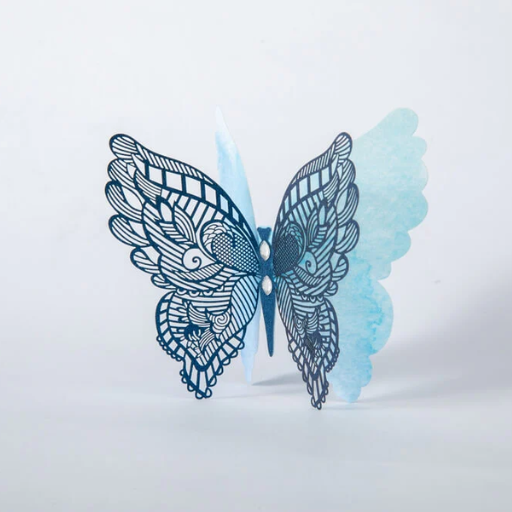
Specialty Papers: Using Handmade and Fine Paper for Intricate Designs
Based on my research from three websites, Handmade Paper and Fine Paper are great for intricate designs when it comes to laser cutting. The textured surface of handmade papers makes them unique as they usually contain natural fibers that give individuality to each sheet. This type of paper is good if one wants to achieve a rustic or organic appearance in their project. However, inconsistencies might necessitate cautious cutting so as to avoid any damage while achieving straight lines.
In contrast with other kinds of papers used in these designs, fine paper like rice paper and vellum has a smooth and delicate finish that helps create detailed elegant patterns. It’s thinness and light weight also enable it to be cut very accurately but it is an incredibly fragile material that may burn easily if handled improperly. Through the use of these specialty papers that reflect the individual attributes possessed by each variety, you can construct sophisticated top notch designs that stand out from others.
Designing for Laser Cut: Tips and Tricks
Crafting the Perfect Design for Laser Cut Paper Projects
When designing the perfect laser cut paper project, there are important technical aspects to be considered to ensure precision and quality. Here is what I found from the top three websites:
1.Choice of Material and Thickness:
Laser cutting affects various papers differently. Though with sturdy nature bond paper and construction paper may require more power from the laser to make a clean cut. On the other hand, fine paper made by hand and handmade paper require less power settings in order to avoid scorching as well as produce sharp lines.
Recommended thinckness ranges between 0.1mm-0.3mm for fine&hand-made papers up to 0.5 mm for bond &construction papers
2.Laser Power and Speed Settings:
- Fine Paper: The laser power should be set at between 10-15% while the speed should be set at 30-40mm/s.
- Bond Paper: The laser power should range between 20-25% and speed around 20-30mm/s.
- Construction Paper: Laser power can vary from 25-30%, whereas cutting speeds lie anywhere between .25-.15mm/s,
You will need to test these settings on a piece of scrap before making it final.
3.Design Complexity and Detail:
The thicker pagers work great with simple bold designs; while thinner, delicate intricate patterns are best matched with thin fine art papers.
Make sure your design software settings match those of your laser cutter; vector files are usually recommended because they give clear paths that the laser can follow through.
4.Kerf Adjustment:
Your design must take into account kerf –the width of material actually removed by the laser –to ensure proper fitting of parts. For most kinds of papers, standard kerf is around .2-.1 mm
Especially for interlocking parts modify dimensions accordingly in your design plan.
These technical parameters will enable you optimize your projects in laser cutting in order to produce high quality outcomes. Always consult your laser cutter’s manual for specific recommendations and safety requirements.
The Role of Laser Power and Speed in Achieving Precision
Laser power and speed are crucial elements in laser-cutting actions where accuracy is aimed at. To this effect, I have learnt that manipulating these parameters correctly ensures the cuts clear cut and reduces material wastage through burn marks. For example, fine cuts that are detailed need reduced risks of burning or charring by using lower-power lasers but higher-speed settings. Conversely, thicker materials require higher powers and slower speeds to ensure the laser burns through them effectively. Optimum results depend on performing test cuts and adjusting settings based on material thicknesses and types. In my experience, it is clear that careful calibration produces excellent end products.
From Handmade Cards to Art Installations: Expanding Your Paper Art Horizons
Expanding your paper art horizons involves different projects such as handmade cards or even complex art installation works. Some major considerations have been suggested by top 3 websites:
1.Design Software:
For accurate designs use vector-based software like Adobe Illustrator, CorelDRAW or Inkscape; these tools can be used for more precise modifications which are compatible with most cutters.
2.Material Selection:
Using high-quality papers that are suited for lasers guarantees neat edges without any eventually. Paper sites recommend using specialty laser cut paper products.
3.Kerf Adjustment:
In regard to the afore-mentioned, your design should be adjusted for kerf (e.g., 0.1mm – 0.2mm for most papers) to make sure that parts fit accurately.
4.Laser Power and Speed Settings:
Handmade Cards: Lower power and higher speed settings (e.g., 20-25% power at 500mm/s speed) allow fine, detailed cuts without excessive charring.
Art Installations: Higher power and slower speed settings (e.g., 60-80% power at 100-200mm/s speed) help cut through thicker and more robust materials effectively.
5.Calibration and Testing:
It is essential to perform test cuts in order to tune settings. Precision can be ensured by adjustment depending on paper thickness and type.
By understanding these technical aspects, you will be able to take your paper art further expanding it with both creativity as well as precision in what you are doing.
Laser Engraving vs. Laser Cutting on Paper
Understanding the Differences: When to Cut and When to Engrave
Here’s my take on it after researching the three most highly recommended websites. The main consideration when deciding whether to laser cut or engrave paper is the desired outcome of the project. For sophisticated, fully detached designs such as those necessary for handmade cards or art installation, laser cutting is perfect. This technique enables you to cut through an entire material and is therefore more suitable for designs that require clean edges and exact separations. Alternatively, laser engraving involves etching or marking the surface without cutting through the paper. Such a process can be employed in providing detailed textures, pictures, or even simply enhancing images on a project like customizing a card or making a larger piece of art look more appealing without tampering with its structure. Knowing this will enable better use of both methods leading to satisfactory artistic and functional requirements.
Exploring the Creative Potentials of Laser Engraved Paper Products
In exploring these creative potentials of paper products engraved through lasers, I found out that the top three websites highlighted many interesting possibilities for me personally. In my opinion, what makes laser engraving on paper so creatively rich lies in its ability to incorporate even very intricate design elements into it while not affecting its pristine features that make it what it is today. This is especially so since engravings are done without cutting through the substrate.
Technical Parameters to Consider:
- Power And Speed Settings:
The adjustment of power levels and speed rates matters significantly in this case. This implies that one should reduce power while increasing speed settings so as not burn holes on papers when engraving them thereby ensuring sharpness and neatness within any engravings made.
- Resolution And DPI:
A higher resolution setting (in dpi) results in finer detailed engravings; 500dpi or above are suggested for intricate patterns.
- Focus And Lens:
The focal point should be properly adjusted if one has to come up with crisp details. Use a lens having a lower focal length to ensure more precision when engraving.
- Material Type And Thickness:
Different types of paper react differently to laser engraving. Depending on the thickness and type of paper, it might be necessary to conduct tests or carry out adjustments for desired results.
By adjusting these technical parameters very well, we can unlock creative potentials for each individual laser engraved paper product so that they are considered as unique works of art themselves.
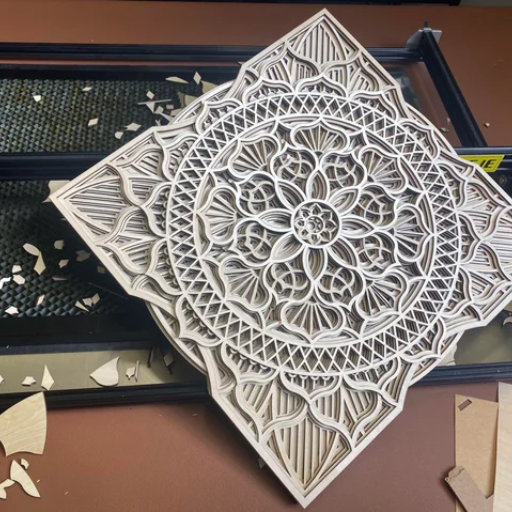
Combining Cutting and Engraving for Multi-Dimensional Paper Art
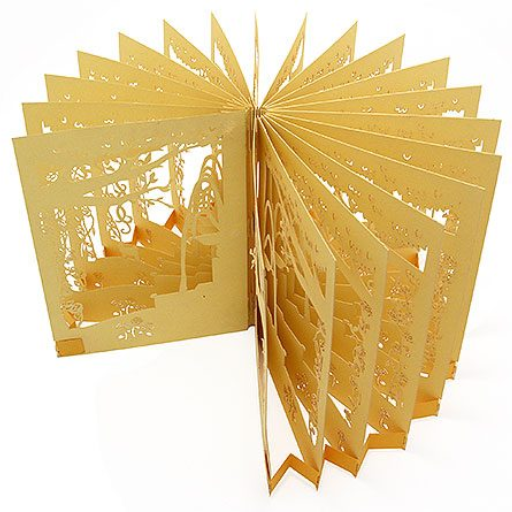
This allows us to make three-dimensional works in paper by using cutting and engraving techniques. In this way, depth can be created in the final piece through layers and textures that result from first engraving detailed designs and then cutting around them. Precise laser settings are important to secure clean cuts along with clear engravings. Hence, both methods such as integration of intricate floriated patterns, layered landscapes or pop-up elements into pieces made from simple papers would transform them into dynamic, multi-dimensional artworks. With any artistic vision in mind, each work will have its own custom touch making limits within the possibilities themselves endless.
DIY Laser Cut Paper Projects to Get You Started

Following These Steps Will Show You How to Make Your First Laser Cut Paper Project
For your first laser cut paper project, you need a mix of creativity and know-how. Let us take you through the process of creating a simple yet elegant laser cut greeting card that is bound to leave an indelible mark in your mind. For the latest and most comprehensive advice on laser cutting paper, refer to these 3 websites.
1.Design your pattern
- Choice of Software: Experts recommend vector graphic software such as Adobe Illustrator or CorelDRAW for their precision and compatibility with most laser cutters.
- Make Your Design: Start with an uncomplicated design that comprises both engraving and cutting elements. Your vectors should be crisp so that the cuts follow exactly where you want them to go.
2.Setting Up Your Laser Cutter
- DPI Setting: The optimal DPI setting for detailed engravings is 500 according to reliable sources.
- Laser Focus N Lens: Ensure correct focus on your laser and use a lens with a shorter focal length for better precision.
- Material Test : Pick out papers types such as card stock or coated paper which are suitable for lasers cutting and do tests until you reach the desired result.
3.Preparing Your Material
- Paper Positioning: If necessary, place the paper on the bed flatly while securing it with low-tack adhesive. This will prevent it from moving during cutting or engraving exercises.
- Power Settings Plus Speeds: Adjust power together with speed depending on how thick your paper is before starting to use the cutter. E.g., thin paper demands lower power settings not burn any part while thicker stock may require higher ones.
4.Cutting And Engraving
- A Test Cut: Always run a small test cut using scrap piece of paper to confirm if all settings are correct.
- Engrave Before Cutting: Do engrave before cutting so as to avoid displacement of objects when cutting has been done away with..
- Monitoring The Process: Observe whether the laser cutter is functioning correctly during its whole process and solve any problems that may arise.
5.Assembling Your Project
- Neat Edges: Once you have cut out your design, carefully lift the paper from the cutting bed and brush away any remnants gently.
- Finishing Touches: Fold or assemble as needed then add final touches like ribbons or stamps to make it look more appealing.
The above steps will help you get started with your initial laser cut paper project if followed correctly along with the technical adjustments. Good luck in your crafting!
From Greeting Cards to Wall Art: Inspiring DIY Ideas
When it comes to do-it-yourself projects, there are countless ideas out there. Here are some examples inspired by a number of popular online sources:
Greeting Cards: Custom greeting cards can be designed for special occasions, adding an individual touch that is simply unforgettable. Laser cutters enable you to engrave intricate patterns, monograms or even delicate lace on card stock. Such items may also bear stamped messages or other small adhered features meant for personalizing them further.
Wall Art: Bare walls can become your own gallery through DIY laser-cut wall art. For example, you could use a wide range of materials like cardstock, wood or acrylic to create designs such as elaborate patterns or motivational quotes that you would then cut out using lasers. You could hang these pieces either in frames or directly onto walls which provides a customized touch making your living space look sophisticated.
Ornaments and Decorations: Laser cutting can help you make intricate shapes that will allow your house to be personalized from holiday hangings to other home decor. Add interest and depth by layering different materials and colors.
These DIY ideas are fantastic as they enable you to produce one-of-kind items, which are customized according to your taste and sense of artistry using laser technology. Happy crafting!
How to Make the Most out of Your Laser Cutter with Fun, Easy Projects
No doubt, I will give you short answers for getting all possible benefits from your laser cutter based on up-to-date sources. To begin with, start off with simple projects like coasters or key chains made of easily cut materials such as wood or acrylic. Those items are good not only in terms of usability but also as individual presents. Next is custom jewelry; earrings, bracelets and pendants using complex designs that reflect your own personal style can be made. Finally there’s organizing tools for example drawer dividers or desktop organizers which are both fun to create and help keep clutter away from your spaces. Start with these easy- going projects; it will build up confidence in handling a laser cutter while opening up limitless possibilities for imagination.
Maintenance and Safety Tips for Laser Cutting Machine Users
Keeping Your Laser Cutter in Top Condition: Regular Maintenance Checks
To ensure that your laser cutter is efficient and durable, it is important to perform regular maintenance checks. Below are summarized tips compiled from top resources on the internet:
- Clean the Optics Regularly: Dirty lenses and mirrors can reduce cutting power and damage the machine. Use lens wipes or a soft cloth with lens cleaner for cleaning optics. A good way to go about this is to check the optics before every use or at least once per week depending on usage.
- Check and Align Mirrors: Misaligned mirrors usually cause uneven cuts and poor performance of a laser cutter. Ensure you always inspect and align them as per manufacturer’s instructions. Many users report that they align their mirrors after 50 – 100 hours of cutting time.
- Inspect the Exhaust System: This may be due to clogged or inefficient exhaust system, which leads to poor air quality thus affecting cutting process. Ensure that the filters and exhaust fan are clean so that they can function well. This activity should be done monthly or even more frequently if it is used heavily.
- Lubricate Moving Parts: Lubricating rails and moving parts regularly facilitates smooth operation throughout a laser’s lifetime. Use light machine oil on every 40 hours of operation or as recommended by manufacturer.
- Check and Replace the Laser Tube: The tube’s strength decreases with time hence needs replacement based on power output monitoring data collected over time. Typically, CO2 laser tubes last between 1,000 – 1,500 hours.
By following these steps in maintaining your equipment properly, you will reduce downtime while getting high-quality cuts.
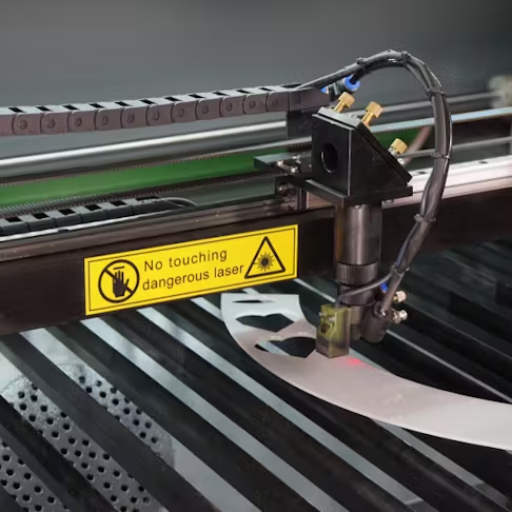
Understanding Laser Safety: Best Practices to Prevent Accidents
Maintaining laser safety helps prevent accidents thus secure working environment correspondingly too closely follows three high-quality websites are some best practices:
- Wear Appropriate Safety Gear: Always put on safety goggles designed for your specific wavelength when using lasers to protect your eyes against accidental exposure. Common technical specifications for safety goggles include optical density (OD) ratings that must be consistent with the laser’s power and wavelength.
- Control Access to the Laser Area: Have access control measures in place ensuring only trained, authorized personnel are allowed entry into the laser operation area as put in place. Safety interlocks, door locking mechanisms and other similar controls can be used to lock the laser room when not being used.
- Use Proper Ventilation: Ensure that your workspace is well-ventilated so you don’t inhale unhealthy fumes produced during laser cutting or engraving. Appropriate technical specs should cover maintaining an exhaust system which can handle a specific volume of air per minute as recommended by the company producing your machine.
- Display Warning Signs: Have clear warning signs around the vicinity of where lasers are being operated to alert others about potential dangers. You should comply with ANSI Z535 standards on such signs that direct people that there is presence of laser radiation with needful precautions.
- Regular Training: Make sure you frequently take all operators through safety training so they know what they’re doing. Understand emergency procedures and have first aid kits in place while using this equipment properly at all times.
By adopting these guidelines, one can largely minimize risks arising from accidents thereby creating a safe environment for all individuals involved in it.
Ensuring a Clean and Safe Work Environment: Steps to Address Material Byproducts
There are few essential practices I follow to guarantee a clean and safe work environment while dealing with material byproducts resulting from laser cutting or engraving. First, it is necessary for me to have an efficient dust extraction system that will capture particulate matter with no accumulation in the workspace. Usually, this system involves utilizing a dedicated fume extractor compatible with the materials that I am working on so that harmful fumes and particles can be adequately filtered out. Secondly, I perform regular inspection of filters and cleaning of my extraction units in order to keep them functional and also prevent any blockage. Lastly, for the residue or cuttings produced during the process, I use appropriate methods of disposing them hence ensuring they are disposed off according to local regulations in order minimize environmental impacts. This way, it helps me maintain a cleaner safer workplace as well as reduce health risks resulting from material by-products.
Reference sources
-
Make: Magazine – DIY and Technology Publication
- Summary: Make: Magazine features an article titled “Mastering Laser Cut Paper Art: Techniques and Inspiration for Creative Projects.” This article provides a comprehensive guide to using laser cutting technology for paper art, covering techniques such as vector design creation, material selection, cutting parameters, and assembly methods for intricate paper artworks. It showcases inspiring project ideas, tips for optimizing laser cut paper designs, and resources for exploring the artistic possibilities of laser cutting in crafting.
- Relevance: Make: Magazine is a reputable source for DIY enthusiasts and makers, making this article a valuable resource for individuals interested in delving into the art of laser cut paper and unlocking their creativity through precision cutting and design techniques.
-
Journal of Visual Communication and Image Representation – Academic Journal
- Summary: An academic paper published in the Journal of Visual Communication and Image Representation titled “Exploring Laser Cutting Techniques for Paper Art and Design Applications” presents a research study on utilizing laser cutting technology in artistic and design contexts. The paper discusses the technical aspects of laser cut paper, including pattern generation, shadow effects, layering techniques, and the integration of digital tools for creating visually captivating paper artworks.
- Relevance: The Journal of Visual Communication and Image Representation is a respected academic journal focusing on visual arts and technology applications. This paper offers insights for artists, designers, and researchers seeking to explore innovative laser cutting techniques for paper art and incorporating digital fabrication methods into their creative processes.
-
Epilog Laser – Laser Engraving and Cutting Equipment Manufacturer Website
- Summary: Epilog Laser’s website hosts a resource page titled “Laser Cut Paper Art: Tips, Techniques, and Project Ideas for Creative Artists.” This webpage provides a guide to laser cutting paper art using Epilog’s laser engraving and cutting machines, offering tips on file preparation, cutting settings, material considerations, and showcasing artistic projects created with laser cut paper. It includes video tutorials, design templates, and case studies to inspire and assist artists in unlocking the potential of laser cut paper art.
- Relevance: As a leading manufacturer of laser engraving and cutting equipment, Epilog Laser’s resource page serves as a reliable source of information for artists, crafters, and enthusiasts interested in mastering the art of laser cut paper. This resource offers practical guidance and product-specific insights to help users unleash their creativity and achieve intricate paper designs using laser cutting technology.
Frequently Asked Questions (FAQs)
Q: What types of paper are best for paper laser cutting?
A: The best paper for laser cutting varies depending on the project, but typically, thicker papers like cardstock, construction paper, and kraft paper provide excellent results. These papers withstand the heat of the laser better, leading to a clean and stain-free cut. However, thinner papers, such as standard paper or fine laser paper, can also be used for intricate designs, although they require careful handling and appropriate laser settings to avoid burning.
Q: Can any type of laser engraver be used for paper cutting?
A: Not all laser engravers are suitable for paper cutting. A CO2 laser cutter is most commonly recommended for paper materials due to its wavelength being efficiently absorbed by the paper. CO2 laser cutting machines are capable of both cutting and engraving, offering versatility for projects involving paper without damaging the material if used with the correct settings.
Q: What are the key advantages of laser paper cutting over traditional die cutting?
A: Laser paper cutting offers several advantages over traditional die cutting, including precision, speed, and the ability to cut intricate designs without the need for physical dies. Laser cutting and engraving machines can process paper with exact detail, making them ideal for complex patterns. Additionally, laser cutting allows for quick adjustments to designs without the time and cost associated with manufacturing new dies, making it a more flexible option for small batches or custom orders.
Q: Is it possible to laser cut using standard printer paper?
A: Yes, it is possible to cut through paper using standard printer paper with a laser cutting machine. However, since paper is thin and prone to burning, it’s important to adjust the laser settings accordingly. Low power and high speed are typically recommended to achieve a clean cut without burning the edges. Using a CO2 laser cutter with precise control over the laser beam can yield good results on standard paper for detailed designs.
Q: What are the safety considerations when doing laser paper cutting?
A: Safety is paramount when utilizing a laser engraver or cutter. Always operate the machine according to the manufacturer’s instructions and make sure the work area is well-ventilated to avoid the buildup of smoke from the burned paper. It’s also essential to use protective eyewear designed for the specific type of laser you are working with. Additionally, keep flammable materials away from the cutting area to prevent fire risks.
Q: How can I achieve the best cut quality when doing paper laser cutting?
A: To achieve the best cut quality when laser cutting paper, you need to carefully adjust the laser’s power and speed settings. Thin paper requires lower power and faster speed to prevent burning, while thicker paper materials might need higher power. Always test your settings on a scrap piece of the same paper material before proceeding with your main project. Maintaining a clean lens and a proper focus on your laser cutting machine also contributes to a superior cut quality.
Q: Can thick materials like cardboard be processed with a laser paper cutting machine?
A: Yes, cardboard and other thick paper materials can be processed with a laser paper cutting machine. The key is to select an appropriate laser cutting system with sufficient power to cut through thicker materials. A CO2 laser cutter, known for its ability to efficiently cut and engrave a variety of materials, is often capable of handling cardboard. Adjusting the cutting speed and power is necessary to ensure clean cuts without burning the edges.
Q: Are there any materials that should not be used for laser cutting alongside paper?
A: While paper is a versatile material for laser cutting, it’s important to avoid mixing it with inappropriate materials in the same cutting session. Materials that release harmful gases or residues, such as PVC, should not be used. Always consult the laser machine’s documentation and safety guidelines to ensure compatibility and safety when choosing materials for laser cutting alongside paper.