
The aim of this guide is to equip you with all the tricks on how you can easily get rid of these structures. Whether it is understanding different types of support materials, making use of advanced tools or post-processing methods; we will discuss everything necessary for you to have perfect 3D prints. This comprehensive guide has detailed information that will help anyone who wants to know how supports come off well in any given work whether one is a beginner or an experienced person in terms of manufacturing.
Understanding 3D Print Supports: Why Are They Necessary?
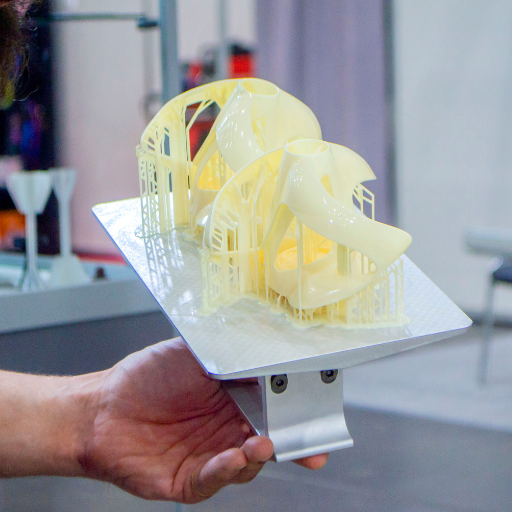
The making of complex shapes and overhanging features, which would not be possible in any other way, is dependent on the use of support structures. When material is laid down by a 3D printer layer by layer, parts of the model that extend outward with no underlying support need more substance to hold them up during the printing process. Such overhangs would fail if they were not supported and this would result to an unsuccessful print. In addition, sagging and warping can be reduced on final prints due to supports hence ensuring fine details are achieved even in delicate designs. This understanding helps in effective planning and optimization that eventually results into successful 3D printed objects with high quality.
The Role of Supports in 3D Printing Process
After finishing a print job these supports have to be removed carefully so that the final piece does not get damaged in any way possible. Understanding their role is therefore crucial in relation to the ease of removal and the final surface quality more especially if one intends to carry out a successful 3D printing project.
Different Types of Support Structures
3D printing applies different types of supporting structures, each one suited for specific applications and printing technologies:
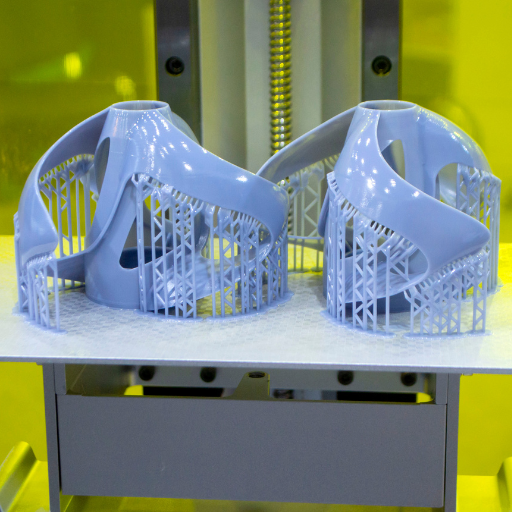
- Linear Supports: These are the most common type and the simplest to generate. It’s easy to form and remove them, though they can result in noticeable pen marks left on the final print.
- Tree Supports: Resembling tree branches, these supports only contact a few areas of overhangs. They reduce material consumption but require more accurate software configurations hence making it difficult to dismantle them.
- Grid Supports:They are structured as grid patterns on which large flat surfaces can be supported firmly. They offer great stability but may be difficult to remove and create more damage on a surface.
- Lattice Supports: These consist of interconnected beams that provide strong support with minimal use of material. They balance between stability and removal ease for complex structures.
- Soluble Supports: With these supports made from materials such as PVA or HIPS which dissolve in water or limonene, dual extrusion printers are used. Removal is clean without any damage to delicate parts but they cost more and need further processing.
- Custom Supports: The manually created supports which are specifically meant for certain areas of the print. This is highly efficient although it requires expertise among other things to come up with one design after another.
Technical Parameters
- Support Density: The amount of support material in relation to the model’s volume. Higher density provides more stability but uses more material and increases print time.
- Overhang Angle: The critical overhang angle beyond which supports are needed, typically around 45 degrees. Custom settings can fine-tune this based on the model’s geometry.
- Z-Distance: The vertical distance between the support and the model. A smaller Z-distance improves accuracy but can make support removal harder.
- Horizontal Expansion: The outward expansion of the support structures to ensure adequate coverage. Incorrect settings can lead to insufficient support or excessive material use.
- Support Pattern: The geometrical pattern of the supports, such as lines, zigzag, grid, or concentric, impacting the ease of removal and surface quality.
Being aware of these different types and their technical parameters enables one select appropriate support structures required for diverse 3D printing projects hence achieving high quality prints with efficient post-processing.
Support Material and Its Impact on Your Final Print
One’s choice of the support material greatly affects the quality and post-processing of your final 3D print. Each different material has its unique properties that affect how easy it is to remove supports, the surface finish of the print, and overall model structural integrity. For example, soluble supports like PVA or HIPS can be dissolved in water or limonene which makes them non-destructive. However, these are costly materials necessitating specialized handling.
Using a similar composition for a material as that of the print material such as PLA or ABS helps stabilize the product during printing though it may require delicate manual removal so as not to spoil fragile parts. In comparison to breakaway supports which are designed to detach easily but often leave behind slight traces requiring sanding or polishing.
Also, thermal and mechanical properties of the support material should correspond with those of main print material to avoid challenges like warping or layer separation. Making proper selection on support material based on these issues is critical as it results into high-quality prints with less need for further enhancement processes required. Knowing what your printer does best and what you will use it for guides you in selecting an optimal support material that improves overall look and functionality in relation to other aspects of your ultimate output
Getting Ready: Tools and Preparations for Support Removal

Removing support material efficiently requires proper preparation and the right tools. To begin with, ensure you have a well-ventilated working area, so as to prevent yourself from inhaling any dust or fumes. Essential tools for this process include: tweezers (for removing small parts) and needlenose pliers (for bigger ones). You can also use a craft knife or deburring tool to carefully cut off stubborn supports without affecting the print quality. With such soluble supports, a container full of water or limonene will be necessary for dissolving materials while some residual bits may still remain that can be gently removed via scrubbing using a light brush.
Also, think about applying fine-grit sandpaper or some sanding sticks for smoothing down any marks left after support removal. For those prints with intricate details, having a set of precision files is an excellent option because they can help you reach into tight corners without causing damage. Lastly, always keep your microfiber cloth close by in order to wipe away all dirt and residue that may accumulate on the surface during printing or debris left behind when sanding.
With these tools as part of your equipments and creating special sections where the process will take place will streamline support removal thus getting cleaner high quality final outputs.
Selecting the Right Tools to Remove Support
It is vital to select the most appropriate tools for support removal so as to ensure that the quality of your 3D print is maintained.The following are some of the essential tools:
- Tweezers and Needle-Nose Pliers: hese tools help in delicately removing both large and small supports.
- Craft Knife or Deburring Tool: It can be used for cutting off resistant supports without affecting the print.
- Soluble Support Solution: Water or limonene containers for dissolvable supports, paired with a soft brush for cleaning.
- Fine-Grit Sandpaper or Sanding Sticks: They help remove blemishes that are left by eliminated supports.
- Precision Files: Such can do well in handling critical elements as well as getting into confined spaces.
- Microfiber Cloth: Final cleaning ought to be done using it so as to eliminate any dust or sanding debris.
Thus, you will efficiently remove all supports from your 3D prints while preserving their texture and finish through employment of these tools.
How to Prepare Your 3D Print for Support Removal
Ensuring that you have properly prepared yourself is the key to having a successful process of removing support and minimizing possibilities of your 3D print being damaged. You can prepare yourself for this task by following these steps:
- Assess the Print: Carefully inspect your 3D print to understand the location and type of supports. This helps you identify the best approach and tools for removal.
- Warm Up the Print: If your material allows, gently warming the print can soften the supports, making them easier to remove. Use a hairdryer or place the print in a warm environment for a few minutes.
- Secure the Print: Place your 3D print on a sturdy surface or a non-slip mat to keep it stable during support removal. This reduces the risk of accidental slips that could damage the print.
- Choose Appropriate Tools: Select the right tools based on the support material and print complexity. Have tweezers, needle-nose pliers, a craft knife, and other essential tools ready.
- Wear Safety Gear: To protect your eyes and hands, wear safety goggles and gloves. This is especially important when using sharp tools or handling dissolvable supports.
- Plan Your Approach: Start with the easier supports first to gradually work towards more complex areas. This incremental approach helps maintain the integrity of the print.
With such preparatory measures observed, you can be sure that removing support will be done more efficiently without causing any damages to your printed objects.
Assessing Support Difficulty: Easy vs. Hard to Remove
There are various factors that affect the ease with which supports can be removed from a 3D print; such include the type of support material, the complexity of the print and the settings used during printing process.
Easy-to-Remove Supports:
- Generally composed of snap-off supports, which need very little force to come off.
- These usually leave behind minimal residue and involve less post-processing cleanup.
- They are best suited for simpler geometries or those prints having larger support structures and accessible ones.
Hard-to-Remove Supports:
- Usually made up of soluble supports that may have to dissolve in an appropriate solvent before they can be removed.
- May present challenges when it comes to removing them from fine or confined spaces inside the printout.
- Involves more delicate handling to prevent damage on any vulnerable or intricate parts while getting rid of the supports.
When you know what is required by your 3D print as well as its limitations, then you can choose appropriately among different types of support removal methods so as to have an easy process after printing.
Step-by-Step Guide to Removing Support from 3D Prints
1. Gather Your Tools
To start the support removal process, you need to ensure that all the tools necessary are at your disposal. Include in these:
- Pliers or tweezers
- Craft knife or scalpel
- Sandpaper or files
- Solvent (if using soluble supports)
2. Begin with Accessible Supports
The initial removals should be made on those supports which can be accessed most easily; those on the periphery of the print that are often breakable either by hand or with pliers.
3. Work Your Way Inward
From the exterior, as you remove outward supports move deeper and more complicated ones gradually. To avoid destroying the fine parts of your print, always practice caution when taking off supports located in small spaces.
4. Use a Craft Knife for Precision
Supports that are less likely to come out easily and are found in places that are delicate can be removed with a craft knife or scalpel. When cutting through them however, you must do this carefully to avoid cracking or distorting the print.
5. Smooth the Surface
Where most of supports have been gotten rid of, one can use sand paper of files to smoothen any remaining stubs or rough spots. By doing this one is able to finish up their 3D prints giving it a polished look.
6. Clean Up
In conclusion wash off any residue from support materials present on your print item and ensure that there isn’t any debris left behind. Soak into an appropriate solvent as recommended by the manufacturer if dealing with soluble models ensuring enough time for complete dissolution of such materials.
By following these steps, you will be able to effectively remove support structures while still keeping the requisite level of accuracy and intricacy about your model designs during 3D printing process.
The Best Way to Remove External Support
There are a few key steps that can refine the process of removing external supports from 3D prints for efficiency and quality.
- Choose the Right Tools:
To start with, basic tools such as long-nosed pliers may be used to remove some parts. For more delicate work, use long-pointed tweezers or a scalpel; sandpapers or files should also be ready for smoothing rough edges.
- Hands-On Removal:
Before resorting to tools, try to remove as much of the support structure as possible by hand. The best way is gently twist and bend them when they want to be broken off without harming the print.
- Work Methodically:
Start from easy areas to reach gradually proceeding towards more delicate sections. This careful method reduces the likelihood of breakage particularly in intricate parts of a 3D print.
- Precision Cutting:
If any supports are stubborn then use a scalpel or craft knife especially in tight or complex regions. From top downwards, cut away these supports gently applying minimal force so as not to mar it.
- Heat Application:
Applying soft heat with a hair dryer or hot air gun might loosen up the support making them easier to take out and reducing chances of breaking main printing. Ensure even distribution and do not keep heat on one area for long.
- Smoothing the Surface:
Use fine grit sandpaper or files on remaining marks and rough edges after most of the supports have been removed. It adds quality into printing giving it a finishing touch before painting or other post-processing operations.
- Solvent Use:
When dealing with prints whose supports dissolve in solvents, submerge all models in corresponding solvent. Follow manufacturer’s instructions regarding time frame and type of solvent ensuring complete dissolution of supports.
Tips for Safely Removing Internal Supports
- Plan Ahead:
Consider making arrangements in advance for the removal of your support. You can make use of software that allows you to strategically position supports so they are easy to get at after printing.
- Separate By Hand:
Twist and gently bend the internal supports until they break off by hand. This is commonly done with larger supports that are not too difficult to reach.
- Utilize Special Tools:
Long, thin tools like needle-nose pliers, dental picks or even custom-made 3D printed tools can be used to access and pull out internal supports without damaging the print.
- Incremental Approach:
Begin from outside going inside as you work. Start by removing external supports so that it will become easier to access internal ones thereby reduce the complexity of task.
- Softening with Heat:
The application of controlled heat through a hair dryer or heat gun can make these scaffolds more flexible and easy to remove while reducing chances that fragile interior structures may fall apart.
- Dissolvable Supports:
If your printer supports this, employ dissolvable filament for your internal scaffoldings. Unlike mechanical means, such prints dissolved in an appropriate solvent have a better chance of being completely removed.
- Fine-tuning with Sandpaper:
Once you remove as much material as possible, smooth any rough areas left using fine grit sandpapers or precision files on inaccessible parts.
- Safety Measures:
Always put on protective gloves and goggles whenever working with tools or solvents intended for eliminating internal scaffolding. These precautions prevent accidents and chemical exposures from happening.
- Patience and Precision:
Take your time; go slow and steady. Sometimes rushing could result in errors and potentially damage the printed model itself.
- Practice:
It becomes easier to know what areas need extra care during cleanup if one works constantly with 3D prints plus their respective scaffoldings and finding suitable removal procedures thereby becomes much faster.
How to Avoid Damaging Your 3D Print During Support Removal
This entails planning, tools and lessons in a calculus to prevent damage to the 3D print during support removal. Here are important suggestions:
- Right Tools for the Job:
Such tools include needle-nose pliers, dental picks, and hobby knives that will allow you to negotiate tight spots without exerting too much force.
- Select Appropriate Support Material:
Choose breakaway or dissolvable supports such as PVA or BVOH which can be removed more easily without damaging your print.
- Optimize Your Supporting Settings:
You can minimize contact points and lower density which will make it less invasive removing them from your print by adjusting your slicing software so as to reduce the number of supports or place them at less critical areas of the model.
- Take it easy when removing supports:
Supports should be taken off lightly. Avoid putting too much pressure while detaching them from the main object since this may destroy the 3D printed object.
- Do It in Parts:
Remove supports in parts rather than trying to do everything at once. In doing this, you can control the process better and avoid accidents.
- Use Heat or Solvent to Soften:
Leveraging mild heat on the support material or using appropriate solvents can soften them making it easier for you to remove them carefully while taking into consideration the fragility of your print.
- Use Sandpaper Sparingly for Final Touches:
After most of these supports have been removed, use fine grit sandpaper to smoothen rough patches thus ensuring a neat surface.
- Be patient with yourself:
Take all time necessary; do not rush. However, rushing might cause faults that cannot be rectified anymore hence ruining your project.
Advanced Techniques: Removing Difficult Supports
Merging these methods with patience and a steady hand is imperative to my success; therefore, I work my way through it carefully that there is no excessive force applied all at once. Lastly, if required, I usually do some sanding and buffing on parts having bumpy surfaces hence resulting in smooth edges that appear just polished and professional. So even where removal of support seems challenging integrating these advanced techniques comes handy with me.
Dealing with Supports in Hard-to-Reach Areas
It is also possible to immerse this model into warm water which will soften some support materials making it easy for them to be removed. When it comes to dissolvable-material-made supports, I usually use solvent recommended by the manufacturer in order to dissolve them excellently. In the course of doing this, I pursue patience and systematic thinking so as to minimize errors. With these techniques culled from synthesizing leading websites’ best practices, I am able to confidently tackle even the most difficult support structures.
Using Dissolvable Supports for Easier Removal
The removal process can be greatly simplified by using dissolvable supports, leading to cleaner prints. In the beginning, I normally select an appropriate support material like HIPS for ABS or PVA for PLA.
I then ensure that my printer is capable of dual extrusion if required at all. After completing the print, I usually dip it in water for PVA or limonene for HIPS. Patience is a virtue during this step because sometimes dissolving completely might take hours when it comes to the supports. The water or solvent should be stirred gently to expedite the process of dissolution.
Finally, after all supports have been dissolved, I clean the print by rinsing it under distilled water and allowing it to dry on its own naturally. If done manually, this method saves time and effort while also lowering chances of damaging the print. Use of such practices has helped me realize that applying dissolve-able supports offers an uncomplicated and efficient way of dealing with complex prints.
Knife for Fine-Tuning and Removing Stubborn Support Material
Finishing Touches: Post-Support Removal Cleanup
The next critical step is removing majority of the support material and doing a post-support removal cleanup. I start by gently sanding off the areas where supports were attached, using a rougher grit and ending with finer grit to achieve a smooth surface. Wet sanding technique can be used in order to minimize dust particles and give a nice finish.
I also use small files or precision rotary tool for meticulous smoothening of any remaining imperfections. Such tools are quite useful in hard-to-reach places or intricate details. Additionally, it is necessary to repeat the washing procedure in order to remove any traces of sanding that might have been left on print hence ensuring that the surface is clean enough for further finishing processes such as painting or dyeing. These practises enable me improve the overall quality and attractiveness of my 3D prints consistently making them look more professional and polished-looking.
How to Smooth Out Your 3D Print After Removing Supports
The Role of Sanding and Other Finishing Techniques
In addition, small files or precision rotary tools are used to reach difficult areas where papers cannot be employed effectively. Consequently, such instances help me maintain an attractive look in relation to my 3D prints that can be considered professional.For this purpose, I am using the above methods for my 3D prints, making sure they keep up with appropriate level of professionalism and visual appearance
Ensuring the Integrity of Your 3D Model Post Support Removal
Optimizing Your Print Settings for Easier Support Removal

Optimizing your print settings may greatly simplify the process of removing supports and improve the quality of your end products. One key adjustment is support density; low-density supports are easier to remove but might not have sufficient structure for complex prints, so you need to strike a balance that caters for your project. Support pattern is also another crucial factor—grid or line patterns can ease removal than zig-zag patterns do.
Moreover, it is important to adjust the support overhang angle which is usually higher when less support material is needed thus reducing time and effort used in its removal. Also, setting up the right support interface layers where the support touches the print results in smooth detachment. Lastly, choosing the correct type of support materials like dissolvable supports for intricate designs can greatly reduce manual removal pain. By adjusting these settings slightly, cleaner support removal could be done saving on time and minimizing post-processing work afterwards.
Choosing the Right Support Settings for Effortless Removal
Moreover, the number of interface layers can be optimized with 2-3 layers being ideal because they strike a balance between stability and ease of removal. In addition, for complex projects, breakaway or dissolvable support materials can be used that provide high convenience in removal at a higher price tag too. Lastly, using a Brim or Raft can stabilize the print and make the supports easier to remove post-printing. By focusing on these parameters, you can ensure that the removal process is both straightforward and effective, leaving you with a polished final product.
The Influence of Support Density and Pattern on Removal
Conversely, supports that have greater density or are intricate generally bond tightly to a print leading to difficulties in removing them hence endangering the final design. Striking a balance between these two aspects ensures structural integrity during printing process as well as ease of post-processing that results into better finish and lesser manual touches.
Design Tips: Reducing the Need for Supports in Future Prints
Similarly, utilizing rounded and organic shapes would decrease overhanging characteristics. Besides that, honeycomb patterns and lattice structures incorporated into the design will improve its structural strength while minimizing contact area with supports. Finally, use a design software that has built-in tools for reducing supports to generate optimized geometries automatically. In conclusion these strategies can help in making your printing process more efficient leading to cleaner outputs and less post processing work.
Reference sources
-
All3DP – How to Remove Hard Supports from 3D Prints
- All3DP provides a detailed guide on removing hard supports from 3D prints, emphasizing the importance of properly tuned support settings and good placement to facilitate easy removal.
- Source: All3DP
-
Xometry – 10 Steps on How To Remove Supports From 3D Prints
- Xometry offers an in-depth look at the step-by-step process for removing supports from 3D prints. This guide includes practical tips such as starting with accessible supports and using needle-nose pliers for intricate parts.
- Source: Xometry
-
Tom’s Hardware – How to Remove Supports from 3D Prints
- Tom’s Hardware provides expert advice on efficient support removal, focusing on the importance of correct settings during slicing and recommending proper tools to achieve clean results.
- Source: Tom’s Hardware
Frequently Asked Questions (FAQs)
Q: What is the best way to remove supports from FDM 3D prints?
A: The best way to remove supports from FDM 3D prints often involves a combination of techniques. Start by gently removing the supports with your hands or pliers. For stubborn sections, using a craft knife or a pair of flush cutters can help you get the support out. If the model and material allow, soaking the part in warm water can make support removal easier, especially with soluble supports. Ensuring your print has cooled down completely can also make the supports easier to break away.
Q: How can I make support removal easier?
A: To make support removal easier, consider adjusting the support settings in your slicer software. Reducing the density of the support structures and selecting supports that are easy to remove can significantly help. Another strategy is to optimize the orientation of your print to minimize the amount of support needed. Using supports with a lower density or a different support interface density can also make removal easier without compromising on the part’s stability during printing.
Q: Can I print without using supports?
A: It’s possible to print certain designs without using supports, especially ones that do not have overhangs exceeding a 45-degree angle. Optimize the design for 3D printing by altering angles and adding fillets or chamfers to decrease the necessity for supports. However, for complex models with significant overhangs, supports may still be required to ensure print quality and integrity.
Q: How do you remove FDM 3D printer supports without damaging the print?
A: To remove FDM 3D printer supports without damaging the print, work slowly and carefully. Start by removing the largest pieces by hand, applying gentle pressure. Use precision tools like flush cutters or craft knives to carefully cut away at the remaining supports. If supports are difficult to remove, applying a small amount of heat with a heat gun can help, but be cautious not to melt or warp your print. Additionally, using a sanding needle or a file can help clean up any remnants without causing damage.
Q: What materials make support removal easier for 3D prints?
A: Materials that have a lower melting point and are less brittle tend to make support removal easier. For instance, PLA and TPU are generally more forgiving and easier to work with than ABS or PETG when it comes to removing supports. Soluble supports, available with some dual extruder 3D printers, can dissolve in water or another specified solvent, making them an excellent option for complex prints where removing physical supports might be challenging.
Q: Is it possible to dissolve the supports instead of manually removing them?
A: Yes, it is possible to dissolve the supports instead of manually removing them, but this option depends on the 3D printing materials used for both the model and the supports. Soluble support materials, such as PVA or HIPS, can be dissolved in water or limonene, respectively. This method is particularly useful for prints with intricate designs or internal structures that would be difficult to reach with tools. Ensure compatibility between your print and support materials when using this technique.
Q: How do different support densities affect the ease of removal?
A: Different support densities can significantly affect the ease of removal. Higher density supports offer more stability for the print but can be more difficult to remove and might leave marks or damage the surface of the print. Lower density supports are easier to remove and reduce the amount of material used, making clean-up quicker and potentially reducing the risk of damage to the print. Experimenting with the support interface density can also help achieve a balance between ease of removal and sufficient support during printing.
Q: What tools are essential for removing supports from 3D prints?
A: Several tools can make the process of removing supports from 3D prints easier and more efficient. Needle-nose pliers and flush cutters are excellent for snipping away large sections of support material. Craft knives or scalpel blades can get closer to the print surface for finer removal. For finishing touches, needle files, sandpaper, and even a small rotary tool for sanding can help smooth out any imperfections left by the supports. Always prioritize safety by wearing protective eyewear and being cautious with sharp tools.