Picking the correct slicer software is a critical step in the 3D printing world. The top two most common ones in the market include Cura and Simplify3D, each with unique features and advantages for different user sets. This blog post examines the main differences, strengths, and weaknesses between Cura and Simplify3D to enlighten readers and help them decide which slicer best suits their needs. Whether you are a novice or a pro trying to gain more control over your prints, this review will offer insights enabling you to make an informed decision about 3D printing technology.
What is Cura and How Does it Work?

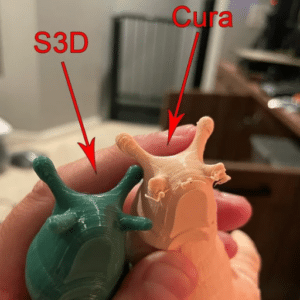
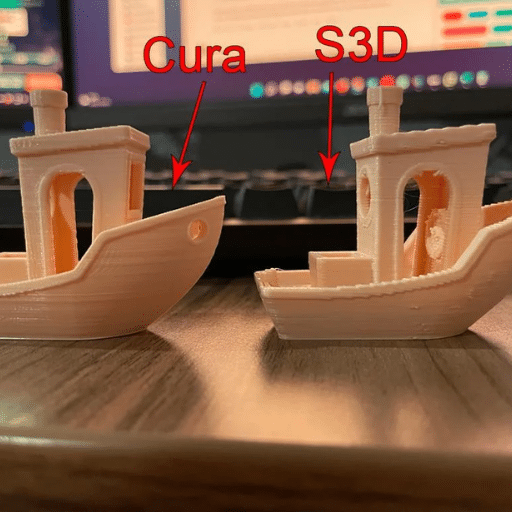
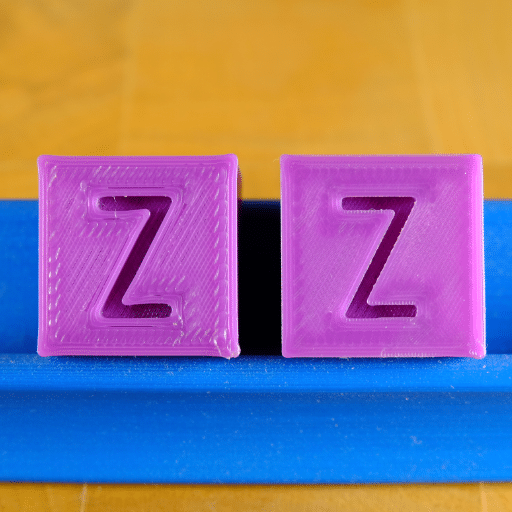
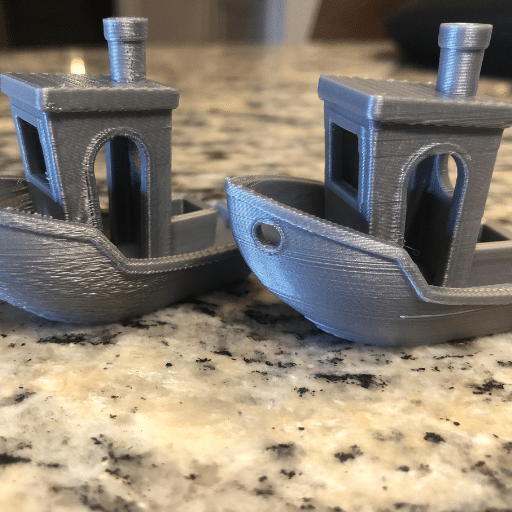
Image source: https://www.reddit.com/
Ultimaker has developed open-source slicing software called Cura, which converts 3D models into instructions for 3D printers to print them out. Digital model inputs by users enable them to optimize print quality and material efficiency by adjusting parameters such as layer height, print speed, infill density, etc. These parameters are converted by Cura into G-code, which is later used by the machine to build objects layer by layer. Its user interface is easy to use, while its vast community support makes it popular among many beginners or experts in 3d Printing. Regular updates ensure that new features are added while functionalities are improved on Acura’s end, keeping up with the demands of ever-changing trends associated with 3DP technologies.
Understanding the Basics of Cura
Cura operates by enabling users to bring in 3D models in popular formats such as STL or OBJ. Once your model is loaded, you can set various options to suit the print process for that particular model. These include the layer height, which influences the resolution of the print; print speed, which determines how long it would take to print an object; and infill density, which affects strength and weight in equal measure. For most popular models of 3D printers, Cura has preconfigured profiles to facilitate fast setup. A simple visual preview function remains for a user-friendly control over slicing before hitting “print,” ensuring every parameter is configured correctly for a successful fabrication outcome. Being community-driven and emphasizing constant improvement, Cura regularly offers new features and updates based on user feedback and advancements in 3D printing technology.
Key Features of Ultimaker Cura
In my experience using Ultimaker Cura, some of the standout features include its highly customizable settings that allow me to easily adjust various print parameters. I appreciate the wide range of supported file formats, which ensures compatibility with my 3D models. The software’s intuitive interface simplifies the slicing process, making it accessible for beginners and seasoned users like myself. Additionally, the built-in print profiles for popular printer models significantly reduce setup time. I find the real-time visualization tool particularly valuable, as it lets me preview the print layers before starting, helping avoid costly mistakes. Lastly, the vibrant community support around Cura means I can access many resources, tutorials, and forums that enhance my 3D printing experience by keeping me updated on the latest best practices and features.
How to Use Cura with Your 3D Printer
The process of using Ultimaker Cura with your 3D printer is easy, and this involves a few main steps:
- Download and Install Cura: The first thing you should do is download the latest version of Ultimaker Cura from the official website, then follow the installation instructions to set it up on your computer.
- Set Up Your Printer: Open Cura, then pick your 3D printer from the preconfigured list or manually enter printer-specific settings such as build volume and nozzle size. This will ensure that the slicing process is accurate.
- Import Your 3D Model: Go to Cura and add your 3D model file (usually in STL or OBJ format). After loading this model, you can change its position, scale, or even orientation on the build plate.
- Configure Print Settings: You can customize parameters like layer height, print speed, and infill density to suit each given project. Alternatively, you can use predefined profiles for ease of this purpose.
- Slice the Model: Ensure all settings have been adjusted by clicking the “slice” button. This turns your 3D model into G-code, representing what the printer understands.
- Preview and Save: Check print layers and paths using a visual preview. Once ready, save the generated G-code to the required location, either onto an SD card or desktop PC, as per the printer specifications.
- Start Printing: Load the g-code into your 3D printer and begin printing. Give it attention during the fusing operation, especially during the early stages, when the most problems occur.
By obeying these measures, one can maximize the utilization of Ultimaker Cura to achieve optimal results in their projects while enhancing their experience with 3D printing.
What is Simplify3D and Its Advantages?
Simplify3D is a professional-grade slicing software that exclusively targets 3D printing; it provides solid tools for preparing and optimizing prints. Simplify3D has more advanced features than other slicers, such as customizable support structures, multiple process settings in one print, and a highly detailed visual preview. These features enable users to optimize the quality of their prints, reduce printing time, and minimize materials wastage. This software also supports different types of 3D printers, making it suitable for hobbyists and professionals. In general, Simplify3D empowers the 3D printing workflow by offering better control and efficiency over the process.
An Overview of Simplify3D Software
Simplify3D is an expert-level software that does slicing professionally for 3D printing, with fantastic power tools to prepare printings for the best outcomes. It offers several beneficial options never seen in ordinary slicers, including adjustability of supporting structures, several pre-sets processes within one print operation, and thorough results previewing. Such intricate characteristics enable adjustment of the printer’s features, thereby improving the quality of output products, speeding up printing time, and reducing useless material utilization when doing this kind of work. Furthermore, this program can be used with numerous models of 3D printers, so it can be employed by beginners and experienced representatives of 3D printing communities.
Why Choose Simplify3D Over Other Slicers?
Based on my experience, Simplify3D is the best choice for slicing software due to its unparalleled flexibility and wide-ranging functionalities. While many slicers offer basic functionality, Simplify3D stands out with its ability to adjust support structures, significantly enhancing print quality and reducing material waste. Multiple process settings mean I can optimize each print for various sections of a model without handling different files. Additionally, it has a real-time visual preview feature, which is very useful for the early detection of potential problems during the printing process, as I have never encountered this feature in other slicers. Overall, its user-friendly interface and extensive compatibility with numerous 3D printers make it an invaluable asset in my 3D printing projects.
How to Use Simplify3D Effectively
To be successful using Simplify3D, one must understand its main features and use them to optimize the printing procedure.
- Know Your Way Around: Study carefully the layout and tools offered in Simplify3D. Browse through the abundant tutorials and user guides on the main website to gain maximum operational awareness of this software package.
- Settings Customization: Play with various print settings to make your prints more precise. For optimal results, adjust layer height, print speeds, and support structures according to the individual needs of your model. The ability to generate distinctive configurations for various parts within the model is especially beneficial for intricate ones.
- Use Preview Feature: Always scan through real-time preview before hitting the print button. This assists you in visualizing each layer, making it possible for you to identify any issues that may arise, such as insufficient supports or challenging overhangs, thus ensuring timely proactive modifications.
- Save Profiles: Make sure you create profiles for materials/models and save them after every project completion; this helps save time required in future endeavors and ensures uniformity across all printed works at all times.
- Be Part of a Community: Participate in Simplify3D groups or forums where other people using the same software offer assistance and advice. Community-based learning allows you to discover advanced troubleshooting techniques that can make your printing tasks even better.
By applying these tactics, users can get the most out of Simplify3D, improving their 3D printing experience and print quality.
How to Choose Between Cura and Simplify3D?
When selecting between Cura and Simplify3D, you should think about your own printer needs as well as your preferences. Cura is an excellent choice for beginners who want free and user-friendly software with various features. It is suitable for everyday use due to its active community and extensive settings library. On the other hand, Simplify3D is designed for advanced users who require more control over print settings and want a professional experience. Some of its advanced features include intricate preview options, bespoke support generation, and excellent performance when dealing with complex models. To make an informed decision on 3D printing projects involving budgeting, simplicity of operation, or desired degree of control.
Evaluating Your 3D Printing Needs
Several crucial factors should be considered before narrowing down to one slicer software package based on your 3D printing requirements. First, establish how intricate the models you will be printing are; intricate designs might need Simplify3D’s advanced features, while simple ones may be well handled by Cura. Then, assess your familiarity with 3D printing; newbies can find their way around Cura better, whereas experienced individuals can choose rather than decide what they want using Simplify3D. The software’s cost must also be considered – Cura is complimentary, while you must purchase Simplify3D. Finally, consider which materials you plan to employ because different slicers may be incompatible with handling exotic filaments. Reflecting on these aspects will help you make a more informed decision that serves your printing objectives better.
What to Consider When Selecting a Slicer
While selecting a slicer, it is crucial to remember some important factors as follows:
- User Experience Level: Consider how well-versed you may be in 3D printing. Newbies might like slicers with easy-to-use interfaces, such as Cura, which has simple navigation menus and basic settings. Conversely, advanced users may want to use Simplify3D or PrusaSlicer since they have more control over their printing settings.
- Model Complexity: The complexity of your 3D designs significantly influences your slicer choice. Many people advise using Simplify3D when handling intricate models that require custom supports or specialized slicing techniques. Nonetheless, friendly options such as Cura and TinkerCAD are available for simpler things.
- Budget Considerations: Financial constraints are also crucial factors in determining the type of printer one can acquire. However, Cura is free for newbies, while Simplify3D requires a one-time payment. It is a good idea to consider such costs vis-à-vis one’s needs and preferences before deciding.
- Material Compatibility: If you intend to experiment with varied materials, examine the filaments that can be used in relation to the slicer. Some have limitations, while others handle more advanced filaments.
- Community Support and Resources: A thriving community and abundant online resources can greatly enhance your experience. Slicers like Cura and PrusaSlicer have active communities offering help, tutorials, downloadable profiles, etc., which go a long way toward assisting users in troubleshooting issues and learning from other people’s experiences through well-informed suggestions.
Considering these points will enable you to opt for a suitable slicer that meets your project requirements and enhances your 3-D printing outcomes.
Are There Alternatives to Cura and Simplify3D?
Yes, several alternatives to Cura and Simplify3D suit different user preferences and requirements for 3D printing. Some examples include PrusaSlicer, a favorite among those who have Prusa printers due to its robustness, and MatterControl, which integrates design and print functionalities. Slic3r is also highly regarded for its flexibility and an active development community. Further still, Repetier-Host allows simultaneous control of multiple printers in one comprehensive interface, making it more appropriate when dealing with more complicated setups. By considering these alternatives, users can find a slicer that better suits their particular needs, whether simple or has advanced features or syncing with various 3D printing technologies.
Exploring Other Slicer Software Options
Three leading websites offer some insights into alternative products to Cura and Simplify3D:
- All3DP provides a comprehensive guide for slicing software based on its features, usability, and compatibility with different printers, among other things. As the site suggests, options like PrusaSlicer and Slic3r cater to both novices and experts.
- Tom’s Hardware offers detailed reviews and performance testing of different slicers. Their evaluation encompasses user-friendly interfaces, slicing speed, and print quality, thus enabling users to make practical selections.
- The 3D Printing Industry presents an overview of emerging slicers and innovations in the field. Additionally, they delve into refined types, such as materials used or special technique slices, hence defining how this technology continues to morph every year.
By using these resources together, we can gain a holistic view of available slicers and select one that best suits our 3D printing requirements.
PrusaSlicer: A Strong Contender
Of all the 3D printing software programs I have encountered, PrusaSlicer seems to be the most popular among enthusiasts. One thing that makes this program stand out is its user-friendly and intuitive interface. Moreover, it has various advanced features that can help experienced users improve print quality by fine-tuning print settings. According to All3DP, its customizability is one area in which PrusaSlicer excels, especially among Prusa printer users. Tom’s Hardware commended it for its fast slicing speeds and excellent outputs compared to other slicers. It should also be highlighted that frequent updates and support from the community were critical points for the 3D Printing Industry to ensure relevance amidst changing technologies.
Comparing Cura and Slic3r
Cura and Slic3r are competing printers with advantages and customer bases. For instance, Cura is loved for its friendly UI and extensive preset profiles for different printers; hence, it is best suited for starters. This platform supports numerous slicing options and is compatible with many materials, making it ideal for average users. It integrates with multiple printers and has an active community, as noted in the 3D Printing Industry, contributing to its popularity through plenty of resources and tutorials.
On the other hand, Slic3r is loved due to its high-level functionality and customization options, making it more suitable for experienced people. The program allows us to make precise adjustments, unlike other software programs such as Simplify 3D.All3DP observes that the variable layer height feature is innovative since no similar software possesses it. This might not be the most effortless slicing application on the market, but many people enjoy it because of what they can do with their prints.
In conclusion, Cura and Slic3r have different target groups depending on their experience and requirements in 3D printing. Cura’s simplicity and support for beginners attract users, whereas Slic3r’s customization factor is preferred by experienced ones.
Tips for Optimizing Your 3D Printing Workflow
- Perform Regular Printer Calibration: Regular calibration is essential to ensure your printer operates at its best and produces high-quality prints. Frequently check the level of the nozzles, extruder settings, and bed leveling.
- Choose the Correct Filament: Use a filament appropriate for your particular printing project—PLA, ABS, PETG, or another material. Each has different properties that affect print quality and durability.
- Set Up Printing Speed and Temperature: Adjust your printing speeds and temperatures with different results in mind. Slow speed typically enhances details, while temperature adjustments can enhance layer adhesion.
- Maintain an Unsoiled Build Surface: Make sure your build plate is free from dirt or grease so that adhesion improves, thereby preventing model warping during print time.
- Use Supports Wisely: Optimize support placement and density to minimize post-processing time while ensuring overhangs remain structurally sound.
- Watch Your Prints: Monitor the entire process of 3D printing using cameras or monitoring software, where necessary, to identify any possible issues early enough.
- Organize Your Workspace Area: A well-organized workstation may help improve your workflow efficiency by making it easier to find tools and materials when needed.
-
Be updated with the latest trends in the 3D Printing industry: To share tips, learn from others, and stay up-to-date with recent improvements and best practices, one should join online communities, forums, and social media groups dedicated to 3D printing.
Best Practices for Using Cura
- Set Up Printer Right: Ensure you properly set your machine’s specifications in Cura. Insert the correct numbers for your printer’s dimensions, nozzle size, and print bed settings; this should prevent wrong printing and enhance efficacy at large.
- Profiles for Different Materials: Various materials have pre-set profiles in Cura. Select a profile that suits the filament type to ensure accurate temperature and speed settings resulting in better printouts.
- Layer Height Optimization: The layer height is dependent on the part’s required detail. Intricate models need smaller layers to achieve more details, while larger layers can reduce printing time on less complex models.
- Infill Settings Adjustment: Adjust infill density and pattern to balance strength requirements and material consumption. A lower percentage of infill can be saved for non-structural components, whereas functional parts may require higher infills.
- Refine Support Structures: Use Cura’s support structures to change their location and orientations when they are created. Adjusting support structure, location, and density helps curtail waste from material leftovers and improves smoothness after printing.
- Preview Your Printout: Always use the preview tool before starting any 3D print job to view its path. This stage allows you to detect any mistakes early enough without wasting resources or energy.
When these best practices are followed, 3D printer users will have an excellent experience using Cura with high-quality prints while optimizing workflow.
Maximizing Your Results with Simplify3D
To maximize the results with Simplify3D, I have focused on a few critical strategies that have proven effective through extensive research. For one, I ensure I use the correct print settings specific to my printer and filament type, which will significantly affect my printing quality. Besides, Simplify3D offers me advanced features, including custom support generation, that enable me to put supports only where needed, reducing post-processing time and material usage. Additionally, by employing the layer-by-layer preview in software, I can foresee and solve any problems before printing begins so that workflow is more seamless and success rates higher. These steps enable me to optimize my 3D printing process for consistently excellent results.
Common Mistakes to Avoid in Slicing
There are several common mistakes when it comes to slicing, which can ruin the quality of 3D prints. One of these is wrong print settings, such as incorrect layer height or infill percentage, leading to fragile structures or too long print times. Further, not checking for overlapping or intersecting parts may endanger the print’s integrity, making assembly difficult. Another error is not considering the model’s orientation because misplaced on the bed makes the layers weaker and gives a bad surface finish. Lastly, failure to properly calibrate your printer before slicing can result in various issues, such as under-extrusion or over-extrusion, which highly influences the final outcome of a printed object. By avoiding these pitfalls, users can improve their slicing process and get more successful prints.
Frequently Asked Questions (FAQs)
Q: What are the main differences between Simplify3D and Cura?
A: The main differences between Simplify3D and Cura include pricing, user interface, and features. Simplify3D is a paid software that offers advanced features like customizable support structures and detailed control over layer height and infill options. In contrast, Cura is free and open-source, making it accessible for beginners and those new to 3D printing. Each software has strengths, so the choice often depends on specific needs and preferences.
Q: Is Simplify3D worth the cost compared to Cura?
A: Whether Simplify3D is worth the cost compared to Cura depends on your 3D printing needs. Users who require advanced features and customization may find that Simplify3D’s capabilities justify the price. However, for hobbyists or those just starting with 3D printing, Cura’s free software and user-friendly interface may be more suitable. A free trial of Simplify3D can also help determine if it meets your needs.
Q: Can I use Simplify3D and Cura for the same 3D printer?
A: You can use Simplify3D and Cura for the same 3D printer. Each software allows you to create printer profiles specific to your machine, ensuring compatibility. Many users often experiment with both to see which slicer produces better results for their particular 3D models and printing preferences.
Q: What types of files can I import into Simplify3D and Cura?
A: Simplify3D and Cura support various file formats, including STL, OBJ, and 3MF. This allows you to import a wide range of 3D models for slicing. Additionally, both software packages can handle CAD designs, enabling users to efficiently prepare their models for the 3D printing process.
Q: How does the layer height affect the print quality in Simplify3D and Cura?
A: Layer height is a crucial factor that affects print quality in both Simplify3D and Cura. A smaller layer height results in finer detail and smoother surfaces but increases print time. Conversely, a more significant layer height speeds up the print process but may produce a rougher finish. Both software allow you to customize layer height settings based on project requirements.
Q: What are the recommended posts for beginners using Cura?
A: For beginners using Cura, recommended posts typically include tutorials on setting up the Cura slicer, tips for optimizing print settings, and guides on effectively using support structures. Additionally, exploring community forums can provide valuable insights from experienced users in the 3D printing community.
Q: Are there any significant new features in the latest version of Cura?
A: Yes, the latest version of Cura (v5) includes significant new features, such as improved print profiles, enhanced support structures, and a more intuitive user interface. These updates aim to improve the user experience and the overall quality of prints. Users are encouraged to explore these new features to maximize their printing capabilities.
Q: How does Simplify3D handle support structures compared to Cura?
A: Simplify3D offers more advanced options for support structures than Cura. Users can customize the density, placement, and type of supports in Simplify3D, allowing greater control over how supports are generated. Cura also provides support options but may not offer the same level of customization as Simplify3D.
Q: What is the best slicing software for someone new to 3D printing?
A: Cura is often recommended for someone new to 3D printing due to its free and open-source nature, user-friendly interface, and extensive community support. It provides essential features without overwhelming new users. However, those interested in exploring more advanced options may try Simplify3D during its free trial to see if its features align with their needs.


