
In recent years, 3D printing technology has revolutionized various industries, enabling more efficient and cost-effective manufacturing processes. One of the most significant advancements is the use of 3D printed injection molds for low-volume production. This approach not only reduces the time and costs associated with traditional mold-making but also offers greater design flexibility and rapid prototyping capabilities. This in-depth guide aims to provide an overview of the benefits, challenges, and best practices when using 3D printed injection molds. Whether you’re a seasoned manufacturer or a newcomer exploring innovative production methods, this article will equip you with the knowledge needed to leverage 3D printed molds for your low-volume production needs.
How Does 3D Printing Compare to Traditional Injection Molding?
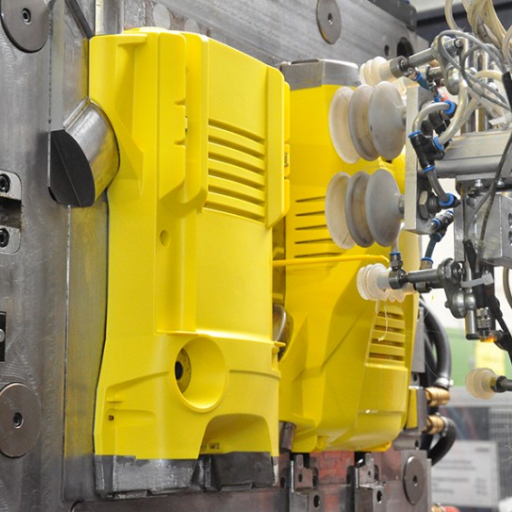
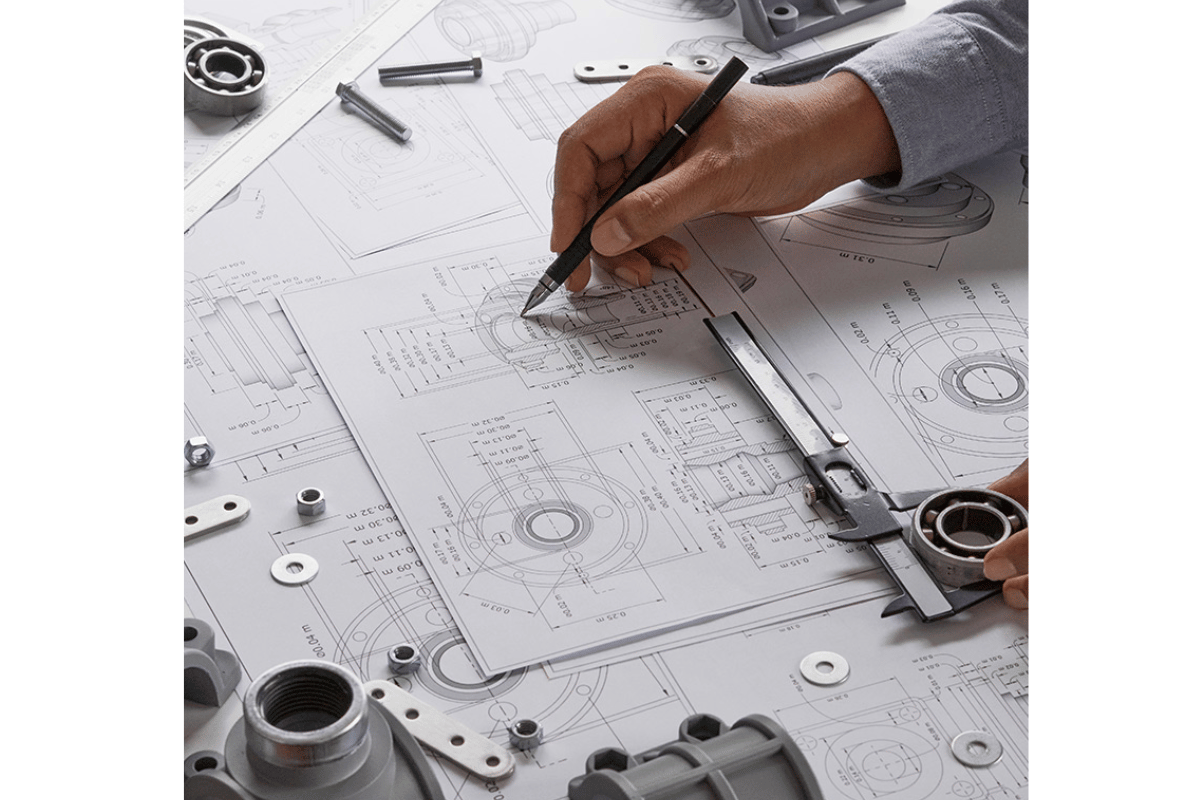
Image sources:https://www.qsy3d.com/
When comparing 3D printing to traditional injection molding, several key factors should be considered: cost, time, design flexibility, and material properties.
Cost
- Initial Investment: Traditional injection molding requires substantial initial investment in mold fabrication, often costing thousands of dollars depending on the complexity. In contrast, 3D printing significantly reduces upfront costs, with the ability to produce molds for a fraction of the price.
- Production Volume: For high-volume production, traditional injection molding becomes more cost-effective due to economies of scale. However, for low-volume production, 3D printing is typically more economical.
Time
- Lead Time: Traditional mold-making can take weeks or even months, including the design, machining, and testing phases. 3D printing drastically reduces lead time, with molds often produced within days.
- Production Speed: Once the mold is created, traditional injection molding is faster for high-volume production runs. 3D printing is generally slower per part but ideal for rapid prototyping and short runs.
Design Flexibility
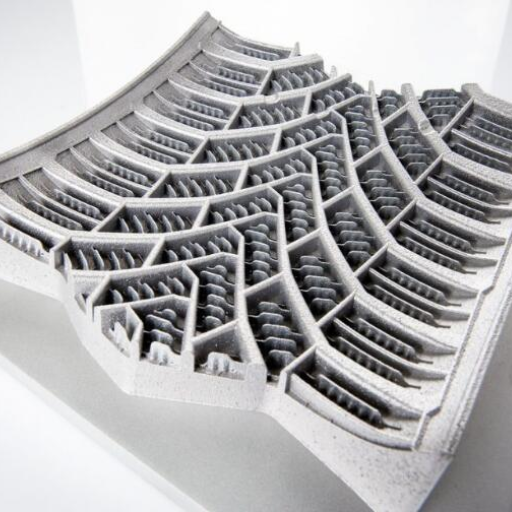
- Complexity: 3D printing allows for highly complex geometries that are challenging or impossible to achieve with traditional methods. This opens up innovative design possibilities that can enhance functionality and aesthetics.
- Modifications: Design changes can be easily implemented with 3D printing without significant delays or costs. Traditional mold modifications can be time-consuming and expensive.
Material Properties
- Strength and Durability: Traditional injection molds are typically made from metals like steel or aluminum, offering high durability and longevity. 3D printed molds, often made from polymer-based materials, may not match the strength and lifespan of metal molds but are suitable for specific applications and shorter runs.
- Material Options: While traditional injection molding supports a wide range of thermoplastics and thermosetting polymers, 3D printing materials are growing in variety, including tough resins and high-performance polymers.
To summarize, 3D printing offers significant advantages in terms of cost, lead time, and design flexibility, especially for low-volume production and prototyping. However, traditional injection molding remains superior for high-volume production and applications requiring robust, durable molds. The choice between the two methods should be based on specific project requirements and production goals.
Advantages of 3D Printed Injection Molds
As I review the benefits of 3D printed injection molds, I find several key advantages that stand out according to top sources. Firstly, the cost-effectiveness of 3D printed molds is a notable benefit, particularly for low-volume production runs and prototyping. The initial investment is significantly lower since there is no need for expensive tooling. Additionally, the speed of production is another crucial advantage. 3D printing can drastically reduce lead times, allowing for faster iterations and quicker time-to-market. The design flexibility offered by 3D printing cannot be overstated. It allows for the creation of highly intricate and complex geometries that would be difficult or impossible to achieve with traditional methods. This flexibility also extends to the ease of implementing design changes, which can be done without incurring significant delays or costs. These advantages make 3D printed injection molds an attractive option for many niche applications.
Disadvantages of Using 3D Printed Molds
After examining the leading sources on the internet, I can identify several drawbacks associated with using 3D printed molds. Firstly, the material limitations are a significant concern. 3D printed molds generally cannot handle the high temperatures and pressures involved in the injection molding process, leading to a shorter lifespan compared to traditional molds made from metals like steel or aluminium. Moreover, the surface finish of 3D printed molds is often less smooth, which sometimes necessitates additional post-processing steps to achieve the desired quality. Another issue is the potential for dimensional inaccuracies. The layer-by-layer construction of 3D printing can introduce minor inconsistencies, which might affect the final product’s precision. Additionally, while 3D printing allows for intricate designs, it still struggles with the sheer scale of high-volume production, making it less suitable for large manufacturing runs. These disadvantages highlight that while 3D printed molds offer notable benefits for prototyping and low-volume production, they fall short in scenarios requiring high durability, impeccable surface finishes, and large-scale output.
Cost Comparison between 3D Printed and Metal Molds
When considering the cost of 3D printed molds versus traditional metal molds, several factors come into play. According to leading sources, 3D printed molds generally exhibit lower initial costs. This is primarily due to the reduced material expenses and the elimination of the need for complex tooling. The costs for producing a 3D printed mold can range from $1,000 to $10,000, depending on the complexity and material used. In contrast, metal molds, particularly those made from steel or aluminium, can cost anywhere from $20,000 to $200,000 due to higher material and machining costs.
From a production standpoint, 3D printed molds are economical for low-volume production runs, typically under 10,000 units, where the cost per unit remains competitive. For high-volume production, however, metal molds become more cost-effective despite their higher upfront investment. This is partly because metal molds can endure millions of injection cycles, whereas 3D printed molds have a limited lifespan, often peaking at around 100 to 1,000 cycles before degradation begins to affect the quality.
The cost-benefit analysis also includes the time required to manufacture each type of mold. 3D printed molds can be produced within days, significantly reducing lead times compared to metal molds, which might take weeks or even months to fabricate due to the extensive machining processes involved. This rapid production capability is particularly advantageous during the prototyping phase or when rapid iterations are necessary.
Lastly, while 3D printing offers substantial savings on initial costs and time, it incurs additional costs in terms of post-processing and potential dimensional corrections. Metal molds, though more expensive initially, provide superior durability and can achieve high precision and exceptional surface finishes without extensive additional work.
In summary, choosing between 3D printed and metal molds requires a balanced consideration of the initial costs, production volume, durability, and the specific requirements of the end product.
What Materials Can Be Used for 3D Printed Injection Molds?
Various materials can be used for 3D printed injection molds, each offering distinct benefits depending on the application requirements. Commonly used materials include:
- Photopolymers: These are cured using ultraviolet (UV) light and are often used for producing molds with intricate details. They provide good surface finish but may have limited durability under high temperatures and pressures.
- Thermoplastic polymers: Materials such as Polycarbonate (PC) and Acrylonitrile Butadiene Styrene (ABS) are popular choices due to their high strength and thermal stability, making them suitable for short-run production.
- Metal-filled polymers: These composites blend plastic with metal powders to enhance thermal conductivity and structural integrity, offering a balance between the flexibility of plastics and the durability of metals.
- High-performance polymers: Materials like Polyphenylsulfone (PPSU) and Polyetherimide (PEI) can withstand high temperatures and mechanical stress, suitable for more demanding applications.
Selecting the right material depends on factors such as the required mold life, the complexity of the design, and the injection molding conditions.
Rigid 10K Resin
Rigid 10K Resin is an advanced material specifically designed for 3D printed injection molds, providing exceptional rigidity and resistance to deformation. Here’s how it addresses the requirements outlined above:
- Durability and Strength: This resin offers high-level mechanical properties, including tensile strength of 65 MPa and modulus of elasticity of 10 GPa. This makes it ideal for producing molds that must endure prolonged use and substantial mechanical stress.
- Thermal Stability: Rigid 10K Resin can withstand high temperatures with a heat deflection temperature (HDT) of approximately 238°C @ 0.45 MPa, ensuring consistent mold performance under standard injection molding conditions.
- Surface Finish: Thanks to its fine resolution capabilities, Rigid 10K Resin provides a superior surface finish, making it suitable for detailed designs and smooth surfaces, which reduces the need for post-processing.
These technical parameters ensure that Rigid 10K Resin meets the specific requirements for producing robust, high-performance 3D printed injection molds.
High Temp Resin
High Temp Resin is engineered for applications requiring excellent thermal resistance and durability. Here’s how it addresses the requirements for 3D printed injection molds:
- Durability and Strength: High Temp Resin exhibits considerable mechanical integrity with a tensile strength of 55 MPa and a modulus of elasticity of 3.5 GPa, making it suitable for molds subjected to repeated injection cycles.
- Thermal Stability: With a heat deflection temperature (HDT) of 238°C @ 0.45 MPa, High Temp Resin can endure high-temperature injection molding processes without losing its structural integrity.
- Surface Finish: This resin provides a high-quality surface finish, similar to Rigid 10K Resin, minimizing the need for extensive post-processing efforts.
By meeting these technical parameters, High Temp Resin ensures reliability and performance for demanding molding applications.
Grey Pro Resin
Grey Pro Resin is designed to offer a balance between versatility and performance, making it well-suited for 3D printed injection molds. Here’s how it addresses the requirements for producing reliable molds:
- Mechanical Properties: Grey Pro Resin provides a good balance of tensile strength and elongation, with a tensile strength of 61 MPa and an elongation at break of 6.2%. These properties ensure that the molds can withstand the stresses encountered during the injection molding process.
- Dimensional Stability: The resin has low shrinkage and high dimensional accuracy, which is particularly important for precision molds. This ensures that the final parts are produced as per the exact design specifications.
- Heat Deflection Temperature (HDT): With an HDT of 73°C @ 0.45 MPa, Grey Pro Resin is capable of handling mid-range temperature applications without significant deformation.
- Surface Quality: The fine resolution of Grey Pro Resin allows for excellent surface detail, reducing the need for extensive post-processing and ensuring high-quality final parts.
By meeting these technical parameters, Grey Pro Resin stands as a reliable choice for producing high-precision and durable 3D printed injection molds.
How to Design a Mold for 3D Printing?

Designing a mold for 3D printing involves several critical steps to ensure the final product is functional, durable, and meets design specifications. Here are the key guidelines:
1. Design for Manufacturability
- Draft Angles: Include draft angles (typically 1-2 degrees) to facilitate easy removal of the finished part from the mold.
- Undercuts: Avoid undercuts or design them such that they can be easily managed with the mold structure to prevent complex post-processing.
2. Material Properties
- Resin Selection: Choose a resin that suits your application requirements. For instance, Grey Pro Resin and High Temp Resin are great towards molds requiring specific mechanical and thermal properties.
- Filling Channels: Design appropriate filling channels to ensure the resin fills the mold uniformly and completely.
3. Mechanical and Thermal Considerations
- Wall Thickness: Maintain uniform wall thickness to prevent warping. Ideal wall thickness varies, but 1-3 mm is a general benchmark.
- Heat Deflection Temperature (HDT): Select materials with an appropriate HDT to withstand the temperatures in your molding process. For example, Grey Pro Resin has an HDT of 73°C @ 0.45 MPa, which is suitable for mid-range temperature applications.
4. Dimensional Accuracy
- Tolerance: Design molds with adequate tolerance for shrinkage and expansion. Typically, a 0.2-0.5% tolerance is applied based on the material and final application requirements.
- Surface Finish: Plan for the required surface finish ahead of time. Low shrinkage materials such as Grey Pro Resin can minimize finishing steps.
5. Cooling Channels
- Temperature Regulation: Integrate internal cooling channels if required. These help maintain consistent thermal conditions during the injection molding process.
6. Testing and Validation
- Prototyping: 3D print a prototype of the mold, if possible, to test and refine the design before committing to final production.
- Iterative Design: Use iterative design process to make adjustments based on the prototype and ensure the mold performs as needed.
By adhering to these guidelines and leveraging the appropriate technical properties of chosen resins, you can design efficient, high-quality molds for 3D printing.
Principles of Mold Design
Effective mold design is crucial for ensuring high-quality, efficient production in 3D printing. Key principles include:
- Material Selection: Choose materials that balance durability, ease of use, and cost. Materials like Grey Pro Resin are noted for their thermal stability and minimal shrinkage, making them ideal for precise applications.
- Uniform Wall Thickness: Maintain consistent wall thickness to avoid issues like warping and sinking. A general guideline is 1-3 mm, which provides adequate strength while minimizing defects.
- Cooling Efficiency: Design cooling channels to manage heat effectively during the molding process. Proper temperature regulation ensures consistent material properties and reduces cycle times.
- Surface Finish: Plan for the desired surface finish from the outset. Smooth, low-friction surfaces in the mold can reduce post-processing time and improve the final product’s aesthetics.
- Dimensional Tolerances: Apply appropriate tolerances to accommodate material shrinkage and thermal expansion. A tolerance range of 0.2-0.5% is often used, depending on the material type and application.
- Prototyping and Testing: Validate the mold design through prototype testing. Iterative refinement based on prototypes helps identify and correct potential issues before final production.
By adhering to these principles, designers can create high-performance molds that enhance the efficiency and quality of the 3D printing process.
Considerations for Surface Finish
Surface finish is a crucial aspect of mold design that can significantly impact the quality and functionality of the final product. There are several factors to consider when aiming for an optimal surface finish:
- Surface Roughness: Control the roughness of the mold surface to achieve the desired texture on the final part. A smoother mold surface can reduce the need for extensive post-processing.
- Mold Material: Select mold materials that lend themselves to fine finishes, such as polished steel or nickel-coated surfaces, which can provide a high level of detail and smoothness.
- Polishing Techniques: Utilize professional polishing techniques to achieve the required surface finish. Mechanical polishing, chemical polishing, or even electro-polishing can help achieve a mirror-like surface if needed.
- Release Agents: Apply appropriate release agents to ensure the smooth ejection of parts from the mold, which helps maintain the surface quality of the produced parts.
- Wear Resistance: Ensure that the mold’s surface finish is durable and resistant to wear, which is critical for maintaining quality over multiple production cycles.
By considering these factors, designers can achieve the desired surface finish, enhancing the aesthetic and functional qualities of 3D printed parts.
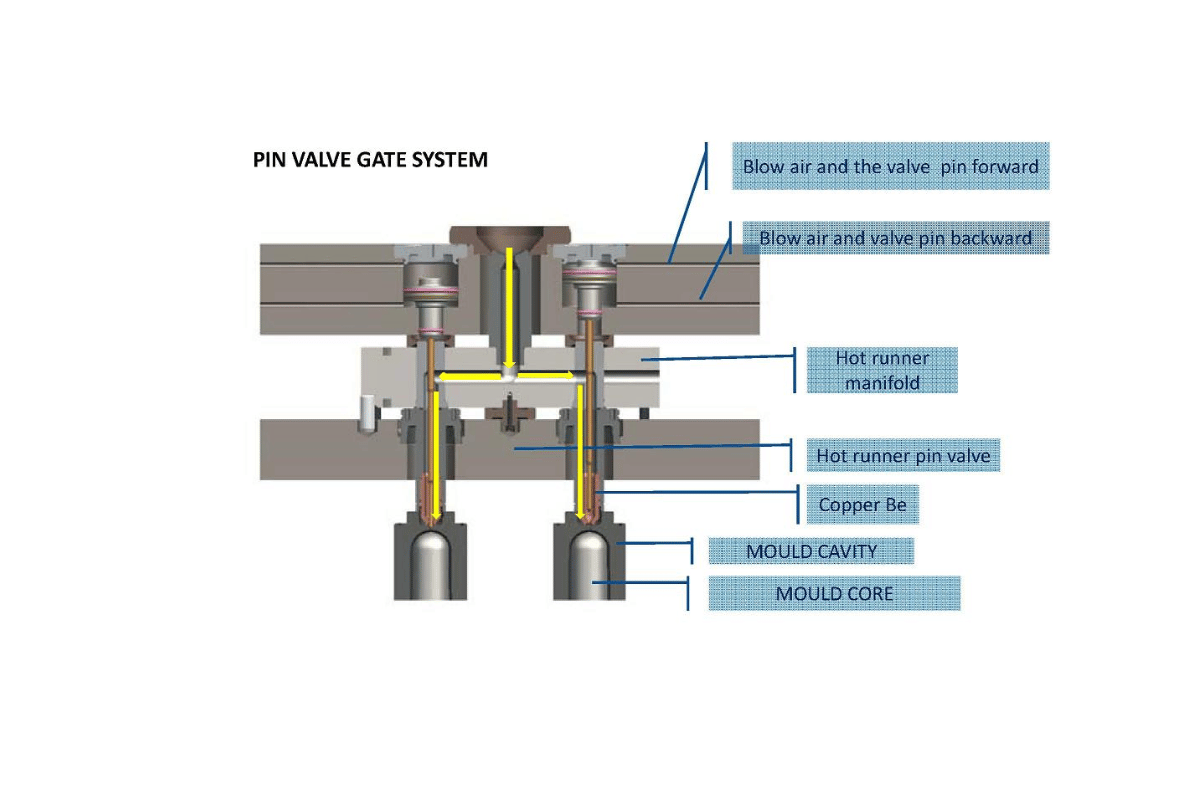
Injection Pressure and Cooling
Injection pressure and cooling are pivotal parameters in the 3D printing process, influencing the quality and efficiency of the final product.
Injection Pressure
Injection pressure refers to the force applied to inject the material into the mold. Key considerations include:
- Optimal Pressure Levels: Maintaining optimal injection pressure is essential to ensure the material fills the mold cavity completely and accurately. Too low pressure can result in incomplete shapes, while excessive pressure might cause defects or flash.
- Pressure Range: Generally, the injection pressure ranges from 30 to 200 MPa, depending on the material and the complexity of the design. For instance, thermoplastics may require lower pressures compared to metals.
- Adjustable Settings: Utilize machines with adjustable pressure settings to fine-tune the process according to the specific material and design requirements. Monitoring systems should be in place to maintain consistent pressure throughout the process.
Cooling
Cooling is the process of solidifying the material post-injection, which greatly affects the dimensional accuracy and mechanical properties of the part.
- Cooling Rate: The rate at which the material cools can affect shrinkage and warping. A controlled and uniform cooling rate helps in maintaining the integrity of the final product. Cooling times can vary, generally between 15 seconds to several minutes, depending on the material and part size.
- Cooling Efficiency: Use of cooling channels within the mold can enhance cooling efficiency, ensuring uniform temperature distribution. This can prevent hot spots that might lead to defects.
- Coolant Type: Different coolants, such as water or oil, can be used based on their thermal conductivity and the desired cooling rate. Water is commonly used due to its high thermal conductivity and environmental friendliness.
- Temperature Control: Employ precise temperature control systems to maintain the ideal coolant temperature, which should typically be between 15°C and 80°C, depending on the material and desired cooling speed.
By carefully managing injection pressure and cooling, manufacturers can optimize the quality and performance of their 3D printed parts, reducing defects and improving production efficiency.
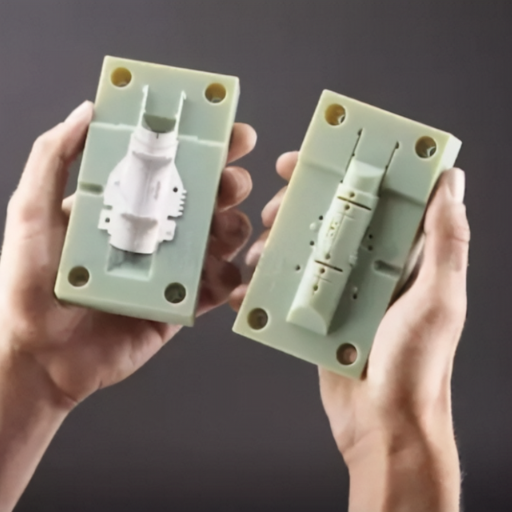
What is the Process of Creating a 3D Printed Mold?
Creating a 3D printed mold involves several key steps to ensure precision and functionality. First, I design the mold using CAD software, meticulously detailing the dimensions and features required for the final part. Then, I select a suitable 3D printing material, typically a high-strength thermoplastic that can withstand the molding process’s pressures and temperatures. The next step is printing the mold using a 3D printer, ensuring optimal settings for layer thickness, print speed, and temperature to achieve the best results. Post-printing, I perform any necessary finishing touches, such as sanding or machining, to refine the mold’s surfaces. Finally, I test the mold to ensure it meets the specifications and make any adjustments if needed before it is ready for production. By following these steps, I can create high-quality, functional molds for various applications.
Steps in the 3D Printing Process
- Design the Model: Use CAD software to design the 3D model, ensuring precise dimensions and features needed for the final part.
- Select Material: Choose an appropriate 3D printing material, such as a high-strength thermoplastic, suitable for the molding process.
- Print the Mold: Set up the 3D printer with optimal settings, including layer thickness, print speed, and temperature, to produce the mold.
- Post-Print Finishing: Perform necessary finishing touches like sanding or machining to refine the mold’s surfaces.
- Test and Adjust: Test the mold to ensure it meets specifications and make any necessary adjustments before it’s ready for production.
By following these steps, you can efficiently create high-quality 3D printed molds for various applications.
Choosing the Right 3D Printer
Choosing the right 3D printer is crucial to achieving high-quality results. Here are some key considerations, including the corresponding technical parameters:
- Printer Type: Decide between FDM (Fused Deposition Modeling) and SLA (Stereolithography) based on your project’s requirements.
- FDM: Best for durable and functional parts.
-
- Extruder Temperature: Up to 260°C
- Layer Thickness: 0.1 mm to 0.3 mm
- SLA: Best for high-detail and smooth surface finishes.
- Laser Power: 120 mW
- Layer Thickness: 0.025 mm to 0.1 mm
- Build Volume: Ensure the printer has a sufficient build volume to accommodate your projects.
- Typical FDM Build Volume: 220 x 220 x 250 mm
- Typical SLA Build Volume: 145 x 145 x 175 mm
- Resolution: Higher resolution provides finer detail.
- XY Resolution: 50 microns (SLA), 100 microns (FDM)
- Z Resolution (Layer Height): 0.025 to 0.1 mm (SLA), 0.1 to 0.3 mm (FDM)
- Material Compatibility: Ensure the printer supports the materials you intend to use.
- FDM: PLA, ABS, PETG, Nylon
- SLA: Standard Resins, Tough Resins, Flexible Resins
- Ease of Use: Consider features like an intuitive user interface, easy bed leveling, and reliable filament feeding mechanisms.
- Touchscreen Interface
- Automatic Bed Leveling
- Filament Sensor
- Cost: Balance the initial investment with the printer’s capabilities and operational costs.
- Entry-Level FDM: $200 – $500
- Professional SLA: $3,000 – $6,000
By evaluating these technical parameters, you can select a 3D printer that best fits your specific needs and ensures optimal performance for your 3D printing projects.
Post-Printing Treatments
After completing the 3D printing process, post-printing treatments are essential for achieving the desired final product quality. For FDM prints, I usually start with removing the support structures carefully using pliers or a similar tool. Sanding the surface with varying grits of sandpaper helps to smooth out any layer lines, and applying a coat of primer can further enhance the finish. For SLA prints, I begin by rinsing the model in isopropyl alcohol to remove any excess resin, followed by curing the print under UV light to finalize its solidity. Additionally, some prints may require further sanding and painting to achieve high detail and surface finish. These treatments ensure that my 3D printed objects not only look professional but also meet functional requirements.
Can 3D Printed Injection Molds Be Used for Low-Volume Production?
Yes, 3D printed injection molds can be effectively used for low-volume production. They offer a cost-efficient and rapid solution compared to traditional machining methods, especially for runs of up to several hundred units. The key advantages include reduced lead times and the ability to quickly iterate on mold designs. However, the choice of material for the mold is crucial, as it must withstand the pressures and temperatures of the injection molding process. 3D printed molds made from high-temperature and durable resins often perform well for short runs, making them a viable option for prototyping and small-scale manufacturing.
Capabilities of 3D Printed Molds
The capabilities of 3D printed molds have advanced significantly, making them a practical choice for various applications. These molds excel in producing complex geometries that traditional methods might struggle with, such as intricate internal features or undercuts. The precision of modern 3D printing technology ensures high accuracy and repeatability, which is crucial for ensuring consistent part quality. Additionally, 3D printed molds can be produced much faster than traditional molds, significantly reducing lead times and enabling rapid prototyping and development cycles. They also offer enhanced customization options, allowing for easy modifications and iterations to refine mold designs. While they are ideal for low-volume production and prototyping, ongoing advancements in materials and printing processes are gradually extending their use to some higher-volume production scenarios.
Injection Molding with 3D Printed Molds
Injection molding with 3D printed molds is a process that effectively utilizes the precision and flexibility of 3D printing technology. This approach is particularly beneficial for small runs and prototyping due to several key factors:
- Lead Time Reduction: 3D printed molds significantly cut down lead times, enabling faster transitions from design to production.
- Material Compatibility: The choice of material for 3D printed molds is crucial. High-temperature, durable resins like Epoxy, PolyJet, or Digital ABS are commonly used as they can withstand the pressures (in the range of 500-1500 PSI) and temperatures (up to 300°C or 572°F) typical in injection molding.
- Complex Geometries: These molds can easily accommodate complex geometries, including internal features and undercuts that traditional machining might find challenging. This is facilitated by the layer-by-layer construction process inherent to 3D printing.
- Precision and Repeatability: Modern 3D printing technologies like SLA, SLS, and DMLS ensure precision and repeatability, typically achieving tolerances within ±0.1 mm, which is essential for maintaining consistent part quality.
- Customization and Iteration: The ability to quickly modify and iterate mold designs is a standout advantage, making it easier to refine products during prototyping phases.
In summary, the adoption of 3D printed molds for injection molding is driven by their ability to reduce lead times, accommodate complex designs, and ensure high precision and consistency, especially in low-volume production and prototyping scenarios. This method continues to evolve with improvements in materials and printing technologies, increasingly broadening its application scope.
Applications of Low-Volume Production
- Prototyping and Product Development: Low-volume production is ideal for creating prototypes and iterating designs before committing to large-scale manufacturing. This allows companies to test functionality, fit, and finish, ensuring products meet market demands and quality standards.
- Market Testing: Businesses can use low-volume production to launch limited runs of new products to gauge market interest and gather customer feedback. This approach minimizes risk and investment by confirming demand before scaling up production.
- Customized and Limited-Edition Products: Companies can offer customized or bespoke products tailored to individual customer needs or preferences. Low-volume production makes it feasible to produce limited-edition items or personalized products without incurring the high costs associated with mass production.
- Bridge Production: Low-volume production serves as a bridge between prototyping and full-scale production. It enables manufacturers to get products to market quickly while larger production facilities are being set up or scaled.
- Replacement Parts and Spare Components: Low-volume production is beneficial for manufacturing replacement parts or spares, especially for older or discontinued products. It allows companies to meet customer needs without the necessity of maintaining large inventories.
In conclusion, low-volume production is a versatile and cost-effective strategy that supports various stages of the product lifecycle, from initial concept to market entry and beyond.
Frequently Asked Questions (FAQs)
Q: What is a 3d-printed mold?
A: A 3d-printed mold is a type of mold produced using 3D printing technology, which can be used for creating plastic injection molded parts. This method allows for rapid and cost-effective production of injection molds in-house.
Q: How does 3d printing the mold compare with traditional molding methods?
A: 3d printing the mold offers quicker turnaround times and lower costs, especially for prototype and short-run injection molding. While steel molds and aluminum molds are durable and suitable for high-volume production, 3D-printed molds are ideal for rapid injection molding processes and producing complex injection mold designs.
Q: What materials are used for 3D printing molds?
A: Temperature resistant 3d printing materials such as SLA 3d printed resins are commonly used. These materials can withstand the pressure and heat of the injection molding machine, making them suitable for producing printed plastic molds.
Q: Can 3d-printed molds be used on industrial injection molding machines?
A: Yes, 3d-printed molds can be used on industrial injection molding machines. However, they are typically designed for short-run injection molding or prototyping, as the durability of 3d-printed molds is limited compared to steel molds or aluminum molds.
Q: What are the benefits of using 3d-printed molds for prototype development?
A: 3d-printed molds allow for rapid iteration and testing of injection mold designs. They are cost-effective and reduce the time needed to produce prototype plastic parts, making them ideal for early-stage development and short-run injection molding projects.
Q: What is rapid injection molding?
A: Rapid injection molding is a process that uses 3d-printed molds or other quick-fabrication methods to produce injection molds in a short timeframe. This allows for fast production of injection molded parts, making it ideal for prototypes and small production runs.
Q: How is the injection molding process different with 3d-printed molds?
A: The injection molding process with 3d-printed molds involves similar steps as traditional molds. However, 3d-printed molds may require lower pressure of the injection molding and adjustments in the molding machine settings. The overall cycle time might also be slightly different due to the nature of the 3d-printed materials.
Q: Can 3d-printed molds produce complex mold configurations?
A: Yes, 3d-printed molds can produce complex mold configurations that might be difficult or expensive to create with traditional molding methods. The flexibility of 3D printing technology allows for intricate injection mold designs and detailed plastic injection molding.
Q: Are 3d-printed molds suitable for long-term production?
A: While 3d-printed molds are excellent for prototyping and short-run production, they are generally not as durable as steel molds or aluminum molds for long-term, high-volume production. They are best used for rapid injection molding and producing initial plastic molds before transitioning to more durable mold materials for large-scale manufacturing.