

Working with 3D modeling and design, especially in the fields of engineering, architecture or manufacturing will usually involve file formats that are designed for particular applications. Common file formats include STP (or STEP) and STL. An STP is a globally accepted format designed to facilitate a seamless integration of computer-aided design (CAD) systems’ digital data. Conversely, an STL refers to a 3D printing file format that represents the geometry of a 3D object without any color information, material properties or texture details.
This article provides a complete guide on how to convert STP files into STL without hassle. For both experienced professionals and beginners in this field of 3D modeling, this article will explain various methods as well as tools used in changing it from one form to another. Eventually you will be confident about going between them so that your designs can be taken into life using three-dimensional printing or other applications.
Understanding STP and STL File Formats
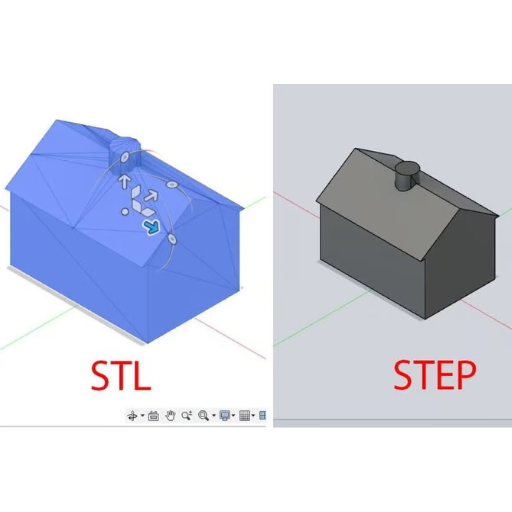
Image source: https://polyd.com/
The distinction between STP and STL file formats is essential in understanding the conversion process. An STP file is widely used to transfer digital information that may be read by various CAD software programs and allow for intricate and complex design representations. It permits the incorporation of geometric data, surface textures and metadata thus suitable for detailed engineering and design work.
Contrarily, an STL file is mainly used in 3D printing as well as rapid prototyping. It simplifies design data by having a mesh made of interconnected triangles that represent only the surface geometry of a 3D object. The format does not contain any information regarding color, material or internal structures because its sole purpose is to give a surface representation which can be easily interpreted by 3D printers.
Understanding these basic differences would enable you to effectively navigate the conversion from STP to STL while maintaining design integrity for 3D printing suitability.
What sets STL apart from STP?
The two files STL and STP are used in 3D design or printing but this use is differentiated by specific technicalities. The important differences are:
- File Structure and Data Representation:
- STP: It contains precise computer aided design (CAD) details such as geometric shapes, surfaces textures, and metadata. ISO standard (ISO 10303-21) ensures that the product model data is interoperable with other CAD systems.
- STL: Only represents surface geometry using arrays of mated triangles which simplifies the design to a succession of triangular facets devoid of metadata, material properties, or color information.
- Purpose and Application:
- STP: Used for involving engineering designs, detailed modeling purposes and CAD data exchange. It is best suited to highly detailed projects demanding exact geometric detail.
- STL: Mainly applied in three-dimensional printing as well as rapid prototyping. It has been tailored to focus only on outer surfaces hence optimized for creating physical models.
- Technical Parameters:
- STP:
- Data Integrity: High, including full 3D model data.
- Storage Format: ASCII or binary.
- File Size: Generally larger due to detailed geometry and metadata.
- STL:
-
- Data Integrity: Moderate, representing shapes with triangular mesh.
- Storage Format: ASCII or binary.
- File Size: Typically smaller as it only includes surface geometry.
Why are STL files crucial for 3D printing?
The importance of file format in CAD software
It should be noted that the choice of file format in CAD software is significant because it affects the precision, interoperability, and efficiency of design workflows. AutoDesk, Scan2CAD and GrabCAD among other best resources on CAD file formats suggest that each format has its own merits:
- Accuracy: STEP (STP) as a high-fidelity format provides 3D models with detailed and exact representation which is essential for complex designs requiring precise specifications.
- Interoperability: IGES and STEP are examples of formats increasing compatibility among different CAD systems enabling seamless collaboration amongst designers and transfer of data.
- Efficiency: In order to hasten the process from digital model to physical print while reducing file sizes, STL offers light-weighted formats designed specifically for 3D printing with simplified surface geometry.
Step-by-Step Guide to Convert STP to STL
Turning an STP (STEP) file into an STL file is a task that often comes up in 3D modeling and printing. Below is an abridged version of the process for converting such files:
- Choose CAD Software: Open any CAD software that can work with STP and STL files, for instance AutoDesk Fusion 360, FreeCAD or SolidWorks.
- Import the STP File:
- Open the preferred CAD software.
- Navigate to the ‘File’ menu and select ‘Open’.
- Browse to the location of your STP file and open it.
- Check and Optimize the Model:
- Look at your model after it has been uploaded in case there are any faults.
- Optimize the meshes where necessary so that all 3D prints have clean geometry.
- Convert the File:
- Go to the ‘File’ menu again and select ‘Save As’ or ‘Export’.
- Choose ‘STL’ as the file type from the list of available formats.
- Configure Export Settings:
- Fine-tune resolution and quality of output by adjusting export settings.
- Some of these include tolerances, chord heights and angular deviations among others.
- Ensure that detail balances well against file size on these settings.
- Save the STL File:
- Choose where you would like to save this STL file from amongst your folders.
- Click either “Save” or “Export” to confirm exporting it out finally.
Choosing the right software for conversion
To maintain the quality and truthfulness of your 3D models it is important to choose the right software for converting STP files to STL type. The following are some options and their corresponding technical parameters that will help you make an informed decision:
- AutoDesk Fusion 360:
- Technical Parameters: Tolerance, mesh refinement, and complex geometry handling.
- Justification: In engineering and manufacturing industries, Fusion 360 has a wide range of advanced mesh and tessellation controls to enable high precision models.
- FreeCAD:
- Technical Parameters: Precision settings, angular deviation , and chordal error.
- Justification: FreeCAD is open-source software whose toolset for detailed mesh processing is robust enough to guarantee high quality yet inexpensive at the same time.
- SolidWorks:
- Technical Parameters: Resolution settings, facet deviation and surface curvature.
- Justification: SolidWorks possesses sophisticated surface modeling capabilities useful in fine designs having accurate particulars as well as sleek surfaces.
Preparing your STP file for conversion
Preparation of your STP file to be converted into STL format for 3D printing must undergo the following preparatory steps before it will be performed smoothly and correctly:
- Check and Clean the Geometry:
- Action: Check if your 3D model has any typical problems like open edges, duplicate faces, non-manifold geometry.
- Reason: The geometry must be cleaned up so as not to face any errors during conversion and ensure that the resulting STL is ready for 3D printing without extensive post-processing.
- Set the Desired Parameters:
- Action: Specify such conversion parameters as tolerance levels, mesh density and resolution. Most software provides an option to set these values based on your needs.
- Reason: By doing so in advance, it allows a balance between file size and model detail which is crucial to realize a high-quality STL file without needless complexity.
- Optimize the Model:
- Action: Simply reduce the complexity of the model whenever possible. This can include reducing number of faces or vertices that would make the model suitable for converting it.
- Reason: Optimization helps in speeding up the conversion process leading to a more manageable STL file especially when dealing with larger models.
How to ensure a smooth conversion process
To make the conversion process smooth from STP to STL, do the following:
- Use Reliable Software:
- Action: Select reputable software tools for creating accurate file conversions such as Fusion 360, FreeCAD, or SOLIDWORKS.
- Why: From trusted software, one is assured of reduced errors and better compatibility with 3D printing standards.
- Adjust Conversion Settings Properly:
- Action: Customize conversion settings like tolerance, mesh density and resolution so that they match your final application requirements.
- Why: Tweak these settings to guarantee that the converted STL file will still have necessary details while maintaining a manageable file size.
- Validate the Converted STL File:
- Action: After converting the file, use STL repair and validation tools to check for any errors like holes in faces , non-manifold edges or intersecting faces.
- Why: Validation tools help detect and correct potential problems thus preparing an error free stl file ready for 3D print.
Converting STP to STL Without Compromising Quality
Importance of Surface Quality
Maintaining surface quality during STP to STL conversion is very important in order to achieve a final product that meets high standards. Start by making sure that the geometry in the STP file is as clean and detailed as possible. Then, utilize advanced settings within the software of your choice to control the resolution and density of a mesh. Try to strike a balance wherein the mesh itself is detailed enough to capture critical features, without becoming too large in size itself. Finally, validate thoroughly and rectify all identified issues before printing defects occur. This meticulousness ensures that original design integrity is preserved on an STL file while enabling smooth 3D printing.
Maintaining model integrity during conversion
There are several crucial steps involved in maintaining model integrity during conversion from STP to STL. Firstly, it’s important to keep the geometrical accuracy of the model intact. This can be achieved through careful adjustment of tessellation settings:
- Tessellation Tolerance: To ensure that mesh accurately follows original geometry, set low tessellation tolerance (usually between 0.01 and 0.001 mm).
- Chordal Deviation: Maintain small chordal deviation which will capture details without increasing file size unnecessarily; commonly used values range around 0.1 mm.
- Angle Control: Set angular control parameter so as to keep smoothness of curved surfaces with typical values ranging from 0.5 up to 1 degree.
Additionally, focus on maintaining topology integrity by:
- Non-Manifold Edges: Non-manifold edges should be avoided because they could result into errors during 3D printing process [6]. Use software tools for checking and repairing non-manifold edges.
- Intersecting Faces: Make sure there are no intersecting faces within your model which can be controlled through validating a model using mesh analysis tool provided by most conversion softwares.
Optimizing file size without losing details
There are several strategies for optimizing the file size of your STL model without sacrificing its detail. One of the main methods is to tune tessellation resolution. Lowering the tessellation resolution reduces the number of triangles used to represent the model, which significantly reduces file size. However, one should be careful not to lower it so much that it affects geometric fidelity in models.
Another good way is utilizing mesh decimation algorithms that reduce overall number of polygons while preserving important characteristics. Many CAD software tools offer these algorithms thus allowing you to adjust a trade-off between detail and file size.
Additionally, eliminating any redundant or irrelevant information that does not contribute to the functionality or visual appeal of a model can also minimize file sizes. In many cases this involves simplifying complex geometries like intricate internal structures which cannot be seen nor required in the end product.
Troubleshooting common conversion issues
In converting 3D models into the STL format, there are certain issues that may happen. The presence of non-manifold edges is among these problems. These kinds of edges create errors in the course of 3D printing. They represent regions where three or more surfaces intersect at a single edge, which results in unclear geometry. In this case, you should make sure that the model is sealed and then check for any non-manifold edges that are present and fix them using CAD tools that are relevant.
File sizes become very large when complex geometries are used making it difficult to handle them. Reducing polygon count and getting rid of unnecessary details will help solve this problem by simplifying your model. Moreover, employing mesh repair software to cleanse up the model and ensure its compliance with STL standards will avert printing mistakes.
Another issue to be considered is scaling as it might bring about size disparities between the intended and actual printed forms. You should always verify if the units employed in your design platform match those needed for printout.. Before exporting to STL convert your units correctly hence avoiding costly errors and ensure your final product has dimensions according to your requirements. By identifying these common challenges you can enhance dependability and standardize the quality of your 3D published items.
Frequently Asked Questions About STP to STL Conversion
What is the purpose of converting STP files to STL format?
Conversion of STP files to STL is important for preparing 3D models for printing. STP files are commonly used in design and engineering processes because they provide detailed representations of 3D objects, whereas most 3D printers use the STL file format. The reason why this conversion process takes place is to ensure that the model can be processed properly by the printing hardware and software.
What software can be used for converting STP to STL?
STP files can be converted into STL format using various software tools. CAD software like Autodesk Fusion 360, SolidWorks, as well as free online converters are some of the popular options available. Each tool may have distinct features such as mesh repair or file optimization that help in converting successfully.
How do I ensure my model remains accurate during the conversion process?
To retain accuracy of your model during conversion process always check export settings in your converter software. Ensure that dimensions and units of measurement are correctly set for your model and see whether there is non-manifold edges on the model’s surface. Reducing complex geometry can also help with accuracy without losing too much detail.
What common issues should I watch for when converting STP to STL?
How can I optimize the STL file for 3D printing?
For optimization of the STL file for 3D printing, decrease the number of polygons where possible, remove unnecessary details and ensure that the model complies with STL standards using mesh repair tools. It will make the file size more manageable and increase reliability as well as quality of printed model.
Can I convert STP to STL online for free?
Yes indeed, you can convert STP to STL online at no cost through a range of web-based applications. These internet-based converters are often easy to navigate and require no installations. Some of these options include: Autodesk’s online STL converter; AnyConv; MakePrintable.
Optimum parameters for your STP file when using these online tools should be:
- File Size: Large STP files may take longer time to upload and process check platform maximum file size.
- Geometry: Ensure that your model is water tight; thus no non-manifold edges; this will enable the conversion tool generate valid 3D printable stl files.
- Units and Scaling: Verify in case the units used in your STP files match those required by your stl files so that there are no scaling conflicts.
- Simplification: Making complex geometry simpler while keeping important details will make it easier to handle this document.
What to do if your STL file doesn’t look right post-conversion?
The steps to consider when your STL file is not looking great post-conversion are as follows:
- Check for Errors: Employ software like Meshmixer or Netfabb, which can help in identifying and fixing common issues such as holes, non-manifold edges or even flipped normals. These tools will identify and correct a lot of problems, ensuring that your model is printable.
- Validate Geometry: Confirm that the geometry is watertight and has no non-manifold edges. Most 3D printing software includes a feature to verify and correct the geometry of the model.
- Re-evaluate Scale and Units: Make sure scale and units used in the STL file are consistent with your 3D printer’s requirements. Units mismatch would lead to parts being too large or too small.
- Reduce Complexity: Simplify the model so that the polygon count is reduced while necessary details are still retained. This also helps in managing file size and improving print quality.
This way, you can resolve most issues that arise during conversion of STL files such as these, which eventually lead to successful 3D prints.
Why convert your STP files to STL? Understanding the benefits
Converting STP files into STL has several advantages especially for those engaged in 3D printing technology including rapid prototyping. Primarily, STL is widely accepted format for 3D printers thus making it compatible with almost all of them if not every one of them together with their slicing programs for this process. This simplifies workflow using different hardware or software platforms by making it possible to exchange files between them using STL format.
Secondly, compared to STP files, usually lighter in nature than STP files; they use a simpler mesh-based format that reduces file size and complexity making management tasks easier as well as speeding up processing time accordingly. This aspect becomes more beneficial when we deal with high resolution model because it can reduce printing and slicing time to a greater extent.
Lastly, converting to STL helps in preserving the vital details necessary for accurate prints. Although STP files are best suited for detailed CAD work and have got vast metadata, STL files only focus on the external geometry which is of extreme importance while producing accurate physical objects. Therefore, conversion to STL guarantees that right data is there leaving out what should not be in 3D printing.
With these benefits in mind, your 3D printing process will become more efficient leading to better results that you can rely on.
Advanced Tips for Professionals: Enhancing Your STL Files Post-Conversion
For bettering your STL files post-conversion, consider the following advanced tips:
- Mesh Repair and Optimization: Specialized software such as Meshmixer or Netfabb can be used to identify and fix any errors in the mesh. This could mean closure of holes, optimizing the density of mesh, removal of redundant vertices etc. which in turn will make sure that the model is watertight.
- Reducing Poly Count: Make your 3D printer’s job easier by simplifying your mesh but without compromising detail. For instance, one can use options like Blender or Simplify3D that allow decimation of mesh to lower polygon count without necessarily changing the structure.
- Smoothing and Refinement: Apply smoothing algorithms to refine surface of you STL files; this helps minimize layer lines during printing thereby improving final print quality. ZBrush or 3D-Coat programs are particularly effective in this case.
- Scaling and Units Adjustment: Ensure correct scaling and proper units setting on your STL file so that it matches with printer specifications. This prevents size discrepancy between designed model and printout.
- Adding Supports and Braces: Add custom supports or braces as needed. Though slicing software might do this automatically, using personalized supports often yields a cleaner print with less finish work needed afterwards.
Improving the printability of your STL files
To make your STL files easier to print, it is essential to focus on some technical aspects. Here are brief answers and parameters for each of these significant areas:
- Mesh Repair and Optimization:
- Software: Meshmixer, Netfabb
- Parameters: Check and repair holes, ensure watertight models, optimize mesh density, remove redundant vertices.
- Justification: Clear mesh without errors prevents printing failures and improves the overall model integrity.
- Reducing Poly Count:
- Software: Blender, Simplify3D
- Parameters: Target a polygon count that balances detail with printer capacity (e.g., reduce high-poly models to under 100,000 polygons without significant detail loss).
- Justification: Lower number of polygons in models makes them easier for 3D printers to process; thus, shortening the time of printing as well as minimizing the likelihood of mistakes while doing so.
- Smoothing and Refinement:
- Software: ZBrush, 3D-Coat
- Parameters: Apply smoothing algorithms and adjust mesh resolution as needed (e.g., Laplacian smooth for minor refinements).
- Justification: A few layer lines decrease upon having smoother surfaces in prints hence making them look better artistically.
- Scaling and Units Adjustment:
- Software: Any CAD software or slicer with scaling functionalities
- Parameters: Confirm that the dimensions and units (mm, cm, inches) match the printer’s specifications.
- Justification: Precise scaling guarantees that the printed object has accurate design sizes without any deviations in measurement.
- Adding Supports and Braces:
- Software: Custom supports can be added in Meshmixer or directly in slicing software.
- Parameters: Optimize support density and placement to balance stability and ease of removal (e.g., support infill density of 10-20%).
- Justification: Well-positioned supports prevent print fails on overhangs as well as delicate features leading to cleaner prints with less post-processing required.
Using CAD software to edit STL files
To 3D printing enthusiasts especially, it is now necessary to have the ability to edit STL files using CAD software. Below is a brief guide on how best to approach this as per current top resources available online
- Importing the STL File:
- Software: The majority of CAD software packages such as Tinkercad, Fusion 360 or Meshmixer can easily import STL files.
- Procedure: In the preferred program select the import option and load your STL file. Some programs also have an automatic repair function that corrects minor errors during importing.
- Modifying the Geometry:
- Techniques: One can perform modifications by way of scaling, rotating, or moving sections of the design. For instance, advanced tools allow for minute alterations like changing single vertices just, edges or faces and even adding new geometry to the model.
- Commands: Utilize commands such as ‘Boolean’, ‘Cut’, ‘Extrude’, ‘Smooth’, and ‘Split’ to reshape and refine your model.
- Repair and Optimisation:
- Software: Tools like Meshmixer, Netfabb, and FreeCAD offer powerful repair and optimisation features.
- Procedure: Non-manifold edges could be fixed with these tools, holes in meshes patched up, intersecting faces resolved too. While maintaining detail through polygon count reduction for smoother prints that are faster.
Converting STL to other file formats for diverse applications
By converting STL files to other formats, the range possible applications in industries including, animation, simulations and advanced manufacturing. Here is a brief guideline based on the top-rated online resources available:
- Choosing the Right Software:
- Blender: Blender is a free open-source tool that has several file format conversion options. Import your STL file and export it as OBJ, FBX or COLLADA.
- MeshLab: This program allows for versatile conversions. You can convert your STL file into other 3D formats such as PLY, 3DS or DAE.
- Autodesk Fusion 360: It is known for its professional-grade capabilities.Fusion 360 enables seamless conversion of STL files to other formats such as STEP and IGES which are widely used in engineering and manufacturing.Load your model from the stl file you have and use Export option to turn it into any other form like STEP or IGES which are extensively used in engineering design and manufacturing.
- Conversion Process:
- Importing and Preparing: Load the chosen software and import the STL file. Make sure that orientation is correct for this model so as to do any repairs if necessary.
- Exporting: Go to Export or Save As option then chose the required format of data. Configure export parameters so that they meet requirements of intended application while preserving integrity of this object type.
Top Tools and Software for STP to STL Conversion
In terms of converting STP (STEP) files to STL format, there are several tools and software that can do this task effectively. Here is a basic guide on some of the leading options;
- Autodesk Fusion 360:
- Fusion 360 is known for its extensive CAD capabilities. One only needs to import an STP file, make necessary adjustments and use export option in order to export it as an STL file.
- SolidWorks:
- For complex models, this professional-grade CAD software works wonders. Open STP file in Solid Works and if needed repair or modify model using built-in options and save it in STL format.
- FreeCAD:
- FreeCAD is an open-source alternative that supports several types of files. Import your STP into FreeCAD, apply any modifications required and then export out as an STL file
- CATIA:
- The CATIA software also has engineering and design capabilities which allow easy transformation from STP to STL. Simply optimize the model as necessary after opening the step files then save it as stl.
Comparing free vs. paid STL converters
Several things should be considered when making a choice between free and paid STL converters, such as cost, features, ease of use and support. Let’s compare their pros and cons along with some technical parameters.
Free STL Converters
Pros:
- Cost: Unlike paid software, there is no fee for using FreeCAD or similar applications and this makes it possible for individuals that are into hobby and small businesses to use them.
- Accessibility: There are numerous open source solutions that can be found and downloaded easily.
- Community Support: In addition, these free tools normally have a strong network of users who can help and provide advice.
Cons:
- Limited Features: Basic free conversion programs may lack more advanced tools available in the paid versions like complex repair methodologies or optimization.
- Performance: However they might not perform well on large files or when speed is required.
- Support: Normally, community forums rather than customer service are used by the open-source tools for help.
Technical Parameters:
- File Size Limitations: Some freely available tools may have difficulties processing very large files.
- Supported Formats: They mostly deal with few formats compared to paid alternatives.
- Update Frequency: The updates and new feature releases may also be infrequent in this case.
Paid STL Converters
Pros:
- Advanced Features: Autodesk Fusion 360 (paid) has a detailed model repair tool that includes mesh optimization capability in addition to high quality export options while SolidWorks (paid) also offers these features as part of its advanced capabilities.
- Performance: These tools are typically more robust, handling complex and large files more efficiently.
- Professional Support: Access to professional customer support services and regular updates.
Cons:
- Cost: On the other hand, it should be noted that the prices can be quite high, making this option unaffordable for personal use or small businesses.
- Complexity: They are more sophisticated tools which require understanding how to exploit them properly before they can help you accomplish what you need.
Technical Parameters:
- Performance Capability: Handles large and complex files with ease.
- Advanced Repair Tools: Include features for detailed repair and optimization of models before conversion.
- Supported Formats: Support a wider range of input and output formats, which can be crucial for specific project requirements.
- Regular Updates: Frequent updates and new features to keep the software current.
Software recommendations for professionals and hobbyists
Based on the latest reports from major websites, here are the best software recommendations for both professionals and hobbyists:
- Autodesk Fusion 360
- Professional Use: This tool is well known for its advanced design and engineering capabilities. It contains a range of tools that make it suitable for 3D modeling, simulation and collaboration thereby suited to detailed and large projects.
- Hobbyist Use: Although Fusion 360 is a professional-grade tool, it has free personal use license with rich features that can be used by hobbyists who want to explore complex designs without any financial commitment.
- Blender
- Professional Use: Blender is an open source software that is highly functional in modeling, rigging, animation as well as simulation; thus this implies professionals can develop their 3-D models extensively with complexity.
- Hobbyist Use: Being free Blender is perfect for hobbyists. Its extensive community support and comprehensive tutorials make it accessible to beginners looking to learn 3D modeling and animation.
- TinkerCAD
- Professional Use: TinkerCAD being less complicated than others can be used for simple prototyping purposes or educational purposes within a professional setting.
- Hobbyist Use: TinkerCAD’s user-friendly interface and easy design tools make it an excellent choice for beginners and hobbyists. It’s good point if you are new in designing in 3-D or you want to print something in 3-D.
How to download and install STL converters
To commence with the STL converters, one must follow these simple instructions to download and install the most popular options that are available today:
- MeshLab
- Download: Go to the official MeshLab website (meshlab.net) and navigate to the download page.
- Install: Select suitable version according to your operating systems such as Windows, Mac OS or Linux and then click on download link. Once you have finished downloading it, run an installer and go through a step by step procedure of installation.
- FreeCAD
- Download: Visit FreeCAD webpage at freecadweb.org from where you can get a link for downloading.
- Install: Choose your computer’s operating system properly then select its respective installer. Open that downloaded file and abide by all those prompts during installation process; hence, FreeCAD will be successfully installed in your PC.
- Fusion 360
- Download: If not registered yet create an account with Autodesk Fusion 360 site (autodesk.com/products/fusion-360). Then navigate to downloads section.
- Install: Download the specific installer for your operating system. After you have downloaded it open up the installer and perform the guided installation steps including signing into your Autodesk account as part of this process.
Reference sources
- Source 1: All3DP – How to Convert STEP Files to STL
-
- Summary: This online article provides a comprehensive guide on converting STEP files to STL format. It explains the process step-by-step, focusing on exporting directly from CAD programs to STL files. The article is user-friendly and suitable for beginners looking to understand the conversion process easily.
- Link: How to Convert STEP Files to STL
- Source 2: Spatial’s Blog – STEP to STL: How to Convert STEP Files to STL
-
- Summary: In this blog post, Spatial’s Blog offers specific instructions on converting STEP files to STL using OnShape software. The post emphasizes a simple approach by opening the STEP file in OnShape, selecting the export option, and choosing the STL file format. This detailed guide is practical for users seeking a direct method for conversion.
- Link: STEP to STL: How to Convert STEP Files to STL
- Source 3: Extreme Molding – STL vs STP File Types: What’s the Difference & Which to Use
-
- Summary: Extreme Molding’s blog post compares STL and STP file types, highlighting their differences and intended uses. The article delves into the specifics, explaining that STP files are ideal for exchanging detailed product data between CAD software. This comparison helps readers understand the distinct purposes of STL and STP formats, aiding them in choosing the appropriate file type for their projects.
- Link: STL vs STP File Types: What’s the Difference & Which to Use
Frequently Asked Questions (FAQs)
Q: What is the process to convert Step to STL for 3D printing?
A: To convert a Step file to STL, you typically need a file converter software where you select the Step file you wish to convert, and then choose STL as the output format. After the conversion, you should download your STL file to use in slicer software for 3D printing. Some converters allow you to do this directly online for free.
Q: Can I convert Step to STL for free using an online converter?
A: Yes, there are several free online converters available that can convert a Step file to STL format. Simply upload your Step file, select STL as the target format, and the online file converter will process the file. Once the conversion is complete, you can download your STL file directly.
Q: How do I select the Step file I want to convert to STL?
A: To select the Step file for conversion, use the file selection tool provided by the file converter software or online service. Click ‘Select the file’ or a similar prompt, then navigate to the folder containing your Step file, select it, and proceed with the conversion process.
Q: Are STL and STP files the same, and can both be used for CNC machining?
A: STL and STP files are not the same. STL stands for Standard Triangle Language and is mainly used for 3D printing, representing 3D models as a series of interconnected triangles. STP (or STEP) files store more complex 3D data in a vector format that is used across different CAD (Computer-Aided Design) applications. While both can be used for CNC machining, STP is more versatile for engineering purposes due to its ability to contain more detailed metadata about the 3D model.
Q: What are the benefits of converting Step format to STL format?
A: Converting Step format to STL format is essential for 3D printing projects since STL files are commonly used in 3D printing services. They can create the most accurate and detailed physical models by allowing for the slicing of the 3D model into layers that a 3D printer can print. Additionally, STL files are supported by a wide range of 3D editing software, making them highly versatile for 3D printing applications.
Q: Is it necessary to download additional software to convert a Step file to STL?
A: While many online services allow you to convert Step files to STL without the need to download anything, for more advanced features or converting large files, it might be beneficial to download dedicated conversion software. Such software can offer more conversion options, advanced settings for your STL file, and sometimes higher conversion speeds.
Q: How long do I have to download my STL file after converting it from Step?
A: The availability period for downloading your STL file after conversion depends on the service or software used. Some online converters provide a download link that will expire after a certain period, typically 24 hours. Make sure to download your STL file soon after conversion to avoid losing access to it.
Q: Can converted STL files from Step be used directly in CNC machining or do they require further modifications?
A: Converted STL files from Step format can often be used directly for CNC machining, especially for simpler projects. However, for more complex parts or precision machining, the STL file may require further modifications or optimization in a 3D CAD or editing software to ensure the final product meets the required specifications.