
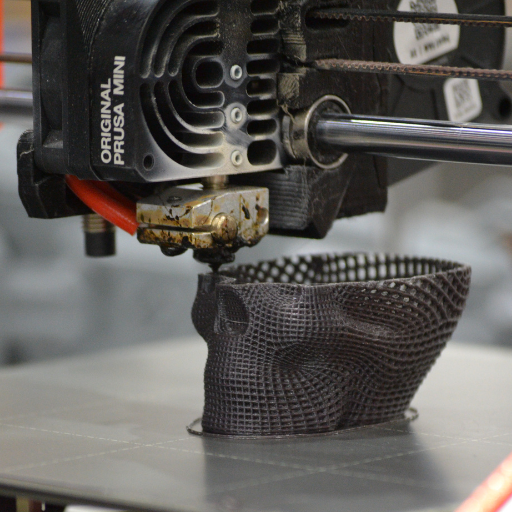
What is a 3D Printing Slicer and Why Do You Need It?
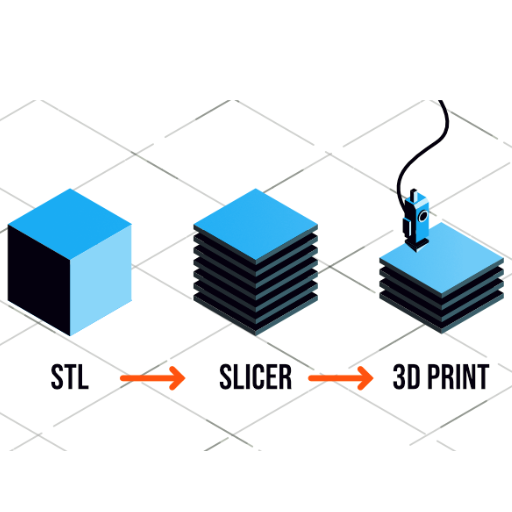
Image source: https://fabheads.com/
A 3D print slicer is a software which converts 3D models to G-code, as well as a set of instructions through which the 3D printer understands and prints. The slicer basically divides the digital model into thin horizontal layers and determines the way in which each layer will be constructed by the printer nozzle. You need a slicer since it optimizes printing parameters such as layer height, print speed, and supports to ensure that your final print is accurate and efficient. It would be almost impossible to convert a digital design into something tangible without using a slicer.
Understanding the Role of a 3D Print Slicer
To understand what role it plays in 3D printing, one needs to appreciate its major functions with regard to building an object on a printer. In other words, a “slicer” takes data from 3-D computer-aided design (CAD) drawings or models created in other ways and translates this information into G code language readable by printers for generating physical objects layer by layer. The main technical parameters and features are outlined below while their justification for producing high-quality prints is given:
- Layer Height: This refers to how thick each slice should be. A thinner slice height (e.g., 0.1mm) gives more detailed output but takes longer whereas higher heights (e.g.,0.3mm) reduce time of printing at the expense of quality finish.
- Print Speed: How fast the nozzle moves across the bed affects its accuracy. Increased speeds may lead to faster manufacturing but could cause some inaccuracies like stringing; besides slower movement frequently enhances quality particularly when dealing with complex shapes.
- Infill Density: Indicates how much material fills up inside an object’s structure. Standard fill percentages range from twenty percent up to hundred percent; however increased density results in stronger pieces while also consuming more materials per time of printing.
- Support Structures: These assistances are essential where overhanging or complex geometries are present and hence maintaining stability in the course of printing. Thus the slicer calculates their placement as well as making them easily removable after printing.
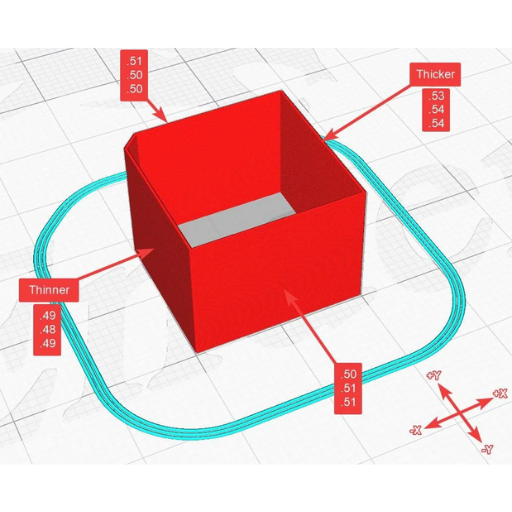
- Shell Thickness: The number of boundaries or perimeters is also referred to as shell thickness. Thicker walls can create more strength and better surface finish but they will increase print time and material consumption.
- Retraction: This setting controls when filament is withdrawn during non-print moves, which stops oozing and stringing. Your prints would stay clean if you use appropriate retraction settings.
- Temperature Settings: Adjusting nozzle and bed temperatures based on filament type ensures proper adhesion, reduces warping, and improves overall print quality.
- Cooling: For instance, if a material is prone to warping or layer delamination, the slicer adapts the cooling fan speed accordingly.
How 3D Slicer Software Converts STL to G-Code
There are several steps involved in converting an STL file to G-code, as indicated by the leading sources:
- Loading the STL File: The process starts with importing the STL file that is a digital representation of a 3D model into slicer software.
- Model Analysis: That software examines different geometrical aspects such as size, shape and structural design of the model. This step makes sure that it’s printable and may also help suggest what way it must be printed.
- Setting Print Parameters: Users set various print settings like layer height, infill density, support structures and temperature for particular needs and materials.
- Slicing the Model: Slicer software then takes the 3D model bringing out thin horizontal layers. Thus, through this slicing technique, 3D geometry is converted into series of 2D cross-sections.
- G-Code Generation: Every layer is turned into g-code instructions. These instructions tell a 3D printer how to move build material including extruding filament so that it solidifies each deposited layer.
- Preview and Optimization: Users will sometimes check the accuracy of G-code before finalizing its generation.Some slicers offer optimization features to enhance print quality and efficiency
Benefits of Using a Good Slicer for Your 3D Printer
How to Choose the Best 3D Printing Slicer Software?
In the selection of the finest 3D printing slicer software, consider the below:
- Compatibility: Make sure that the slicer is compatible with your specific 3D printer model and that it supports file formats you use most often.
- User Interface: Find software which has a user friendly interface and is intuitive to improve your workflow.
- Features: Assess different software packages for a range of features like advanced print settings, customization options, optimization tools etc.
- Community and Support: Opt for programs having an active user community, in-depth documentation and dependable customer support.
- Cost: Compare prices of different slicers on the basis of free versions with basic characteristics against paid versions that are more expensive but have advanced capabilities.
Key Features to Look for in a 3D Slicer Software
In the selection of 3D slicer software, specific features and capabilities are worth considering for a better 3D printing experience. According to reliable sources:
- Ease of Use: Crucial is a user interface which is easy to use, navigate easily. For beginners, software with simple controls and explicit instructions will be the best.
- Customization Options: Fine-tuning various parameters like layer height, print speed or infill density that determine the desired quality of printing can only be achieved through advanced customization settings.
- Preview and Simulation: It helps in identifying any possible issues before starting real printing when it has a function of previewing slicing process as well as simulating thereby printing path.
- Support Structures: This really matters when your design is complex by all means and you need support structures that can be gotten rid of post-printing without damaging the final object.
- Performance and Speed: If it can handle large files quickly while optimizing the print path for faster, more efficient printouts this would save time and resources.
- Multi-Material and Multi-Color Printing: Thus, confirm that your slicer software can perfectly operate these options in case your 3D printer allows multi-material or multi-color printing.
- Regular Updates and Community Support: Go for that one that gets regular updates to keep enjoying its use plus having a community following it up because this ensures you get new features immediately they are released also making all problems facing it attended to instantly.
Comparing Popular 3D Slicer Software: Cura, PrusaSlicer, and Simplify3D
Cura: Cura is a 3D printer slicing software developed by Ultimaker and it ranks among the most used slicers worldwide due to its user-friendly interface and powerful features which are suited for both beginners and experts in 3D printing. It has a large community support group, and is compatible with many types of 3D printers. For instance, there are several advanced customization options available such as multiple extruder support, continually updated with new features and improvements.
PrusaSlicer: PrusaSlicer enhanced heavily upon the open source Slic3r software initially. The slicer works best with the brand’s own machines but can also be used on other models too. When it comes to Prusa printers, this slicer has good integration with them that is often improved through incorporating views from customers into newer versions. Always updated in response to users’ suggestions or whenever there are new releases of versions.
Simplify3D: Simplify3D is renowned for its high-end product which is strongly identified with its superior slicing power and complete dominance over print settings. It may cost you but offers variable layer heights, customizable supports and lots of compatible printers amongst other things. On top of that, it does a detailed simulation of a print job to help you achieve prints that are done efficiently while at the same time optimizing print paths leading to excellent quality printing.
By a thorough analysis of what Cura, PrusaSlicer, and Simplify3D stand for including their unique benefits; one should select ideal software depending on his/her specific requirements in order to improve their 3d printing skills.
Evaluating Open Source vs. Proprietary 3D Slicing Software
How to Optimize Your 3D Prints with Slicer Settings?
Adjusting Layer Height and Print Speed for Optimal Results
The key to achieve the greatest outcomes in 3D printing is adjusting the layer height. Smaller heights will however result into more details while the larger ones will make it rougher. Conversely, large values of hspeed up the process of fabricating though some details may be lost.
The layer misalignment, poor surface quality and weak bonding between layers are usually resultant from fast printing rates. On the other hand, if you print to slowly you can experience long times of the prints and issues with filament flow along with melting.
That carrying out test prints at various speeds and layer heights enables you to determine what settings work best for your specific printer and filament. Balancing these two factors ensures that your 3D prints are high quality and produced within a short span.
Optimizing Infill Settings for Various 3D Models
When optimizing infill settings for different 3D models, there are factors to consider such as the model type, level of strength expected, purpose of printing. All3DP claims that modifying infill density and pattern can greatly affect the strength and weight of a printed object. High infill densities make stronger parts but also result in longer print times and more materials used. Some common grid patterns are grid, honeycomb, and triangle; each with its own compromise between strength and efficiency.
The infill pattern should be changed depending on what is being printed. For instance, a simple grid pattern may work best for fast prints requiring moderate strength while a complex dense gyroid pattern might be better suited for functional parts where they need more robustness.
Lastly, That with larger prints which do not require much strength it would be advisable to use lower infill density in order to save filament while still maintaining the structural integrity of the print. On other hand if the part will experience high stress or it is load bearing then higher infill density coupled with a strong pattern is vital. Additionally, trying various combinations of these settings as well as doing some test prints can assist you in finding out what suits your specific printing requirements the most.
Enhancing Print Quality with Proper Support Structures
The most important thing in achieving successful 3D prints is through enhancing the quality of print by using proper support structures, especially in complex geometries or overhangs. These settings that can be material, density and pattern on supports may greatly affect how easy it will be to remove the print from the bed and surface finish of your printed part according to 3D Hubs. For example, dissolvable supports or supports with same materials as those used for printing can provide a necessary backing without lowering its quality.
Suggests reducing post-processing workloads by minimizing contacts between support and part. This process is made more efficient when we consider factors such as customizing locations for these structures, adjusting angles and using break-away supports which will make it easier to get rid of support but not lose out on small details.
Lastly, That automatic support creation tools are better used by adapting their density and pattern to suit every twist of a model. An instance is where tree-like supports prove beneficial in complexity print because they save on materials while providing enough support.Carefully balancing settings of your support architecture guarantees good print quality, resource economy as well as smooth aftertreatment operation.
Steps to Slice a 3D Model Using Popular Slicer Software
After designing or creating a 3D model, it must be transformed into thin layers that form G-code files for 3D printers. Here is how to slice your model using popular slicer software:
- Import Your 3D Model:
This involves opening a preferred slicer (Cura, PrusaSlicer or Simplify3D) and importing the model file which usually comes in STL or OBJ format.
- Position and Scale:
Ensure that the model fits within the printer’s build volume by positioning it on the virtual build plate. You can use scaling tools to resize it if necessary.
- Select Print Settings:
Printing speed, layer height, infill density and support options are some of the settings you will have to specify after selecting this option. These parameters can significantly affect print quality as well as durability .
- Configure Support Structures:
Where necessary, enable and configure support structures. Use any of these slicers’ support generation tools in order to customize placement and patterns for support depending on how intricate the design is.
- Set Material and Extruder Settings:
These include specifying material type as well as configuring extruder settings like temperature or flow rate so that you can match with filament being used.
- Generate G-code:
Once all settings have been adjusted click ‘slice’ or ‘generate g-code’. The software will process your object so that its data describing every move could be written down in a G-code file.
- Preview and Save:
Check slicing preview for errors before saving this to SD card or directly transferring into your printer; save it onto an SD card or transfer it directly to your machine.
- Start Printing:
Load up the G-code file into your 3D printer and begin printing procedure. Observe adhesion during initial layers making changes when necessary.
Common Problems and Troubleshooting Tips in 3D Slicing
Filament Jamming
Jamming of filament is an issue that frequently arises when the filament becomes stuck and blocks the nozzle. For this reason, make sure that the spool carrying filament is properly installed to allow it unwind smoothly. In addition, regularly clean your nozzle and also check for any clogs or debris.
Warping and Curling
Warping refers to situations where print edges lift off the plate creating distorted models. To prevent this from happening, ensure that your build plate is flat and uniformly heated. Use adhesive materials like glue sticks or painter’s tape also enhance adhesion.
Stringing and Oozing
Stringing occurs when there are small strands of filament material left behind between different parts of a model. Change retraction settings in slicer software in order to minimize this problem. Additionally, ensuring proper calibration of print temperature as well as flow rate can help reduce stringing.
Layer Shifting
Layer shifting causes layers to misalign which may spoil a printout completely. For this reason, see if belts along with pulleys are tight enough while ensuring printer frame stability. You can also slow down printing speed for more complex or taller models.
Inconsistent Extrusion
Inconsistent extrusions could have higher or lower volume thereby affecting quality of printed works. Therefore, calibrate E-steps for the extruder millimeters per step as well as filaments diameter within situational software.
Reference sources
-
All3DP – Best 3D Slicer Software for 2024
- All3DP offers a comprehensive review of the best 3D slicer software available, analyzing their features, performance, compatibility, and user experiences. This resource provides an in-depth comparison to help users select the most suitable slicer for their needs.
- Source: All3DP
-
MatterHackers – Choosing the Right 3D Slicer: A Guide for Beginners and Experts
- MatterHackers provides a detailed guide on selecting the right 3D slicer, covering key factors such as functionality, ease of use, and the specific needs of different types of users. This resource is valuable for both beginners and experienced users.
- Source: MatterHackers
-
Simplify3D – How to Choose the Best 3D Slicer Software
- Simplify3D offers an expert perspective on what to look for when choosing 3D slicer software. The guide covers essential features, performance benchmarks, and practical tips for making an informed decision based on specific printing requirements.
- Source: Simplify3D
Frequently Asked Questions (FAQs)
Q: What is a 3D printer slicer and why is it important?
A: A 3D printer slicer is a crucial software tool that converts 3D CAD models into instructions for the printer, often in the form of g-code files. It determines how the 3D object will be printed layer by layer, ensuring precise and efficient printing.
Q: What features should I look for in a 3D printer slicer?
A: When selecting a 3D printer slicer, consider features such as user interface, compatibility with your printer, support for a range of 3D file formats, visualization tools, and availability of advanced settings for fine-tuning print quality.
Q: How does PrusaSlicer compare to other slicers like Chitubox and IdeaMaker?
A: PrusaSlicer is known for its robust feature set and compatibility with many 3D printers, including Prusa models. Chitubox is favored for resin printing due to its detailed preview capabilities. IdeaMaker offers a balanced mix of simplicity and advanced features, making it suitable for both beginners and experienced users.
Q: Can I use a slicer on a Raspberry Pi?
A: Yes, you can use some slicers on a Raspberry Pi. For example, OctoPrint is a popular option that can be installed on a Raspberry Pi, providing remote control and monitoring capabilities, along with slicing using plugins.
Q: What is the significance of a slicer’s analytics tools?
A: Analytics tools in a slicer provide valuable real-time data and insights into the printing process. They can help identify issues, optimize print settings, and improve the overall quality and efficiency of 3D printing.
Q: How do I choose between multiple slicers available on the market?
A: Consider your specific printer needs, the types of 3D objects you print, and your skill level. Free slicer options might be sufficient for beginners, while advanced users might prefer slicers with more customization options and better support for complex prints.
Q: What role does the preview function play in a 3D printer slicer?
A: The preview function allows users to visualize how the 3D object will be printed. This helps in identifying potential issues, optimizing the toolpath, and ensuring that the print adheres to the desired specifications before starting the print.
Q: How important is the user interface in a slicer in 3D printing?
A: A user-friendly interface is critical because it can significantly affect your workflow and ease of use. A well-designed interface facilitates quicker setup, easier adjustments, and a smoother overall experience, especially for those new to the world of 3D printing.
Q: Are there open-source 3D printing slicers available?
A: Yes, there are several open-source 3D printing slicers available, such as Slic3r and Cura. These slicers offer extensive customization options and are supported by active communities, making them a good choice for users who want to modify and tweak their slicing process.
Q: What is the difference between FDM and resin slicers?
A: FDM slicers are designed for FDM printers and focus on layer-by-layer deposition of filament. Resin slicers, on the other hand, are tailored for resin printers and provide features like support structure generation and precise control over exposure settings. The choice of slicer depends on the type of 3D printing technology you are using.