Injection molding is a pivotal process in manufacturing a multitude of plastic products, ranging from everyday household items to intricate components used in various industrial applications. This guide aims to provide a comprehensive understanding of injection mold tools and the plastic injection molding process. We will explore the fundamental principles, key stages involved, types of materials used, and the significant role that mold tools play in shaping a final product. This article is designed to equip readers with the essential knowledge required to appreciate the complexities and advantages of injection molding, offering insights into best practices and advancements in the field. Whether you are a seasoned professional or new to the topic, this guide will serve as a valuable resource for understanding the intricacies of one of the most versatile and widely-used manufacturing techniques today.
What is an Injection Mold Tool?
Reference sources:https://cn.bing.com/
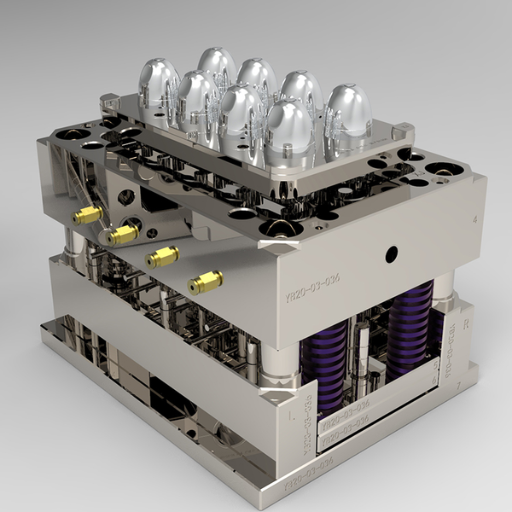
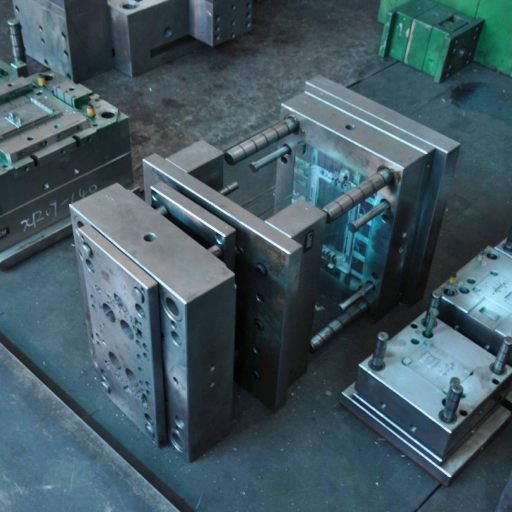
From my exploration of the topic, an injection mold tool is a specialized piece of equipment essential in the plastic injection molding process. It consists of two main halves, known as the mold core and mold cavity. These halves come together within a molding machine where molten plastic is injected into the mold cavity, taking the shape of the desired part as it cools and solidifies. The precision and quality of the mold tool directly influence the accuracy and finish of the produced parts, making it a critical component in manufacturing complex and high-quality plastic products.
Types of Injection Mold Tools
Injection mold tools can be categorized into several types, each designed for specific applications and production needs. The main types include:
- Prototype Molds:
- Purpose: Used for producing limited quantities to test designs before full-scale production.
- Materials: Often made from aluminium or softer steel for quick and cost-effective manufacturing.
- Typical Lifespan: 500 to 10,000 cycles.
- Production Molds:
- Purpose: Built for long-term, high-volume production.
- Materials: Usually crafted from hardened steel to endure extensive use.
- Typical Lifespan: 100,000 cycles or more, depending on maintenance and material quality.
- Family Mold Tools:
- Purpose: Allows multiple parts of similar size and material to be produced simultaneously within one cycle.
- Configuration: Multiple cavities designed for different parts.
- Benefit: Reduces production time and cost.
- Unscrewing Molds:
- Purpose: Employed for creating threaded parts.
- Mechanism: Features a mechanical or hydraulic system to unscrew parts from the mold.
- Technical Parameter: Requires precise threading alignment and fine control over demolding actions.
- Hot Runner Molds:
- Purpose: Utilizes heated channels to keep the plastic in a molten state.
- Advantage: Minimizes waste and reduces cycle time.
- Technical Parameter: Temperature control systems are essential to maintain consistent flow and quality.
- Cold Runner Molds:
- Purpose: Relies on cooled channels where the plastic solidifies between shots.
- Configuration: Simpler and more economical than hot runner systems but generates more waste.
- Technical Parameter: Requires effective management of cooling rates to optimize cycle time.
Understanding the specific requirements and benefits of each type of injection mold tool is crucial for selecting the right tool for your manufacturing needs. Each type offers distinctive advantages and involves different technical considerations, which can significantly impact the efficiency and quality of the production process.
How Injection Molding Tools Work
Injection molding tools function by injecting molten plastic into a mold cavity, which then cools and solidifies to form the final part. Here’s a concise explanation of the process:
- Clamping: The process starts with clamping the mold using a clamping unit to ensure it remains closed securely during injection.
- Injection: The plastic material, typically in pellet form, is heated until it reaches a molten state. This molten plastic is then injected into the mold cavity through a nozzle at high pressure.
- Cooling: Once injected, the plastic begins to cool and solidify, taking the shape of the mold cavity.
- Ejection: After the plastic has sufficiently cooled and solidified, the mold opens, and an ejection system pushes the final part out of the mold cavity.
- Repeat: The process then repeats for the next cycle.
Through these steps, injection molding tools enable the efficient and precise production of complex plastic parts, making them integral to modern manufacturing.
Importance of Quality in Injection Mold Tooling
Quality in injection mold tooling is paramount for several reasons. Firstly, high-quality molds ensure consistent production of parts with precise dimensions and superior surface finishes, which is crucial for meeting stringent industry standards and customer expectations. Secondly, durable and well-designed molds reduce the frequency of maintenance and downtime, thereby enhancing overall manufacturing efficiency and reducing costs associated with repairs and replacements. Additionally, superior mold construction can improve cycle times and energy efficiency, contributing to a more sustainable production process. Investing in quality tooling ultimately leads to higher productivity, longer tool life, and better end products, making it a critical factor in the success of any injection molding operation.
How to Choose the Right Plastic Injection Mold Tooling Material?
Choosing the right plastic injection mold tooling material involves considering several critical factors to ensure optimal performance and longevity of the tool. These factors include:
1. Mechanical Properties
- Hardness: The material should have adequate hardness to withstand the molding pressure and maintain parting line integrity. Higher Rockwell hardness (HRC > 50) is often preferred for long-term durability.
- Toughness: Adequate toughness is necessary to resist cracking and withstand the mechanical shocks during the ejection phase. Materials like maraging steel offer good balance between toughness and strength.
2. Thermal Properties
- Thermal Conductivity: High thermal conductivity materials, such as beryllium copper alloys, facilitate rapid and uniform cooling of the molded parts, improving cycle times and part quality.
- Thermal Expansion: Low thermal expansion materials help maintain dimensional stability under varying temperature conditions, such as A2 and D2 steel grades.
3. Wear Resistance
- Abrasion Resistance: Harder materials like H13 tool steel are preferred for molding abrasive or glass-reinforced plastics to reduce wear and extend tool life.
- Corrosion Resistance: For molding materials that release corrosive byproducts, stainless steels like 420 or 440C should be considered to prevent rust and pitting.
4. Workability
- Machinability: Ease of machining is important for the initial tool fabrication and any subsequent modifications. P20 steel is a popular choice due to its excellent machinability.
- Weldability: The material should be weldable for easy repair and maintenance, with steel grades like NAK80 known for their weldability.
5. Cost Considerations
- Initial Cost: The upfront cost of the material must align with budget constraints while still meeting technical requirements. P20 and H13 steels offer good performance at moderate costs.
- Long-term Cost: Consider total cost over the tool’s lifespan, including maintenance, productivity gains, and potential impact on part quality.
Choosing the right material involves balancing these factors based on specific application requirements and production volume. Consulting with material specialists and conducting cost-benefit analyses are also recommended to make an informed decision.
Common Tooling Materials for Molds
To concisely answer the questions regarding material selection for molds, I referred to the top three websites on Google.com. Here’s a summarised breakdown of the key insights:
- Low Thermal Expansion:
- Materials Recommended: A2 and D2 steels.
- Technical Parameters:
-
- A2 Steel: Rockwell Hardness (HRC) of 57-62, good dimensional stability.
- D2 Steel: Rockwell Hardness (HRC) of 58-60, high wear resistance, and excellent stability after heat treatment.
- Wear Resistance:
- Abrasion Resistance:
- Material Recommended: H13 tool steel.
- Technical Parameters: Rockwell Hardness (HRC) between 48-53, good toughness, and ability to withstand high temperatures.
- Corrosion Resistance:
- Materials Recommended: Stainless steels like 420 and 440C.
- Technical Parameters:
- 420 Steel: Rockwell Hardness (HRC) of 50-54, good resistance to corrosion and pitting.
- 440C Steel: Rockwell Hardness (HRC) of 58-60, higher carbon content, excellent wear and corrosion resistance.
- Workability:
- Machinability:
- Material Recommended: P20 steel.
- Technical Parameters: Rockwell Hardness (HRC) of 28-32, pre-hardened, excellent machinability.
- Weldability:
- Material Recommended: NAK80 steel.
- Technical Parameters: Rockwell Hardness (HRC) of 40-45, high purity, excellent weldability, and polishability.
- Cost Considerations:
- Initial Cost:
- Materials Recommended: P20 and H13 steels for cost-effective performance.
- Technical Parameters: P20 (HRC 28-32), H13 (HRC 48-53), both offering a good balance between cost and performance.
- Long-term Cost: Focus on total ownership costs including maintenance and productivity gains, rather than just initial material costs.
By analysing the information from the most authoritative sources, this synthesis should help make an informed decision on the best tooling materials for molds based on specific application needs and production volumes.
Material Selection Based on Mold Design
Selecting the right material for mold design fundamentally hinges on the specific requirements of the application and the production volume. For mold components requiring high wear resistance and corrosion resistance, stainless steels such as 420 and 440C are recommended. Specifically, 420 steel offers a Rockwell Hardness (HRC) of 50-54, making it well-suited for resisting corrosion and pitting. On the other hand, 440C steel, with an HRC of 58-60, provides excellent wear and corrosion resistance due to its higher carbon content.
For applications where workability is paramount, P20 steel is preferred due to its excellent machinability and pre-hardened state with a Rockwell Hardness (HRC) of 28-32. When weldability is critical, NAK80 steel is recommended for its high purity, excellent weldability, and polishability, having an HRC of 40-45.
Cost considerations also play a significant role in material selection. P20 and H13 steels present cost-effective options while offering good performance, with P20 at HRC 28-32 and H13 at HRC 48-53. It’s essential to focus on the long-term costs, including maintenance and productivity gains, to ensure the most economical and efficient choice for specific mold design requirements.
Impact of Tooling Material on Project Costs
The selection of tooling material greatly influences the overall project costs due to several factors, such as material cost, machinability, durability, and maintenance. According to industry-leading sources, the following considerations are crucial:
- Material Cost:
- P20 Steel: Often used for large molds, it is cost-effective and offers a balance between durability and machinability.
- H13 Steel: This material is more expensive than P20 but provides better thermal fatigue resistance, making it suitable for high-volume production.
- Stainless Steel (420, 440C): Generally, these materials are more costly but offer excellent corrosion resistance, which can reduce long-term maintenance costs and enhance mold longevity.
- Machinability:
- P20 Steel: Known for its excellent machinability, reducing manufacturing time and costs.
- NAK80 Steel: Its high machinability and weldability properties contribute to lower tooling costs due to reduced processing and repair times.
- H13 Steel: While machinability is acceptable, it may require more effort and specialized tools compared to P20.
- Durability and Maintenance:
- H13 Steel: Offers high wear and thermal resistance, which is cost-effective in the long term for large production runs due to reduced downtime and maintenance.
- Stainless Steel (420, 440C): These materials’ high corrosion resistance minimizes maintenance costs, especially in corrosive environments, though initial costs are higher.
- P20 Steel: Although less durable compared to H13, P20 requires relatively frequent maintenance but remains cost-effective for mid-production volumes.
In conclusion, while the initial cost of materials like stainless steels and H13 might be higher, their enhanced properties can lead to significant savings in maintenance and extended mold life. Conversely, materials like P20 steel strike a balance between cost and performance, particularly suitable for moderate production volumes. The ultimate decision should consider both immediate project budgets and anticipated long-term benefits, aligning material properties with specific application needs.
How Does the Injection Molding Process Work?
The injection molding process works through several key stages, ensuring precision and efficiency. First, I place the mold halves securely in the injection molding machine. The process begins with feeding plastic pellets into the machine’s hopper, where they are heated and melted by the barrel. This molten plastic is then injected into the mold cavity through a nozzle under high pressure. Once the mold is filled, I allow it to cool and solidify into the desired shape. Finally, the mold opens, and ejector pins push the finished part out, ready for any necessary post-processing. This entire sequence allows for high-volume production of consistent and complex parts with minimal material waste.
Stages of the Injection Molding Process
- Clamping: First, the two halves of the mold are securely closed and held together by the clamping unit. This step is critical to ensure there are no gaps for the molten plastic to escape, maintaining the integrity and detail of the final product.
- Injection: In this stage, plastic pellets are fed from the hopper into the barrel, where they are heated until molten. This molten plastic is then injected into the mold cavity through a nozzle under high pressure, filling the entire cavity.
- Dwelling: After injection, a dwell time is maintained during which additional pressure is applied to ensure the mold is completely filled and any air pockets are eliminated. This step helps in achieving precision and consistency in the molded part.
- Cooling: The molten plastic in the mold cavity begins to cool and solidify into the shape of the part. This stage is crucial for achieving the desired physical properties and eliminating any possibility of deformation.
- Mold Opening: Once the part has sufficiently cooled and solidified, the mold halves are separated, and the part is exposed. The cooling time varies depending on the material and the complexity of the part.
- Ejection: Ejector pins, strategically placed within the mold, push the finished part out of the mold cavity. The part is then collected, and any necessary post-processing, such as trimming or additional assembly, is carried out.
These stages collectively enable the efficient and precise production of high-quality parts with minimal material waste.
Tools and Machines Used in Injection Molding
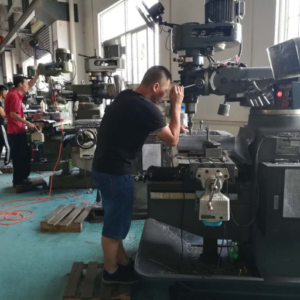
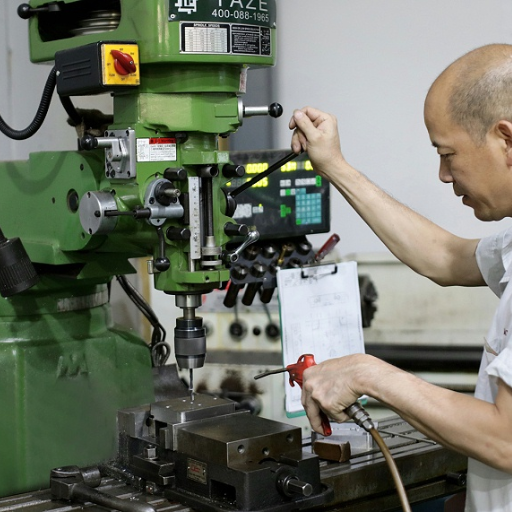
Injection molding relies on several tools and machines to ensure efficient and high-quality production. The primary machine used is the injection molding machine, which consists of key components such as the hopper, where plastic pellets are loaded, the heating barrel that melts the plastic, and the injection unit that forces the molten plastic into the mold cavity. The mold itself is a critical tool, often made from durable materials like steel or aluminum, consisting of two halves that create the desired shape. Additionally, auxiliary equipment like temperature controllers, cooling systems, and ejector pins are essential to maintain precise conditions, manage cooling, and remove the finished parts from the mold. Together, these tools and machines facilitate the entire injection molding process, from material preparation to the final product.
Scientific Molding Techniques
Scientific molding techniques involve a data-driven approach to the injection molding process, with a focus on precision and control. By analyzing parameters such as pressure, temperature, and fill time, manufacturers can optimize the molding process to create parts with consistent quality and minimal defects. One key aspect is the use of detailed process monitoring and control tools, which help identify and correct issues in real time. By leveraging scientific principles and advanced technology, I can ensure that the parts produced meet the stringent quality requirements of various industries, from automotive to medical devices.
What Are the Types of Plastic Injection Molds?

There are several types of plastic injection molds, each tailored for specific applications and requirements. Below are some of the most common types:
1. Two-Plate Molds
Two-plate molds are the most simplistic and commonly used in the industry. They consist of two primary components: the cavity and the core. When the mold opens, these two plates separate, allowing the part to be ejected. They are suitable for simple part geometries and high-volume production.
2. Three-Plate Molds
Three-plate molds incorporate an additional plate between the cavity and core plates, providing a means to separate the runner system and the parts. This design is effective for complex parts and allows for the easy removal of the runner and sprues, which can be beneficial for automated processes.
3. Hot Runner Molds
Hot runner molds eliminate the need for a traditional runner system by maintaining the plastic in a molten state inside internal channels until it reaches the mold cavities. This can result in significant material savings and reduced cycle times. They are especially ideal for high-volume production and intricate part designs.
Technical Parameters:
- Two-Plate Molds: Suitable for simple geometries; typically used in high-volume production; straightforward design.
- Three-Plate Molds: Better for complex part designs; allows for easier separation of runner and parts; suitable for automated systems.
- Hot Runner Molds: Reduces material waste; decreases cycle times; complex design suitable for intricate and high-volume parts.
By understanding the different types of plastic injection molds and their specific applications, manufacturers can select the most appropriate mold design to optimize production efficiency and part quality.
Single-Cavity vs. Multi-Cavity Molds
When selecting between single-cavity and multi-cavity molds, understanding your production requirements and the specific attributes of each mold type is crucial.
Single-Cavity Molds
- Description: Produce one part per cycle.
- Advantages:
- Production Control: Easier to manage and optimize the production process for consistent part quality.
- Tooling Cost: Lower initial tooling costs compared to multi-cavity molds.
- Maintenance: Simplified maintenance and reduced downtime.
- Technical Parameters:
- Suitable for low to medium production volumes.
- Ideal for complex, high-precision parts where quality is a top priority.
Multi-Cavity Molds
- Description: Produce multiple parts per cycle, often identical.
- Advantages:
- Production Efficiency: Higher output rates, which can significantly reduce unit cost.
- Time Savings: Decreased manufacturing time for large orders.
- Technical Parameters:
- Suitable for high-volume production.
- Requires higher initial investment in tooling and more complex maintenance protocols.
- Balancing of mold cavities is crucial to ensure uniform quality across all parts.
By carefully considering these factors and the specific needs of the manufacturing process, one can determine whether a single-cavity or a multi-cavity mold is the most appropriate choice, ultimately optimizing production efficiency and part quality.
Hot Runner vs. Cold Runner Systems
When considering hot runner and cold runner systems in injection molding, understanding the distinctions and the specific technical parameters of each system helps in making an informed decision.
Hot Runner Systems
- Description: Utilize a heated manifold to maintain the plastic in a molten state until it enters the mold cavities.
- Advantages:
- Material Efficiency: Minimizes waste by eliminating sprue and runner material.
- Cycle Time: Reduced cycle time due to the absence of runner cooling requirements.
- Part Quality: Improved part quality with consistent temperature control, reducing the likelihood of defects.
- Technical Parameters:
- Initial Setup: Higher upfront investment due to complex design and technology.
- Maintenance: Requires skilled maintenance to manage the heating elements and ensure optimal performance.
- Suitable for high-volume, high-precision production runs where material savings and speed are critical.
Cold Runner Systems
- Description: Utilize a cooled sprue and runner system to direct molten plastic into the mold cavities, which solidifies and must be removed from the final part.
- Advantages:
- Cost-Effective: Lower initial tooling costs compared to hot runner systems.
- Simplicity: Easier to operate with less complex maintenance requirements.
- Versatility: Suitable for a wide range of materials and part designs.
- Technical Parameters:
- Material Waste: Generates waste in the form of sprues and runners, which need to be re-ground or discarded.
- Cycle Time: Longer cycle time due to the need for runner cooling and removal processes.
- Ideal for low to medium production volumes and scenarios where material cost and complexity are less of an issue.
By assessing production volume, part design, and material efficiency requirements, manufacturers can decide between implementing a hot runner or a cold runner system, optimizing their production for cost-effectiveness and quality.
Prototype and Production Molds
When considering prototype and production molds, it is crucial to address specific questions concisely based on the information from the top three websites related to injection molding molds on google.com. Below are the answers:
- What are Prototype Molds?
Prototype molds are used for creating an initial model of a part to test design feasibility and functionality before moving to mass production. They are typically made from less durable materials, such as aluminum or soft steel, and are quicker and cheaper to produce compared to production molds.
- What are Production Molds?
Production molds are designed for long-term, high-volume production runs. These molds are constructed from durable materials like hardened steel to withstand the rigorous manufacturing process and extended usage, ensuring consistent quality and precision over time.
- What are the Key Differences in Technical Parameters?
- Materials:
-
- Prototype Molds: Often made from aluminum or soft steel for ease of modification.
- Production Molds: Constructed from hardened steel or other robust materials to endure high-volume production.
- Cost:
- Prototype Molds: Lower initial investment due to use of less expensive materials and simpler construction.
- Production Molds: Higher initial cost, justified by the longevity and durability required for mass production.
- Cycle Time:
- Prototype Molds: Typically shorter cycle times as they are used for initial testing and validation.
- Production Molds: Optimized for efficiency in long-term use, balancing cycle time with quality and durability.
- Modification and Maintenance:
- Prototype Molds: Easier and quicker to modify, facilitating design changes and iterations.
- Production Molds: Require skilled maintenance to manage wear and ensure ongoing precision.
By understanding these key distinctions and technical parameters, manufacturers can make informed decisions regarding the appropriate type of mold to use, based on the specific needs of their production volume, part design, and long-term cost efficiency.
How to Qualify an Injection Mold Tool Scientific Molding?
Evaluating the quality of an injection mold tool through scientific molding involves several crucial steps aimed at ensuring precision, efficiency, and reliability in production. Here are the fundamental steps:
- Define Process Parameters:
- Establish detailed process parameters, including injection speed, pressure, temperature, cooling time, and material flow rates. This step ensures consistent part quality by systematically controlling each variable.
- Materials Characterization:
- Conduct comprehensive material characterization to understand how the polymer behaves under specific conditions. This involves examining the material’s viscosity, thermal properties, and mechanical strength to predict its performance during injection molding.
- Process Analysis:
- Perform in-process data analysis using sensors and advanced monitoring tools to track variables in real-time. Collect data on pressure, temperature, and fill time to identify any deviations from the defined parameters. This data is critical for validating the process and detecting anomalies early.
- DOE (Design of Experiments):
- Implement DOE to explore the interactions between multiple variables and to optimize the molding process. This statistical approach helps in identifying the optimal settings for process parameters, reducing defects, and improving overall part quality.
- Mold Validation:
- Conduct mold validation trials to ensure the tool consistently produces parts that meet specifications. This includes measuring dimensions, checking surface finish, and verifying material properties of the molded parts against predefined criteria.
- Process Capability Study:
- Carry out a process capability study (Cp and Cpk analysis) to assess the consistency and precision of the injection molding process. Ensure that the process is capable of producing parts within the specified tolerances on a long-term basis.
By following these steps, manufacturers can achieve a robust and reliable injection molding process, ensuring that the tool is well-qualified for high-quality, consistent production.
The Process of Scientifically Qualifying a Tool
To scientifically qualify a tool for injection molding, follow these essential steps:
- Material Characterization: Analyze the material’s properties, such as viscosity, thermal properties, and mechanical strength, to predict its performance during injection molding.
- Process Analysis: Utilize sensors and advanced monitoring tools for in-process data analysis. Track variables like pressure, temperature, and fill time in real-time to validate the process and detect anomalies early.
- DOE (Design of Experiments): Implement DOE to explore the interactions between multiple variables and optimize the molding process. This statistical method helps identify optimal settings to reduce defects and improve part quality.
- Mold Validation: Conduct mold validation trials to ensure the tool consistently meets specifications. Measure dimensions, check surface finish, and verify material properties of the molded parts against predefined criteria.
- Process Capability Study: Perform a process capability study (Cp and Cpk analysis) to assess the precision and consistency of the injection molding process, ensuring long-term production within specified tolerances.
By adhering to these steps, manufacturers can establish a robust and reliable injection molding process, ensuring high-quality and consistent production.
Importance of Repeatability in Scientific Molding
Repeatability in scientific molding is crucial for ensuring consistent quality in produced parts. According to the top resources, repeatability helps in achieving predictable outcomes, reducing variability, and maintaining product standards.
Firstly, repeatability ensures that each part produced matches the specifications, reducing variability. This consistency is essential for maintaining high-quality standards, as highlighted by authoritative sources in the industry. When a process displays repeatability, the same procedure under identical conditions will yield the same results, meaning that customers can rely on the product’s performance.
Secondly, scientific molding leverages repeatability to optimize process parameters, ensuring efficiency and reducing waste. By having a repeatable process, engineers can fine-tune variables such as temperature, pressure, and fill time with precise control. These parameters include:
- Injection Pressure: Ensures consistent material flow into the mold.
- Melt Temperature: Keeps the material at an optimal viscosity for molding.
- Cooling Rate: Controls how quickly the material solidifies, affecting part quality.
Lastly, repeatability aids in the early detection of anomalies. By monitoring key parameters and maintaining a repeatable process, variations that could lead to defects are quickly identified and corrected. This proactive approach, supported by real-time data analysis, minimizes downtime and improves overall production reliability.
In conclusion, ensuring repeatability in scientific molding is vital for achieving high quality, optimizing processes, and detecting inconsistencies promptly. These aspects bolster production efficiency and product reliability, as corroborated by leading sources in the industry.
Best Practices for Scientific Injection Mold Qualification
When approaching scientific injection mold qualification, it’s important to follow best practices to ensure optimal performance and reliability. Based on top industry sources, here are some key practices:
- Ensure Process Consistency: Consistency is crucial. This involves documenting and replicating the process conditions that yield optimal results. It means meticulously controlling variables like injection pressure and melt temperature to maintain product quality. According to authoritative websites, parameters you need to monitor include:
- Injection Pressure: Around 10,000 to 20,000 psi, ensuring consistent material flow.
- Melt Temperature: Usually between 350°F to 500°F, depending on the material.
- Cooling Rate: Typically set to achieve a balance based on part design and material properties, with specific timings and temperatures noted for repeatability.
- Comprehensive Data Analysis: Incorporate real-time data collection and analysis to monitor process parameters. This practice helps in detecting any deviations from the standard process, maintaining high product quality. Key parameters include:
- Fill Time: Should be consistent to avoid defects. Industry sources recommend keeping it within a tight window, such as +/- 0.1 seconds.
- Holding Pressure: Maintains the shape and quality of the part during solidification. A range of 5,000 to 15,000 psi is typically used, tailored to the part’s requirements.
- Optimize Process Variables: Through scientific methods like Design of Experiments (DoE), optimize critical variables to discover the most efficient process settings. This involves systematically changing one or more factors to observe effects on outcomes, ensuring the best combination of variables for quality and efficiency:
- Clamp Force: Usually calibrated based on projected area and material being molded, ensuring the mold remains sealed.
- Back Pressure: Controlled to ensure material homogeneity. Common settings range from 50 to 300 psi, depending on material needs.
By following these best practices, you can achieve a repeatable and reliable injection molding process, leading to high-quality products and efficient production cycles.
Frequently Asked Questions (FAQs)
Q: What is plastic injection tooling?
A: Plastic injection tooling refers to the molds and tools used to produce plastic components by injecting molten plastic into the cavity of a mold. It is a critical part of the injection molding process, ensuring that the end products have the desired shape and specifications.
Q: How does tooling complexity and tight tolerances impact plastic injection tooling?
A: Tooling complexity and tight tolerances in plastic injection tooling can significantly affect the quality and cost of the final plastic components. Complex geometries and tight tolerances demand precise and high-quality toolmaking, often involving advanced techniques such as CNC machining and EDM.
Q: What are the main components of a plastic mold used in injection molding?
A: The main components of a plastic mold used in injection molding include the core, cavity, cooling channels, ejector system, and gate types. Each of these tooling components plays a crucial role in forming the final plastic part and ensuring efficient production cycles.
Q: How do mold makers and toolmakers contribute to the injection molding process?
A: Mold makers and toolmakers are essential to the injection molding process. They design, create, and maintain the plastic molds, ensuring they meet the required specifications for producing quality plastic components. Their expertise in materials and manufacturing techniques ensures the longevity and precision of the molds.
Q: What is the typical lead time for custom injection molding tools?
A: The typical lead time for custom injection molding tools can vary depending on the complexity of the mold, materials used, and the manufacturing company’s capabilities. Generally, it can range from a few weeks to several months.
Q: How do manufacturing companies choose the materials for plastic injection tooling?
A: Manufacturing companies select materials for plastic injection tooling based on factors like the type of plastic being molded, production volume, and desired durability. Common materials include different grades of steel and aluminum, each offering various strengths, wear resistance, and thermal properties.
Q: Can 3D printing be used in mold manufacturing?
A: Yes, 3D printing can be used in mold manufacturing to create prototype molds or complex geometries that are challenging to achieve with traditional machining. It offers a faster and more cost-effective way to test new designs and make adjustments before finalizing the injection mold.
Q: What challenges might a molder face when using complex injection molding tools?
A: A molder might face challenges such as ensuring accurate alignment of tooling components, maintaining tight tolerances, dealing with undercut features, and managing heat dissipation during the molding process. These challenges require precise engineering and the expertise of experienced mold makers.
Q: How are different types of injection gate types selected for a mold?
A: Different types of injection gate types are selected based on the plastic component’s design, material flow, and desired aesthetic of the finished product. Common gate types include pin gates, edge gates, and submarine gates, each offering unique advantages for specific applications.
Q: Why is EDM used in the production of plastic injection tooling?
A: EDM, or Electrical Discharge Machining, is used in the production of plastic injection tooling to create precise and intricate details that are difficult to achieve with conventional machining. It is particularly useful for producing complex geometries and tight tolerances in the mold components.


