
The bay laurel is a plant that gardeners and chefs would appreciate for its aromatic and flavorful leaves. A fair amount of interest in the growth and care of bay laurel plants would be rewarding and practical for seasoned gardeners and culinary enthusiasts. This blog post will take you through the highlights of how to grow care for bay leaf plants, from choosing the correct sites to their long-term maintenance. You will discover how to harvest bay leaves and methods of preserving their flavor to use in your culinary exploits. With a bit of knowledge and care, bay laurel can become a very viable addition to either your home or garden.
Introduction to Bay Laurel

Bay laurel (Laurus nobilis) is a lovely evergreen plant, which provides highly aromatic leaves used all over the world in culinary arts to impart fragrance and flavor to various dishes. Known to be native to the Mediterranean areas, bay laurels grow in warm climates, but maybe even be grown in containers if you live in the cold. Keep in mind that the plant should have well-draining soil and sufficient sunlight if you want to nourish it. By trimming every now and then, you create shape and encourage the growth of new foliage, whereas occasional fertilizing enhances its vitality. You can pick mature glossy bay leaves for harvesting and then dry them to retain the full flavor for culinary use. Give the bay laurel proper care, and it will thank you by gracing your home garden with its beauty and utility.
What is a Bay Laurel Plant?
The bay laurel plant or scientifically Laurus nobilis, is an evergreen shrub or tree native to the Mediterranean region. These are aromatic dark green leaves commonly used as seasoning in different cookeries. Bay laurel grows better in well-drained soil with a lot of sunlight and can be grown indoors and outdoors, depending on the climate. The plant is fairly easy to care for, making it a good choice for any patio or lawn. Given a little care, the plant will produce fresh, flavorful leaves for a long time.
Types of Bay Leaf Plants
There are varying categories of bay leaf trees, each having its own unique properties. The most common is the Mediterranean bay laurel, which is commercially valued for culinary purposes and has glossy hard surface leaves. The California bay leaf or Umbellularia californica, is considered better for having a stronger odor and is native to the western part of the United States. Indian bay, or Cinnamomum tamala, is mostly used in cooking in South Asia and provides a scent similar to cinnamon. Different climatic conditions and culinary purposes demand these varieties, which would make wonderful utility plants for any garden or kitchen.
Bay Laurel Plant Family
The Bay laurel is a member of Lauraceae, a family of aromatic trees and shrubs common to warmer temperate and tropical regions. Plants in this family generally have leathery leaves and a great scent, serving ecological as well as culinary purposes. Bay laurels flourish well in well-drained soil under full sunlight; thus, they suit Mediterranean and similar climate types. The leaves are also used in cooking to impart flavor to various recipes like soups, stews, and sauces. Further, being biologically so diverse and ecologically important, this family contains such trees as avocado and camphor as well.
How to Grow Bay Laurel
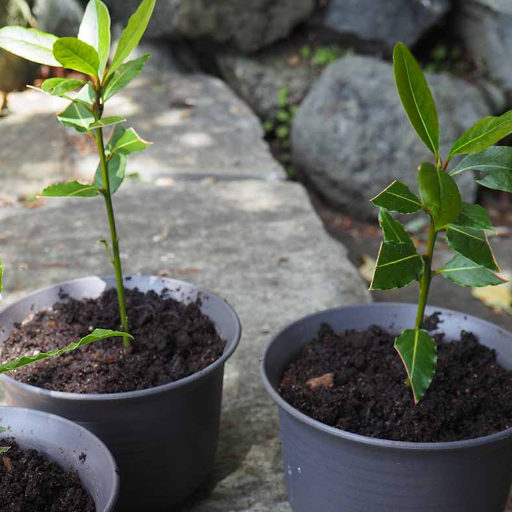
How to grow care for bay leaf plants? The Bay Laurel is an extremely tolerant tree. It will grow well in any well-drained soil with good air circulation and abundant sunlight, ideally for about six to eight hours daily of direct light. If planting in pots, make sure they have watering holes at the bottom, or select a garden location without chances of waterlogging. Water normally but let the soil dry out slightly between waterings, so as not to encourage overwatering. Pruning is essential to help the tree keep its form and stay healthy. Bay laurels can be grown directly in pots and are ideal for both indoor and outdoor settings. Avoid frost by bringing potted bay laurels inside because they are very susceptible to freezing. If taken care of properly, the plant grows well and offers good, fresh leaves with a lovely aroma for cooking.
Planting a Bay Leaf Plant
I suggest choosing a free-draining soil mix upon the planting of a bay leaf plant, since bay laurel favors soil that does not remain waterlogged. Being a sunny spot for partial shade during the hottest part of the day would be best, since excessive direct sunlight may burn the leaves. For container-grown ones, ensure the pot has enough drainage holes. Starting with a young plant or cutting is generally easier, since germination is slower and inconsistent at best.
Water rarely, allowing the soil to dry out slightly between waterings–bay laurel likes to stay moist but does not like to be wet. During the growing season, fertilize with a balanced slow-release fertilizer to promote healthy growth. Regular pruning helps maintain their shape, and stimulates the growth of branches-that perfect if you are harvesting leaves for cooking. In colder climates, it would be wise to bring your bay laurel in before any frost descends, as bay laurel can’t stand any frost. Given steady care, fresh and fragrant leaves will be yours in abundance throughout the year for culinary prowess!
Best Conditions to Grow Bay
The bay laurel likes its soil to be well-draining, with neutral to slightly acidic pH values. Ideally, it should be planted where it is exposed to full sun or partial shade. Make sure it gets around 6-8 hours of sunlight daily. It should always be watered as needed; if overwatering occurs, let the surface of the soil dry out a bit, say an inch or so, to keep the roots from rotting. Bay plants prefer the mild temperate weather and grow best between 50°F and 75°F. For colder areas, potting your bay allows you to move it inside for ease in winter. To help keep fungal problems at bay, give it some good air circulation; resist the urge to overcrowd it.
Common Problems with Bay
Yellowing leaves is one problem with bay plants and always means overwatering or the soil cannot drain sufficiently. I make sure my bay enjoys well-draining soil and holds water only when the top inch is dry. Other problems are pests like scale insects and aphids. I monitor the leaves regularly and intervene with insecticidal soap if needed. Fungal diseases such as powdery mildew occur when the air circulation is poor; therefore, I always put my bay in a well-ventilated space and keep it from being crowded. Another reason for slow growth could be that the plant is not getting enough sunlight or nutrients. I always make sure it has plenty of light, and I fertilize it with a balanced fertilizer during its growing season.
Caring for Your Bay Laurel Tree
Prompt response in times of trouble will ensure a healthy bay laurel. For insect attacks of scale or aphids, an inspection of the tree on a regular basis is necessary: treat infestations with insecticidal soap at once. Protection against fungi such as powdery mildew results from good circulation around the plant and the prevention of overcrowding. Slow growth? Check the plant’s exposures: is it getting plenty of light? Fertilize the tree during its active growing phase with a balanced fertilizer, encouraging it to grow more strongly. Transform these attentions into good outcomes, and your bay laurel tree would reach excellence all year round.
Watering and Fertilizing
Watering is still very important when keeping a bay laurel potted. The tree likes a consistent supply of moisture; however, it cannot tolerate waterlogging. It is best to water the tree deeply when the upper inch of the soil dries up, mainly in the warmth of the summer, and encourage drying out during the winter because the plant slows in its growth. A fertilizer such as a balanced slow-release fertilizer is applied in the growing period—generally the spring and summer—so the plants can have a good supply of nutrition. Keeping up with this will keep the plant happy, lush, and productive all year round.
Repotting Bay Laurel
Repotting a bay laurel tree is essential to give it a better chance for growth and to prevent it from becoming root-bound. I prepare by selecting a container just a little larger than the current one, but with good drainage holes. After ensuring that the potting soil is of high-quality, well-draining, I gently remove the plant from its old pot while loosening any compacted roots. I place the tree in the new pot, backfill with new soil, and keep the top of the root ball just a little below the rim of the pot. After that, I water well to settle the soil and enable good root growth. Usually, I repot every 2 to 3 years or whenever I notice that the roots are too big for the container.
Pruning Your Bay Tree
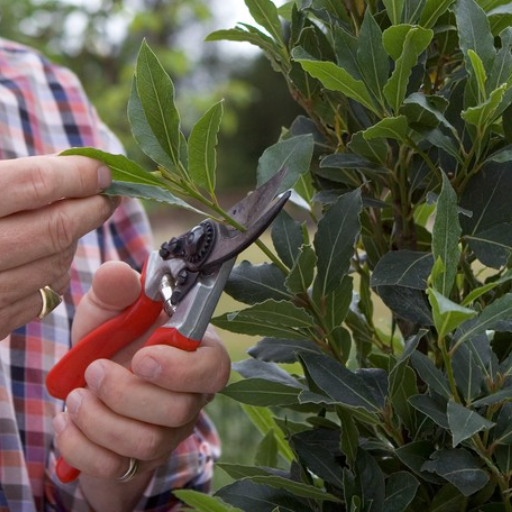
To keep my bay tree healthy and looking at its best, I prune it regularly, once or twice a year. First, I start by eliminating any dead or damaged leaves and twigs by using clean, sharp pruning shears. For shaping, I trim overgrown areas to maintain a compact, balanced form with good air circulation and light penetration. I usually nip back the tips of new shoots if I want to encourage bushier growth. Pruning is best performed in late spring to early summer when the tree is actively growing. I always make sure not to do too much at one time so as to not stress the plant.
Harvesting Bay Leaves

I harvest bay leaves by selecting mature ones that are deep green, since those will have the fullest flavor and fragrance. Using clean, sharp scissors or pruning shears, I cut the leaves near their stems so that the plant is not damaged. Harvesting can happen at any time of year, although I prefer to pick the leaves in mid-morning since it is believed that essential oils are at their highest content then. The leaves are gently washed and left to dry by spreading in a single layer and storing in a cool and dry place for further use.
When to Harvest Bay Leaves
After harvesting and drying my bay leaves, I utilize them for a variety of purposes. For cooking, I usually add them to soups, stews, and sauces to impart a delicate, earthy flavor. Just one leaf is enough to complement a dish without overshadowing other ingredients. Dried bay leaves can also be crushed and powdered for use in spice mixtures. On the household side, I like to place a few leaves in storage containers to keep pests at bay naturally. Properly stored bay leaves will keep well for a year, which is ample time in which to use up those culinary and household requirements.
How to Use Bay Leaves for Cooking
In my cooking, I usually add whole leaves to simmering dishes such as soups, stews, and sauces at the outset to develop and bring out their full flavor. They are removed before serving, as they are tough and not meant to be swallowed. If I use them in a spice mixture, I crush dried leaves to a powder to lend a distinct aroma. I always use bay very sparingly-one single leaf can very well stand for all the bay without overshadowing anything else. It is thus, with such simple principles, that bay becomes an essential factor for flavoring my culinary experiment.
Enjoy Your Bay: Culinary Uses
Absolutely! I do tend to prefer the dried bay leaves for their concentrated flavor and sheer convenience. That said, fresh leaves might indeed have their place in specific recipes, but the aromas tend to be mellow. I always store my dried bay leaves in an airtight container and keep them away in a cool, dark place for maximum potency. For soups, stews, or any sort of sauce cooking, I put them in with the other ingredients at the very beginning: the flavor needs time to really make itself felt as the dish slowly cooks. If you aren’t sure when to add bay leaves, feel free to start with one or two leaves in a slow-cook dish and learn to appreciate the scent that gently seeps out of the pot.
Indoor vs Outdoor Growing

The indoors bay leaves growing conditions versus outdoors offer both advantages and problems. In these situations, the growing area maintains a temperature favorable to plant growth, with similarly-regulated light, humidity, and so on, suitable for a colder climate or inclement and unpredictable weather. This prevents potential attacks by pests or diseases. Indoors, however, the plants might necessitate more hands-on attention: keeping them trimmed and ensuring they get sufficient sunlight or supplementary light. On the contrary, outside growth provides bay trees with conditions closest to their natural environment, usually producing a bigger and more robust plant, but only if the climatic conditions allow mild winters with well-drained soil. Consider your climate, available space, and how much attention you can provide on care for the plant while making a decision.
Planting Bay Laurel Inside
Because I am planting bay laurel indoors, I make sure to place the plant in a pot that drains well with good-quality potting soil. I keep it close to a sunny window for the sunlight it requires, and with or without the sun, I provide some grow light in case the natural light is insufficient. To avoid overwatering, I water only when the soil feels dry to the touch, and I make sure drainage in the pot is proper. Also, I prune the plant regularly to keep its size in check and to encourage healthy growth. Following these instructions, I am able to successfully raise a bay laurel indoors, even in places with cold weather.
Benefits of Growing Bay in the Garden
Cultivating bay laurel in the garden presents a lot of advantages, making it an important addition to any outdoor space. Imagine plucking those fragrant leaves straight from your tree to use in kitchen recipes — fresh, dried, or ground into a spice for soups, stews, and more. Essentially, the plant is quite friendly to its owner, needing only a little bit of care amid well-drained soil; some consider it almost no care at all. Another bonus is that bay laurel keeps pests at bay, protecting your other plants. Its evergreen attribute also assures the green color of life throughout the year, thus uplifting the look of any landscaping. From this, we can deduce that having a bay tree grown in your yard is worth its practical and rewarding value for a home gardener.
Maintaining a Small Bay Tree
The maintenance of a small bay tree describes how I plant it in well-drained soil and full sunshine because these are its needs. Watering should be moderate enough to keep the soil moist but not soggy; in winter, watering is reduced more. Pruning is the greatest thing for shaping and helping growth, so I trim it once a year, removing dead leaves and branches or any other parts that look damaged. During its affair of growing, it is fed with some balanced fertilizer so it can develop luscious foliage. Every couple of years, potted bay trees benefit from repotting, which prevents them from becoming root-bound and refreshes the soil composition. By following these steps, my bay tree thrives and stays healthy in my garden or patio.
References
-
Martha Stewart: How to Grow and Care for a Bay Leaf Plant – This article offers practical tips on selecting the right location and conditions for planting bay leaf plants.
-
The Spruce: How to Grow and Care for Bay Laurel – A detailed guide on caring for bay laurel trees, including indoor and outdoor care tips.
-
Gardenary: How to Grow Bay Laurel at Home – This source provides insights on spacing, transplanting, and maintaining bay laurel plants.
Frequently Asked Questions (FAQ)
How to grow a bay laurel plant indoors?
To grow a bay laurel plant indoors, ensure you use a well-draining potting mix and a pot that allows for adequate drainage. Bay laurel can be grown as a houseplant, thriving in bright, indirect sunlight. Keep the soil moist but not soggy, and water bay laurel when the top inch of soil feels dry. Providing the right amount of light and moisture will encourage new growth in your bay leaf plant. If you notice that your plant becomes root-bound, it may need to be repotted into a larger pot to continue thriving. Regularly check for pests and ensure proper air circulation.
What are common problems with bay leaf plants?
Common problems with bay leaf plants include overwatering, which can lead to root rot, and insufficient light, causing stunted growth. If leaves turn yellow or begin to drop, it may indicate that the soil is too wet or that the plant isn’t receiving enough sunlight. Additionally, pests like spider mites and aphids can affect bay laurel leaves. To prevent these issues, ensure you plant bay laurel in soil that drains well and provide adequate light. Regularly inspecting your plant for signs of distress can help you address these common problems before they escalate. Always prune any dead or damaged leaves to promote healthy growth.
When is the best time to harvest bay leaves?
The best time to harvest bay leaves is in the summer when the leaves are mature and flavorful. You can harvest bay leaves as needed by picking them from the plant, ensuring you do not remove more than one-third of the leaves at a time. This practice allows the plant to continue growing and producing new leaves. To dry leaves, place them in a cool, dark area and then store them in an airtight container. Harvesting bay leaves regularly can also encourage the plant to grow bushier and healthier. Remember to use bay leaves in your culinary dishes for their aromatic flavor.
How do I repot a bay laurel tree?
Repotting a bay laurel tree is essential when it outgrows its current container or when the soil becomes depleted. Choose a slightly larger pot with drainage holes and fill it with fresh potting mix that drains well. Carefully remove the plant from its old pot, loosening any tightly bound roots. Place the bay laurel in the new pot, ensuring the root ball is level with the soil surface, then fill in around the roots with the new potting mix. After repotting, water the plant thoroughly and monitor it closely for signs of transplant shock. Repotting bay laurel every few years will help maintain its health and vigor.
How to prune a bay leaf plant for better growth?
Pruning a bay leaf plant is important for maintaining its shape and encouraging bushier growth. The best time to prune is in late spring or early summer when the plant is actively growing. Use sharp, clean pruning shears to remove any dead, damaged, or crossing branches. You can also trim back the tips of the branches to promote new leaves and a fuller appearance. Be cautious not to remove more than one-third of the plant at once, as this can stress the tree. Regular pruning will help you enjoy your bay laurel plant for many years and ensure it remains healthy and productive.


