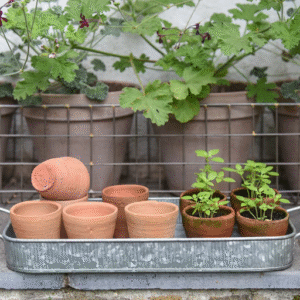
Anything from rustic charm to old-world charm conjures images scattered with clay pots. Terra cotta is also porous, which means it absorbs some moisture and helps to strike a balance for plants in need of a dry root environment. But over time, these pots become mineralized with caliche deposits or algae and get dirty to the point that their build-up is detrimental to the plants and unappealing to look at. This guide emphasizes why keeping terra cotta pots clean is important and shows you, step by step, the cleansing procedure to rid those pots of any harmful residues. You will gain tips from this article on pot maintenance and plants’ home creation, whether you are an experienced gardener or have just walked into the planting world.
Understanding Terra Cotta Pots

Terra cotta pots, constructed from porous clay, act as potential moisture absorbers and de-moisturizers for an array of plants. Such natural breathability keeps soil in check for moisture and temperature, thus preventing risks of over-watering. Due to the same porosity that helps keep out overwatering, they may also absorb salts, minerals, and residues in water and fertilizer, causing harm to plants if left unwashed for a long time. An insight into this unique phenomenon stresses proper care and upkeep of these vessels to maintain their functionality as well as the plants’ health bestowed upon them.
What are Terra Cotta Pots?
The classic pot for a garden, or planting, is terracotta clay pots. Being made from an all-natural clay that is very porous, such a pot provides for good airflow and water drainage-conditions perfect for healthy root development. I feel that they come in handy for many plants that might otherwise suffer from overwatering, as excess moisture is soaked up into the pot. In terms of aesthetics, they present the classic look that allows any garden or fun room to brighten up! I do clean mine all the time because they can accumulate salts and residues from water and fertilizers over a long period of time, given their porosity.
Benefits of Using Clay Pots
Terra cotta pots are particularly advantageous to keep soil temperatures under control because their porous walls enforce natural cooling in warmer setups that could lead to overheating. This feature turns out to be great for plants that pretty much do not enjoy exposure to temperature variations. Environmentally, these pots also allow oxygen to reach the root directly, giving the plant healthier support and at the same time, preventing root rot. Plus, these pots are mostly heavy, providing support to tall or top-heavy plants, therefore keeping them from tipping over. In essence, the natural properties of terra cotta pots harmonize with the needs of many plants, boosting their vigor and health.
Common Issues with Terra Cotta Pots
One thing that can go slightly wrong with terra cotta pots is their drying out quickly. Since the porous material absorbs the moisture that is in the soil, one has to water their plants more often. This is especially common in hot or dry climates. Another thing that can go unfavored is the actual fragility of terra cotta, susceptible to cracking or breaking if dropped or subjected to extreme temperature variations. They can crack in freezing weather when the material expands and contracts in the cold. Over time, mineral deposits from water and fertilizers may accumulate on the surface of the pots, affecting their appearance and sometimes even the health of the plants if not cleaned properly. However, with a little love and care, these problems are barely a concern, making these pots a good option to consider for any gardener.
How to Clean Terra Cotta Pots

How to clean terra cotta pots? When cleaning terra cotta pots, the aim is to retain them while permitting the plants to grow efficiently inside them. First, remove any remaining soil or debris. Rinse the pots with water to get rid of any surface dirt. Should stains or mineral deposits prove stubborn, soak the pots for about 20-30 minutes in a diluted vinegar solution made of one part white vinegar to three parts water; after soaking, scrub gently with a brush or sponge. Rinse once more thoroughly with fresh water after the cleaning process and leave the pots to dry completely in the air before using them again. If well maintained, there will be less chance for buildup to occur on your terra cotta pots, thereby keeping them in excellent condition.
Materials Needed for Cleaning
To clean your pots thoroughly, a few simple pieces of equipment are required. Chief among these is a brush with stiff bristles or an old toothbrush, to get rid of dirt and mineral deposits. For use as cleaning solutions, mild dish soap or white vinegar can do a great job at taking off buildups. Also, some warm water in a bucket or sink is needed; sufficient enough to allow pots to be entirely submerged. Another option for troubling stains is hydrogen peroxide or baking soda, especially if you intend to keep your cleaning routine gentle. Lastly, you’ll want to dry off your pots with a clean cloth or towel before being able to use them again. Having all these materials ready and on hand will surely see you through an easy and efficient cleaning process.
Step-by-Step Cleaning Process
Empty and Rinse the Pots: Any remains or dirt clogs out of the pots are made sure to be emptied before being rinsed with a high force of water, so much grime would be loosened.
Prepare the Cleaning Solution: I mix a solution of resorting soap or white vinegar and some warm water in a big bucket or the sink, both being good at dissolving grease and buildup.
Set to Soak: I let the pots hang in the prepared bath for about 15 to 30 minutes. This soaking can help soften stubborn stains or residues, allowing for easier scrubbing.
Scrub Away the Buildup: If there are stubborn stains, I apply some baking soda or hydrogen peroxide on them, scrubbing gently with a pad or sponge. I concentrate on the stained areas but refrain from physically aggressive scrubbing that might damage the pot surface.
Washing: Potting, I go in for a good rinse, balancing with warm water to wash off the solution along with any residue.
Dry: Last and always, I wipe off the pots using a clean cloth or towel so that they are dry, ready to stand some water spots or rust.
And so, I keep my pots clean, perfect, and ready for the next round of actual use!
Using Bleach to Disinfect Terra Cotta Pots
A diluted bleach solution is my first solution upon disinfection of terra cotta pots; one part bleach to ten parts of water. This dilution kills harmful bacteria, fungi, or pests without damaging the pots. I submerge the pots completely in the solution that all surfaces are bathed in it-and soak for about 30 minutes. At the end of the soaking process, I enhance the cleaning by gently scrubbing with a soft brush to dislodge any stubborn dirt or grime. The next step is to give final rinsing under fresh water to wash off any residual traces of bleach. I then lay them out under the sun to dry because sunlight is yet another free sterilizer. This way, I will have fully sterilized pots and safely reuse them for planting down the road.
Maintaining Clean Terra Cotta Pots

Keeping terra cotta pots clean necessitates the establishment of a recurrent cleaning schedule. First, empty the pots of any old soil and plant debris. For more thorough cleaning, let them soak in a solution of water and mild bleach. Use the ratio of ten parts water to one part bleach for approximately thirty minutes. After soaking, gently scrub off the dirt or mineral deposits with a soft brush-wearing, keeping in mind not to harm the pot surface. Wash each pot generously with clean water to remove any remaining detergent residue. Set these clean pots out to air dry under direct sunlight, which will help achieve natural sterilization. This kind of treatment keeps the pots hygienic and extends their life, setting the stage for a healthier environment for the next plant.
How Often to Clean Clay Pots
From my experience and research, clay pots should ideally be cleaned at the end of a growing season or in the event they are about to be reused for other plants. This process will serve to clean away any residual dirt, salt deposits, or pathogens harmful to the plants. Still, the heavier the buildup, the more mid-season cleaning is warranted, especially when changing plants. Light maintenance like wiping them with a damp cloth, keeps them in good condition through the growing season. Regular cleaning ensures that the pots make a great visual statement and offer a healthier setting for your plants.
Tips for Keeping Pots Clean Longer
One of the best things I’ve done to keep pots cleaner for longer is to ensure that they are cleaned properly between planting seasons. I always remove every bit of old soil, see to it that all residue is scrubbed out, and, most importantly, disinfect the pots; this is extremely important if they are to be used for a different species of plant. Proper well-draining potting soil coupled with a thin layer of coarse gravel at the bottom of the pot must have been able to reduce much of the buildup. I tend not to overwater, just a little, for the accumulation of moisture would make perfect conditions for algae and molds to grow in. The location of the pots would be arranged in such a way as to promote good air circulation and to receive sunlight every now and then so that the spots of damp condition conducive to grime would be prevented. Usually, one regular check-up of the pots followed by a quick wipe-down every couple of weeks will keep them clean and ready to host an environment conducive to plant growth.
Preventing Algae and Mold Growth
In the presence of algae or mold, I maintain the delicate balance of moisture-Sun-cleanliness. Never overwater the pots; if there is one thing that coaxes mold, it’s poor drainage, allowing water to pool. Location is crucial; plants seated with the proper sunlight and air circulation do not allow dampness, thus cutting down on mold risk. While watering, I consciously do not keep water droplets on the leaf surface or on the topsoil, because such situations favor mold formation. It is also fitting that every now and then, I clean the pots and trays of plants, washing away any film that might encourage growth. A diluted vinegar or hydrogen peroxide solution helps as a natural remedy to cleanse affected areas without damaging plants. These activities ensure a mold-free environment for both the plants and me.
Preparing New Clay Pots

When preparing new clay pots for planting, it is essential to ensure that the clay pots are cleaned and ready to support good growth. Soak the pots in water for a few hours to saturate the porous clay and prevent it from drawing moisture from the potting soil. Next, scrub the pots with a brush to remove all dirt, dust, and residue. For a thorough sanitation, especially if the pots have had a previous use, rinse them with a fairly strong solution of vinegar and water (one part vinegar to ten parts water) to remove bacteria or salts left behind. Let the pots air dry completely before filling them with soil and planting. Such treatment renders your clay pots ready for your plants to grow well.
Cleaning New Terra Cotta Pots Before Use
Properly cleaning new clay pots helps to prepare them for planting. The pots are rinsed with water to remove any loose dust or dirt left from the manufacturing process. Next, they are soaked in clean water in a bucket for about 24 hours. This soaking aids in saturating the porous material and keeps the pots from drawing moisture from the soil when planted. Following a full soak, I check the pots for any residue and, if necessary, scrub them down with a soft brush. A final cleaning requires the pots to be air-dried, with soil added only when completely dry. This simple procedure ensures the pots are ready and safe for use and gives the plants a good start.
Sealing New Clay Pots for Longevity
Applying a sealant to the inside of clay pots is the first step to sealing new ones. This is so that excessive amounts of water are not absorbed, weakening the material over time. Before sealing, I always make sure that the pots are clean and completely dry. I apply an even coat with a brush that must dry thoroughly, depending on the sealant instructions. Sometimes, a second coat is applied for additional protection. The sealing protects the pots from loss of durability and prevents cracking, so that the pots can last through a few planting seasons while bearing up to healthy plant growth.
Importance of Disinfecting New Pots
Disinfecting new pots is an important step towards preventing the transfer of harmful pathogens to the plants. In fact, even new pots could harbor bacteria, fungi, or pests that could affect plant health. My initial step in disinfecting pots involves scrubbing them with warm water using a brush to remove all residues. Then I soak them for 10 to 15 minutes in a home-made solution containing diluted bleach with one part bleach and nine parts water. This dissolves any spores or contaminants that could be present. Finally, I give the pots a thorough rinse with clean water and allow them to air dry completely before use. This extra step has worked well for me, guaranteeing my plants have a healthy and disease-free environment on which to grow.
References
-
Martha Stewart: This guide explains how to clean terra cotta pots using a mixture of white vinegar and water, soaking them for at least 30 minutes, and scrubbing with a soft brush. Source
-
Better Homes & Gardens: This article details the process of cleaning terra cotta pots by removing old soil and debris, and washing them with a dishwashing liquid solution. Source
-
The Spruce: This resource outlines three methods for disinfecting terra cotta pots: using chlorine bleach, isopropyl alcohol, or phenolic disinfectant. Source
Frequently Asked Questions (FAQ)
How often should you clean terra-cotta pots?
It’s important to clean your terra-cotta pots regularly to prevent the buildup of salts and minerals that can harm your plants. Generally, cleaning them every time you change the potting soil or at least once a season is advisable. If you notice any crusty residue or algae growth, it’s a good sign that your pots need immediate attention. Using a solution of one part bleach to ten parts water can help disinfect terra-cotta pots effectively. Additionally, if you live in an area with hard water, you may need to clean more often to prevent mineral deposits. Taking these steps will ensure your pots stay in good condition and your plants thrive.
What is the best way to disinfect terra-cotta pots?
The most effective way to disinfect terra-cotta pots is by using a solution of one part chlorine bleach to ten parts water. This solution can kill any bacteria, mold, or mildew that may reside in the porous material of the pot. After soaking the pots in this mixture for about 10-15 minutes, scrub them with a nylon scrub brush to remove any stubborn residues. Rinse thoroughly with tap water to wash away any remaining bleach and let them dry completely in a dry place before reusing. Alternatively, a vinegar solution can also effectively clean and disinfect these pots without harsh chemicals, making it a great option for organic gardening.
Can you clean clay pots with bleach?
Yes, you can clean clay pots with bleach, but it’s crucial to do so carefully. A solution of one part chlorine bleach mixed with ten parts water works effectively to disinfect clay pots. However, you should avoid using bleach on pots that have intricate glazes or decorations, as bleach can damage these finishes. After soaking the pots, be sure to rinse them thoroughly with water to eliminate any bleach residue. If you’re concerned about using chemicals, consider using a vinegar solution or a mild detergent instead. These alternatives can effectively clean clay while being gentler on the pots.
How do you clean caked-on soil and debris from terracotta pots?
To clean caked-on soil and debris from terracotta pots, start by removing as much of the dry soil as possible. You can tap the pots gently or use a plastic bucket to lightly knock off the excess. For stubborn residues, soak the pots in warm, soapy water with a few drops of dishwashing liquid. After soaking for about 15-20 minutes, use a scrub brush to remove the remaining dirt. If necessary, you can also use a solution of one part bleach to disinfect the pots afterward. Rinse thoroughly with rainwater or tap water, and let them dry completely in a dry place.
How can you prevent mold from growing in clean terracotta pots?
To prevent mold from growing in clean terracotta pots, ensure that they are thoroughly dried after cleaning. Mold thrives in damp conditions, so it’s essential to allow adequate air circulation around the pots. Using a well-draining potting soil can also help prevent excess moisture from accumulating. Additionally, consider placing your pots in a location that receives good sunlight, as UV rays can inhibit mold growth. If you notice any signs of mold, remove the affected soil and clean the pot with a vinegar solution or a diluted bleach mixture to eliminate the spores. Regularly inspecting your pots will help you catch any potential issues early.


