
Drying curly hair tends to be a dreadful thought for most, but with the right skills and tools, you can do a lovely job of enhancing your natural curl and imparting all-day volume and definition. This guide serves as your reference for learning how to blow-dry curly hair, breaking down every step in detail to achieve salon-quality results at home. Whether you’re going for ultradefined curls, soft waves, or controlled volume, knowing all about this process will help you a great deal. In this article, we will discuss preparations, selecting the right tools, preventing heat damage, and a few advanced tips that will make achieving your style an easy task. Get ready to elevate your curly hair regimen with industry secrets and expert methods.
Understanding Curly Hair Types

Curly hair types are usually divided into three major subtypes depending on the shape and texture of the curls: Type 2 (Wavy), Type 3 (Curly), and Type 4 (Coily). Under these, there exist finer divisions ranging from A to C as an indication of the extent of looseness or tightness of the curl.
Type 2 (Wavy)
Hair has an S-shaped wave pattern and is usually fine, making it less prone to frizz.
Type 3 (Curly)
Hair is composed of very well-defined curls, ranging from loose loops (3A) to tighter corkscrews (3C). Curls need more moisture to retain their shape and minimize frizz.
Type 4 (Coily)
Defined by tighter curls or coils and very much prone to dryness and shrinkage with a range of textures varying from soft, springy (4A) to dense, zigzag-like (4C).
Essentially, knowing about your curl type helps you select the kind of products and method that will take care of your curls just right.
Different Curl Patterns
Curl patterns are essentially intertwined with the hair follicle’s shape. Oval or asymmetrical follicles create textured hair, hence various types of curls. The categories of curl patterns are broken into four main types:
- Type 1 (Straight): Hair has no wave or curl pattern to it and lies flat from root to tip. It tends to reflect light evenly, giving a glossy sheen.
- Type 2 (Wavy): An S-shaped pattern ranging from loose (2A) to more defined and coarse waves (2C). With such a hair type, various textures can be present, which makes it prone to frizzing if not correctly cared for.
- Type 3 (Curly): Shows a much finer curl structure, ranging from larger loose spirals (3A) to tighter corkscrews and ringlets (3C). Typically, these curls require continuous hydration to maintain their shape and minimize frizz.
- Type 4 (Coily): Comprised of very tight curls or coils ranging from soft curls (4A) to dense zigzag patterns (4C). Due to its tightly coiled nature, Type 4 hair is prone to dryness and shrinkage; therefore, it requires intensive moisturizing treatments.
Recognizing your own particular curl will help you determine the best way to care for them, focusing on products and methods suited for your kind of curl.
Caring for Your Curl Hair
A good hair care begins with knowing that curly hair tends to lose moisture and is susceptible to damage. To keep curls healthy, the following main procedures should be carried out:
Washing:
Use a sulfate-free shampoo or co-wash to gently wash off dirt and oil from the scalp, avoiding the stripping of natural oils. Water washing hair less helps it to stay hydrated.
Conditioning:
Deep condition your hair regularly to restore moisture and increase curl elasticity. Look for products containing natural oils, such as argan and coconut oil, to help maintain moisture retention.
Styling:
Apply leave-in conditioners, curl creams, or gels to set and define curl patterns. Use a wide-tooth comb or fingers to detangle, as this will reduce hair breakage.
Drying:
It is best to avoid heat when drying. Use a microfiber towel or a cotton T-shirt to minimize frizz. Alternatively, air dry or diffuse dry on a low heat setting to maintain the integrity of the curls.
Trimming:
Schedule regular trims every six to eight weeks to prevent split ends and encourage healthy growth.
A curly hair care regimen tailored to your curl type will have your curls popping with plumpness and vigor, with each one defined and smooth, and will be a significant contribution to the long fight against damage.
Common Challenges with Dry Curly Hair
Moisture Retention
Due to the natural structure of curly hair, it is prone to dryness because the oils produced by the scalp struggle to travel down the spiral-shaped strands.
Frizz
With the lack of moisture and the presence of factors such as humidity, hair becomes frizzy and forms an unmanageable mass of curls.
Breakage
The natural bends and twists of curly hair make it inherently vulnerable to breaking, especially when handled roughly or improperly.
Tangles and Knots
Dry, curly hair tends to tangle, which can create knots that are tough to unravel without compromising the hair further by breaking and damaging it.
Split Ends
Things can go from bad to worse for curly hair the longer it is left dry and the less maintenance it receives.
Preparing Your Curly Hair for Blow Drying
1
Wash and Condition
The curls need to be washed with a sulfate-free shampoo to cleanse the hair without stripping away the necessary natural oils, allowing the hair to retain its moisture. A conditioner for curly hair is the ideal option to follow because it contains the moisturizing capabilities needed for hydration and frizz reduction.
2
Apply a Heat Protectant
A high-quality heat protectant should be evenly distributed throughout the entire hair after washing. Blow-drying curly hair is always best, as it provides as much moisture protection as possible from exposure to heat. This hair is curly and dry, making it easily breakable when exposed to high heat.
3
Drying Gently Before Blow Drying Process
Pat your hair dry with a microfiber towel or, preferably, a cotton t-shirt. Avoid rubbing, as this can only encourage frizz and tangles. Your hair should be damp, but not dripping with water, as you put it into the blow dryer.
4
Detangle Cautiously
A wide-tooth comb should be used to gently detangle the hair, or, better yet, your fingers will serve the purpose better when the hair is still damp. This procedure will ensure fewer knots in the making as the hair dries and also good uptake of any applied product.
5
Section the Hair
Section the hair with clips to ensure even drying and gain better control, maintaining curl definition and reducing heat exposure in any one area.
Importance of Heat Protectants
Heat protectants serve as your hair’s first line of defense against the heat produced by styling devices, including blow dryers, flat irons, and curling wands. The formulation ensures that moisture is retained and minimizes damage to the hair cuticles, thereby preventing breakage and forming a protective shield over each hair strand. With silicones and polymers, the heat protectants ensure that heat is evenly distributed, preventing overheating in specific areas. Furthermore, some heat protectants contain nurturing vitamins and natural oils that keep the hair conditioned, so it remains soft and shiny even when operating at high heat. Applying a heat protectant before styling will help maintain your hair’s health and strength and shall keep it from breaking, essentially keeping the hair’s overall integrity intact.
Using Detangling Sprays
Detangling sprays simplify the removal of knots and tangles, reducing the potential for hair breakage and pain that often occurs during brushing or combing. Mostly, they contain conditioning ingredients such as silicones or cationic surfactants that lay down the hair cuticle and lessen friction between strands. Many also contain moisturizers, such as glycerin or panthenol, to hydrate and strengthen the hair, making it more manageable. To use, apply the spray liberally to damp or dry hair, especially in tangled areas, before gently working it through with a wide-tooth comb or detangling brush. Such sprays work wonderfully for textured, long, or easily damaged hair types, preserving their health and enhancing manageability.
Choosing the Right Shampoo and Conditioner
When selecting shampoo and conditioner, I consider my hair type and the specific requirements it entails. Dry or damaged hair, for example, requires products that claim to hydrate or repair, and may likely contain argan oil, keratin, or shea butter. For oily hair, I opt for those that are light and clarifying, balancing the scalp oils without straining. I always opt for sulfate-free products, especially when I want a mild clean or when my hair is color-treated or sensitive. Additionally, when using these Products, I would typically match the conditioner with the shampoo; after all, the conditioner should address similar concerns to maintain a consistent care regimen for my hair.
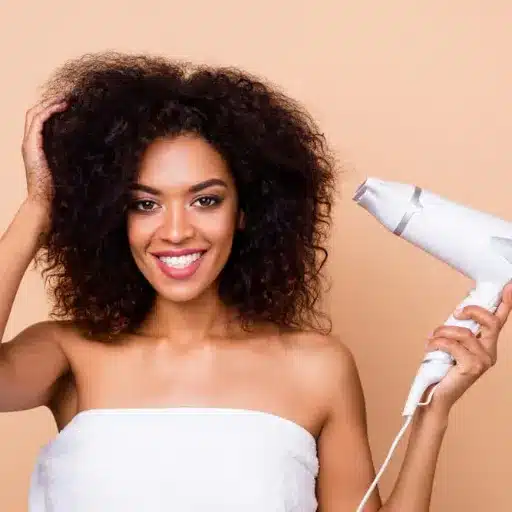
Essential Tools for Blow Drying Curly Hair

The art of blow-drying curly hair effectively demands the right kind of equipment that preserves the natural curl pattern and avoids frizz. A good-quality blow dryer with adjustable temperature and speed settings is needed to maintain control and minimize heat damage. Using a diffuser attachment is actually quite helpful; it disperses airflow evenly and sustains the definition of curls. Heat protectant sprays must be applied before any blow-drying process to shield the hair from damage. Additionally, a wide-tooth comb or detangling brush can be used to gently smooth and separate the curls without causing breakage. Sectioning clips will also be helpful for working in small sections, ensuring even drying and styling throughout the hair.
Types of Blow Dryers: Ionic vs. Traditional
Ionic and traditional blow dryers differ primarily in their function, impact on hair, and suitability for various hair types.
Benefits of Using a Diffuser
- Even Heat Distribution: The diffuser distributes heat evenly throughout the hair, preventing damage at any one spot and allowing for healthy hair growth.
- Enhanced Curl Definition: This works very well for curly or wavy hair, helping to define and hold natural curls without causing frizz.
- Reduced Drying Time: This allows the airflow to spread over a larger portion of the hair, resulting in faster drying.
- Minimized Frizz: The distributed air prevents excessive disturbance of the hair cuticle, resulting in smooth finishes free from frizz.
- Versatility Across Hair Types: In fact, a diffuser can work with any hair texture, making it a great way to add volume, create waves, or maintain your natural pattern.
Round Brushes for Curl Enhancement
Round brushes are ideal for creating and enhancing curls due to their cylindrical shape and heat-retention properties. The brush’s function is to impart tension uniformly on the hair during styling, this tension being crucial for shaping clear curls or waves. The barrel, typically made of ceramic or another heat-conductive material, helps dry and straighten hair much faster when used in conjunction with a blow dryer. The different sizes of round brushes enable accuracy and versatility, depending on the tightness of the curl desired. Techniques such as controlled sectioning of the hair and rotation of the brush help form the best curls without causing tangles or heat damage.
Step-by-Step Guide to Blow Dry Curly Hair

1
Preparation
Wash your hair with a moisturizing shampoo and conditioner to retain moisture. Lift the water out gently with a microfiber towel or cotton T-shirt to prevent frizz formation. Then, apply a heat protectant and a styling product to lift your curls evenly onto your damp hair.
2
Sectioning
Toward the end, divide hair with clips into manageable sections. Smaller sections allow better control and defined curls during the blow-drying procedure.
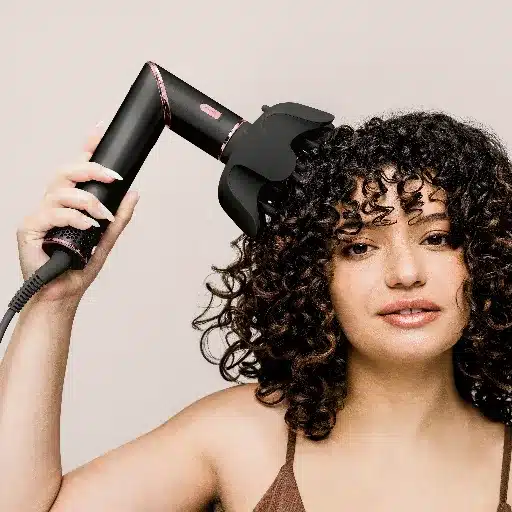
3
Using the Diffuser
Attach the diffuser to your blow dryer as this tool helps the dryer do away with direct heat while maintaining the curl pattern. Typically, a lower or medium heat setting is best to avoid heat damage.
4
Drying Technique
Once you place the section of hair into the diffuser bowl from the root, gently press it with the presser to keep the curl from being retained too much movement, which can cause frizz. Once dried, move to the next section to keep it dry.
5
Finishing Touches
Gently scrunch your curls to increase volume and definition. Next, either apply a lightweight oil or serum to impart shine and tame any potential frizz. Don’t overwork those curls, or their laid-back vibe might just vanish.
Sectioning Your Hair for Even Drying
The preparation is high in Interior Design, to achieve even drying and consistent curl definition. Start blocking your hair into sections, usually four to six, depending on thickness and length. Then clamp up the sections, keeping them manageable and untangled. Then begin drying the lower sections first until all are dry. Ensure each area is completely dry before proceeding to the next. This method will reduce drying time and provide uniform results by minimizing frizz and enhancing curl formation. This technique of the sectioning process is very worthwhile for an orderly drying method while pursuing an excellent styling result.
Techniques for Blow Drying Curls
Knowing when and how to blow-dry the curls will help to retain the essence of the curl pattern while lessening frizz and maximizing definition. The use of a diffuser attachment is essential, as it distributes heat evenly and reduces direct airflow, thereby minimizing the movement of curls compared to hand-drying with direct airflow. After applying a heat protectant and curl-enhancing product to damp hair, ensuring even distribution to protect the hair from heat damage and boost curl structure, gently lean your head and bring the diffuser close to the roots; your curls will fall naturally into the attachment. Use low heat and speed settings, which will minimize exposure to heat on your curls and the generation of frizz. When you dry, either pause your hand action to scrunch upward on your curls for volume and bounce or continue drying with as little touching as possible. The less you touch your curls while drying, the more they will clump together and retain their definition. Being consistent will give you beautifully polished curls that are defined and mostly frizz-free.
Finishing Touches for Smooth and Defined Curls
To achieve smooth and defined curls, I focus on sealing in moisture and controlling frizz. I apply a lightweight, curl-enhancing serum or oil to the dry curls and gently scrunch it in with my hands for added shine and to tame any flyaways. When needed, I use a little more anti-frizz or defining cream to spot-treat areas that require extra control. Then, I lightly mist flexible hold hairspray to set the style and ensure my curls stay well-defined throughout the day. Following these simple steps, I consistently achieve sleek and well-defined curls.
Tips for Maintaining Curl Definition
💧
Hydration
Use a sulfate-free moisturizing shampoo and conditioner to hydrate curls and prevent dryness.
🌬️
Proper Drying Techniques
Either leave your hair to dry naturally or blot excess water with a microfiber towel to avoid disrupting the formation of curl patterns.
✨
Right Products
Makeup gels, creams, or serums designed for curls help define and fight frizz.
🌙
Sleep Protection
Either hug the curls on a satin or silk pillowcase or wrap them in a silk scarf to protect curls overnight.
🚫
Avoid Over-Manipulation
Less brushing and combing will keep unwanted frizz and loss of definition at bay once curls are styled.
Avoiding Frizz During Blow Drying
The blow-dry process should begin with somewhat damp hair. Then, apply heat protectant or anti-frizz serum evenly throughout the strands. A blow dryer equipped with a diffuser is ideal because it diffuses heat well and does not ruin the coarse texture of the hair. To prevent frizz, heat should be kept at a low or medium setting. Always use downward airflow down the hair shaft to smooth the cuticle. For the most significant benefits, finish by turning the cool air on to seal in moisture and add shine.
Heat Protection for Dry Hair
When hair becomes dry, it can easily become damaged by heat, so preventing heat damage is extremely important. First, choose a good heat protector specifically designed for dry hair. Look for silicon-based ingredients, such as dimethicone and natural oils, as they coat the hair and help prevent moisture loss during styling. Hydrating additions, such as argan oil, shea butter, or keratin, will also serve to rehydrate while acting as a barrier.
While styling, keep the temperature of your styling tool within the recommended range for your hair category, which is between 300°F and 370°F if you have dry or damaged hair. It will be detrimental if you use higher temperatures, as it will dry out and break your hair. Split your hair into small sections to ensure even heat application with reduced exposure time. Limit the frequency of heat styling, if possible, allowing your hair time to recover and hydrate.
Consider also doing regular deep conditioning treatments, which will strengthen and nurture dry hair over time. Deep conditioning treatments improve elasticity to keep your hair resilient even while being exposed to heat.
Post-Blow Dry Care for Curly Hair
After blow-drying curly hair, maintenance of moisture and definition is essential. A lightweight leave-in conditioner or curl cream is used to hydrate the curls and prevent frizz. To seal in that moisture, apply a minor quantity of natural oil, such as argan or jojoba, focusing on the ends. Over-manipulation is avoided to keep the curls well-defined. Drying with a silk or satin scarf or pillowcase further aids in reducing friction and curb breakage. This aftercare keeps the curls nourished and well-defined following heat application.
Reference Sources
-
Wella Professionals: How to Blow Dry Curly Hair in 6 Steps
Offers step-by-step guidance and tips for using a diffuser attachment effectively.
-
Sam Villa Blog: How To Blow Dry Hair Without Damage – Ultimate Guide
Focuses on techniques to avoid damage while blow-drying curly hair.
-
L’Oréal Paris: How to Blow-Dry Curly Hair Step-by-Step
Provides product recommendations and detailed instructions for achieving frizz-free curls.
-
African Pride Hair: How to Safely Blow Dry Natural Hair Without Damage
Emphasizes the importance of preparation, including moisturizing and using heat protectants.
-
Beautycon: 7 Essential Rules for Blow Drying Curly Hair Without Damage
Shares essential rules for protecting curly hair during the blow-drying process.
Frequently Asked Questions (FAQs)
How to Blow Dry Curly Hair Without Frizz?
Usually, you would wash and condition curly hair with exceptional products. After towel-drying to remove all excess water from the hair, use a blow-dry primer to seal the cuticle layer and protect against heat damage. Then use a diffuser to apply heat evenly, which helps diminish frizz and promotes the natural behavior of your curls.
How to Reduce Dry and Frizzy Hair When Blow Drying?
To protect your hair from drying and frizz, avoid blow-drying on thoroughly wet hair. Instead, gently towel-dry, then apply a leave-in conditioner or serum that prevents frizz. Blow-dry with the nozzle directed downward, using a diffuser to direct the airflow and minimize frizz.
Can a Regular Blow Dryer Be Used for Curly Blow Drying?
Yes, a regular blow dryer can be used, but a blow dryer with a diffuser is highly recommended for best results. The diffuser evenly applies heat, helping to define your natural curl and keep frizz at bay. If you only have a regular blow dryer, then using low heat will be your best option.
How to Section Hair for Blow Drying Curly Hair?
To section hair for blow-drying, part hair into 4 main sections: two at the front and two at the back. Use hair clips to hold each section. With this method, you can focus on drying each section of hair properly to achieve the best curly look, ensuring no areas remain dry.
Is It Better to Blow-Dry or Let Your Curly Hair Air-Dry?
Whether to blow-dry or let curly hair air-dry depends on the hair’s texture and type. Blow drying helps define curls and reduces drying time, while air drying means less heat damage. If you must blow-dry, always diffuse to protect your curls and prevent frizz.
What is the Best Technique for Drying Curly Hair with a Diffuser?
The best way to blow dry curly hair with a diffuser is to place the sections of wet hair into the bowl of the diffuser and gently pull it towards the scalp while moving around the head to dry each section, keeping the nozzle pointed down the hair shaft at the same time. This will help define the curl pattern and keep frizz at bay.
Ready to Transform Your Curls?
With the right techniques, tools, and products, you can achieve salon-quality results at home. Remember to always prioritize hair health and moisture to keep your curls looking their best!


