
Among the many problems that can be encountered in 3D printing, heat creep is one of the most common. It is responsible for filament jams and inconsistent extrusion which can ruin a print. This guide will tell you all about how to deal with this problem effectively so that you can still achieve high-quality prints with your 3D printer while also ensuring its durability. We are going to look at what causes heat creep, how to know if your printer has it, and different ways of fixing or preventing it. You will find useful tips on avoiding errors in printing perfect models without risking damage to the device whether an experienced user or just starting out with three-dimensional printing technology.
What is Heat Creep in 3D Printing?
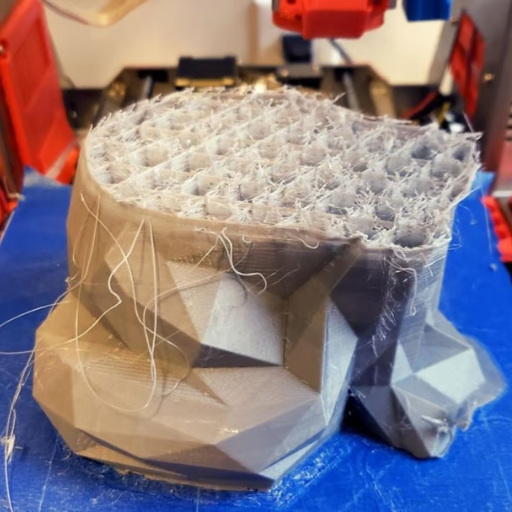
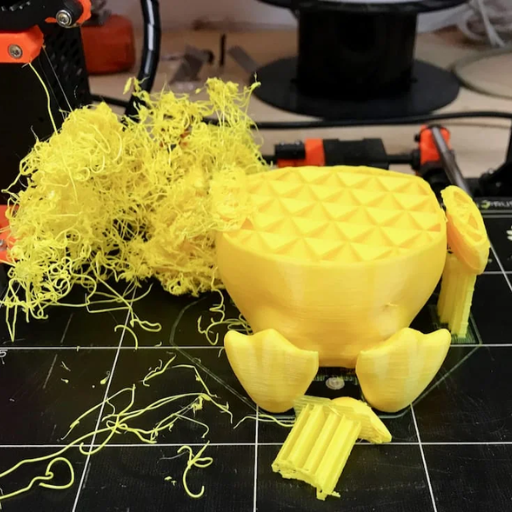
Image source: https://all3dp.com/
Heat creep in 3D printing occurs when heat moves from the hot end to the cold end of a printer, melting filament too soon. This usually comes about through bad cooling or insulation between parts. Subsequently, this leads to blockages within the extruder as softened filament can get stuck thereby causing uneven extrusion and ultimately failing to print properly. Printers should be designed with an understanding of how heat creep works so that they can be fixed or avoided altogether for seamless printing operations every time.
Understanding heat creep explained
Heat creep is primarily caused by inadequate cooling of the hot end that heats up inappropriately at some points above the heating element. This occurs when heat from the heater block travels up through filament path. Environmental temperature, printing speed and design of the hot end or heat sink can worsen this problem. When softening starts too early due to over-heating above heater block, extrusion problems usually occur like clogs etcetera.. The thermal gradient should be kept steep at transition zone of extruder so as to reduce cases of heat creeping which can be achieved by proper installation of heatsink with active cooling fans as well as insulating the hotend.
Why heat creep occurs in 3D printers
Heat sneaks into 3D printers when it comes to dynamics of heat and inadequate cooling. To begin, the filament gets heated up too quickly when the hot end moves towards the cold end due to an ineffective heat break. Another thing that could happen is that a cooling fan may not blow enough air around or in right directions to separate hot places from cold ones. Finally, surrounding conditions including high room temperatures and long periods of continuous printing exacerbate these problems making it difficult for printers to dissipate heat properly thereby causing premature softening of filaments leading to jams and failed prints.
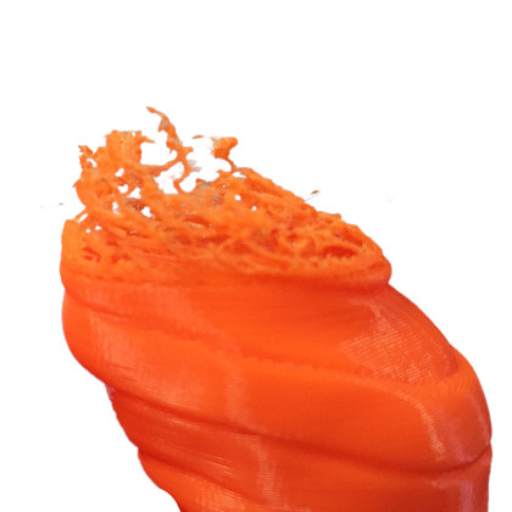
Consequences of heat creep in 3D printed parts
The consequences of heat creep can be very harmful for 3D printed parts because it negatively affects the quality and success of print jobs. First, when the filament gets soft too early, it can block the extruder partially or completely which means that there will be no extrusion at all or it will not be even. There are often shifts in layers, under-extrusion and weak spots in prints. Second, frequent maintenance is required due to clogs themselves as they cause machines to be out of order for longer periods of time so that total productivity drops significantly. Besides this problem with downtime stringing and blobs occur on printed parts when melted material flows around without any control caused by heat creeping up into cold areas before reaching hotend where plastic should be melted. These defects are not only ugly but also make object useless for functional purposes because they affect its strength thus making it fail under load. That’s why efficient cooling methods must be combined with proper printer care if we want high-quality 3D printing results to come true.
What Causes Heat Creep in 3D Printers?
Mainly inadequate thermal management around the hot end is what results in heat creep in 3D printers. There are a number of causes to this problem: low heat dissipation, poor cooling and high room temperatures. If not well managed, the heat produced by the hot end can move up along the filament path making it soften prematurely. This problem is worsened by lack of enough or wrongly pointed cooling fans which do not keep hot zones far from cold ones. In addition, these conditions are aggravated during long printing hours and when the ambient temperature rises because they prevent effective dissipation of heat that can lead to jams and failed prints. For that reason, effective cooling methods should be used together with regular maintenance to prevent heat creep.
Common causes of heat creep
- Insufficient Cooling: Among the major reasons for heat migration happens to be inefficient cooling around the hot side. Whenever airflow separation between hot and cold regions is not being achieved by cooling fans, heat can rise thereby causing early softening of filament.
- Poor Heat Dissipation: Poor heat dissipation is also a major cause. If the transfer of heat away from the hot side is not done well, adjacent components may get overheated and this raises chances of melting or deformation of filaments in supposed-to-be cool areas.
- High Ambient Temperatures: Increased ambient temperatures are another factor behind heat migration. When the environment around becomes too warm, printer finds it harder to dissipate heats which worsens clogging among other printing problems.
How filament type affects heat creep
Heat creep can be highly likely in 3D printing depending on what kind of filament is used. The thing is, these different materials have different points at which they melt, conductivity levels of heat and viscosity that influence their reaction with temperature changes within the hot end.
- PLA (Polylactic Acid): PLA has a melting point lower than ABS or PETG among other filaments. Hence it can easily succumb to heat creep if not adequately managed since it gets soft and deforms readily under high temperatures. Cooling should be done well during printing with this material so as to avoid premature softening.
- ABS (Acrylonitrile Butadiene Styrene): Compared to PLA, ABS’s melting point is higher so that it won’t suffer much from heat creeping although needs continuous handling at elevated temperatures. However still; poor dissipation of heat may cause problems especially when working in places where there are too many degrees around ambient air. Thus good cooling coupled with appropriate heat control goes a long way in reducing risks.
- PETG (Polyethylene Terephthalate Glycol): In terms of its melting temperature, PETG lies between PLA and ABS. As a result it is generally less susceptible to getting affected by heat creeping than PLA but the latter still should be cooled effectively for successful prints quality sustainability. Higher viscosity of PETG means that it might forgive some mistakes however this requires enough airflow together with adequate cooling so that nothing bad happens.
It would be better if we choose right filaments along side effective cool solutions while printing 3D objects because this prevents them from failing due to overheating which makes them unreliable too often.
The impact of print speed on heat creep
Heat creep in 3D printing is influenced by the speed at which printing is done. It produces excess heat during a given time hence overloading the cooling system. Fast print speeds cause extruders to work harder and at higher temperatures thus making filaments soft before time. But if print speed is reduced, more time can be allowed for cooling to take place thereby minimizing back flow of heat along filament path which would otherwise lead to heat creep. Nevertheless, very low speeds may result into longer exposure of filaments to residual warmth with potentiality of causing similar challenges. Therefore it is important to identify a good balance between rapid cooling and steady extrusion through finding the right print speed that will help prevent heat creep from happening while ensuring good quality prints are achieved.
Ways to Prevent Heat Creep in 3D Printing
- Use Effective Cooling Systems: Ensure that your printer is provided with adequate cooling by adding supplementary fans or using ones that are stronger to keep the hotend surrounded by the correct temperature.
- Optimize Print Speed: Find a point at which print speeds allow sufficient cooling while preventing heat from building up too much.
- Select Appropriate Filament: PETG or other high-temperature materials are less susceptible to heat creep than many others, so they can handle higher temperatures during their conversion into solid objects through extrusion better.
- Maintain Your Printer: Regularly examine and clean all cooling components, hotends, and extruders in order to maintain them at peak conditions which also helps in preventing heat-related problems.
- Adjust Retraction Settings: Adjust these parameters meticulously so as to reduce distances traveled by filaments when moving in and out of zones where they get heated, thereby minimizing chances for heat creep.
Implement all above mentioned tips and you will minimize the possibility of heat creeping while achieving more consistent and successful 3D prints.
Improving cooling fan performance
Here are some strategies for improving cooling fan performance in 3D printing:
- Upgrade Your Fan: Swap out your standard cooling fan with a higher-performance one like those made by Noctua or other reputable companies. These models offer increased airflow and more consistent cooling which is essential to fight against heat creep.
- Fan Shrouds and Ducts:
- Use shrouds or ducts around the fan to direct air flow more efficiently at the hotend. This will ensure that the heat is transferred away from it properly and decrease chances of leaving residual heat on filament.
- Dual Fans: Cooling can be greatly enhanced by implementing two fans set up where they blow cool air uniformly across both sides of the hotend and print surface. Doing so keeps stable filament temperatures thereby improving overall print quality.
By following these tips, you’ll make your 3D printer fans work better at removing heat hence managing temperatures rightly leading to high-quality prints.
Optimizing retraction settings
In 3D printing, there is a need to optimize retraction settings by adjusting some specific parameters so as to reduce filament stringing and enhance print quality. Points to ponder:
- Retraction Distance: Set the retraction distance in such a way that it will pull back the filament adequately enough to relieve pressure from the nozzle but not too much as to cause long waiting time before extrusion starts again. This should be between 1mm – 5mm for most cases; however; direct drive extruders require less retraction than Bowden setups.
- Retraction Speed: The speed at which you retract should be fast enough to prevent oozing yet slow enough not grind or strip off filament. It ranges from 20mm/s – 50mm/s typically with common speeds being ok but using faster ones carries risk of damaging filament.
- Extra Prime Amount: When extruding resumes after retracting, this setting adds some extra length because during retraction small quantity gets lost somewhere along the line hence making sure that it continues flowing uniformly always.
- Retraction Minimum Travel: For short moves retraction may not be necessary at all thus by defining minimum travel distance which needs to take place before starting another move we avoid unnecessary retractions especially on small models where many moves are done close together and mostly within same area. Ideally around 2mm would work well here.
- Retraction Z Hop: Giving Z some upward movement while lifting up avoids hitting already printed parts ensuring better surface finish is achieved without sacrificing accuracy due to collisions occurring between nozzle and objects being printed out below it when performing such actions like moving away or over them. Typically between 0.1mm – 0.5mm.
By playing around with these adjustments on your printer’s software interface, you can greatly reduce stringing as well as improve general appearance of finished products since they will look neat without any unwanted material hanging around unnecessarily.
Installing a better heat sink or fan
To improve the 3D printer performance you can upgrade a more efficient heat sink or fan which will cool better and reduce the risk of overheating. Here are some things to think about:
- Choosing the Right Heat Sink: Go for a bigger heat sink that has been made with aluminum or copper in order to increase thermal conductivity, and thus dissipate heat from critical parts more effectively.
- Selecting a High-Quality Fan: Look for higher CFM (cubic feet per minute) airflow fans which are quiet when they operate; also those that have ball bearings tend last longer while working continuously.
- Installation Process: First unplug your printer then wait until the hot end has cooled. Unscrew carefully to remove old heatsinks/fans if necessary; attach new ones using screws provided or mounting hardware supplied ensuring that it fits tightly enough not be loose; plug fan into correct connector on printers control board.
- Testing and Calibration: Power up printer after fitting new components, check operation of fan(s); make sure they start spinning as expected at required speeds for cooling improvements. Monitor temperatures throughout test print to verify enhanced thermal management.
A better investment in terms of stability and print quality can be achieved through purchasing improved heatsinks or fans for 3D printing devices.
How to Fix Heat Creep When It Happens
Heat creep is a standard problem in 3D printing where heat flows up the filament path, melting the filament too early and blocking the printer. Here’s how to fix it briefly:
- Check Cooling Efficiency: Make sure your heat sink fan is working well; clean any dust or dirt out of it and the heat sink so air can move through as much as possible.
- Use a Thermal Barrier: Try using a thermal barrier tube (often made of PTFE) between the hot end and other cooler parts on your printer – this will insulate more of the filament path.
- Adjust Printing Settings: If you have set it too high, lower the printing temperature; additionally raise retraction distance and speed during non-print moves so that there is less chance for heat creeping up along filament.
- Upgrade Components: If you are experiencing continual problems with heat creep, you may need to upgrade your cooling system to have an all-metal hot end which can handle higher temperatures more effectively.
By following these steps one can lessen the effects of Heat Creep and maintain consistent print quality.
Methods to unclog the nozzle
To eliminate the blockage or jam in the 3D printer nozzle, you can use one of the following methods:
- Cold Pull (Atomic Method): The nozzle should be heated to the printing temperature. When it reaches the required temperature, a filament is inserted into it and slightly pressed until it starts to come out. After that, reduce the temperature to 90-100°C for PLA or 130–140°C for ABS. At this point, quickly pull out the filament; if there is any foreign material left inside, it will be removed along with it.
- Manual Cleaning with a Needle: You can also clean out the nozzle by hand using a thin needle or pin. First heat up the nozzle so that any obstructions become soft, then carefully insert your sharp object into its opening while trying not to damage anything around.
- Chemical Soak: If none of the above works because clog is too severe then soak it overnight in appropriate solvent like acetone (for ABS) or hot water (for PLA). After few hours take a brush and clean all debris from inner side using compressed air gun.
Once you’ve tried these different methods described above based on your need , you should able get back printing again without wasting much time during troubleshooting process.
Cleaning the extruder and hot end
To maintain the proper performance of your printer or any other machine, there are certain procedures that must be followed when cleaning the extruder and hot end:
- Unload the Filament: BIncrease the temperature of the extruder to match that of the current filament then gently unload it so as not to block its way with remaining materials.
- Disassemble the Extruder: Power off the printer; carefully dismantle all pieces making up this component while keeping track on how they were originally set for easier putting back together later.
- Clean the Hot End: Make sure that you heat up your hotend until it reaches its working temperature. This will soften any stuck plastics. You should also use a brass brush which does not cause scratches but can clean thoroughly enough. Another method involves soaking in some solvent such as (hot water) when dealing with PLA or acetone which is ideal for ABS before wiping using a soft cloth afterwards.
- Inspect and Clean the Nozzle: During this time where heat from still remains, make use specific needles designed purposely for cleaning nozzles or pins could do too. Be very keen so that you get rid of anything like carbonized plastic and dirt particles which may have found their way into it.
- Lubricate Moving Parts: Once done with washing off dirties ensure applying a lubricant that can withstand high temperatures on movable sections within extruders so as to reduce friction during operations thereby minimizing wear and tear as well.
If these steps are followed strictly, one will be able to enjoy longer life spans coupled with improved efficiencies from their systems since they will now produce prints reliably without compromising quality.
Replacing the thermal barrier tube
One of the most important things you can do to keep your 3D printer in good working order, and ensure that it continues to print smoothly, is to replace the thermal barrier tube. Here’s a simplified guide based on the best way of doing it:
- Power Off the Printer: Make sure that the printer is unplugged and turned off so as not to cause any electric shock.
- Cool Down the Hot End: Allow some time for hot end cooling before touching it so as not to get burnt or damage anything else.
- Disassemble the Hot End Components: Remove fan shroud along with other components that may block access to thermal barrier tube.
- Remove the Old Thermal Barrier Tube: Take out gently unscrewed or detached previous thermal barrier from heated block and heat sink while being cautious about PTFE lining or delicate parts which might break easily.
- Install the New Thermal Barrier Tube: Screw on or attach another one ensuring its firmly fixed both into heated block as well as into heat sink.
- Reassemble the Hot End: Reattach fan shroud plus any other component removed previously making sure all connections are tight and secure.
- Test the Printer: Power up printer after assembling back together load filament then run test print to verify everything works okay.
By following these steps you will be able easily swap out a thermal barrier tube thus minimizing downtimes while maintaining printing quality.
Why Heat Creeps in Some 3D Printers More Than Others
The main factors that cause heat creep in 3D printers are the efficiency of thermal control systems and the configuration of hot end elements. If a printer has poor cooling methods or not enough heat sinks, it may experience excessive heat creep whereby warmth from the heated block moves up along the filament path resulting into early softening or melting of filament. Furthermore, material makeup together with quality of thermal barrier tube is also important – cheaper tubes may not insulate well thus increasing heat transfer. Such a problem can be solved by correctly adjusting printing settings and keeping the machine in good condition for better quality prints every time.
Design differences in 3D printer models
Performance, reliability, and applicability of 3D printer models are highly influenced by design disparities. Among the major dissimilarities is the extruder type; a direct drive extruder has its motor mounted on the print head to give better control over flexible filaments whereas Bowden extruders separate the motor from the print head thus reducing weight and allowing faster movement. Another main difference lies in bed leveling mechanism where automated bed level systems make it easier for users to operate printers with them as compared to manual beds that need more frequent adjustments for successful prints. Also build volume differs along with frame construction since some machines offer larger printing areas than others while having stronger stable frames which are necessary for accurate details in complex designs.Lastly firmware compatibility as well software used may vary greatly between different models thereby affecting user convenience and overall capabilities of a given machine.
Role of thermal barrier and heat sink
To ensure that a 3D printer can print efficiently and accurately, the hot end assembly needs two components: the thermal barrier and the heat sink. The thermal barrier, or heat break, blocks heats from moving up along the filament path by insulating between the heated block and colder upper parts. This way filament stays solid until it reaches nozzle so that there will be no such problems like clogs or jams.
On the other side of things, heat sink conducts excessive amount of heat away from thermal barrier. Usually having fins and combined with cooling fan for better dissipation efficiency; its job is to keep temperature low enough on heat break which helps maintain reliability throughout hotend as well as overall performance. What this means is during printing process if these two items don’t work together properly then not only will you get bad prints but your machine may also stop extruding entirely
The importance of ambient temperature and airflow
Getting the best 3D prints is reliant on managing ambient temperature and airflow. This means that one needs to have optimum ambient temperature so that his or her printer can operate within the recommended thermal range which prevents warping among other print defects caused by inappropriate temperatures. Consistent ambient temperature also helps in maintaining stability of printed materials especially those made from ABS since they are known to be very sensitive to changes in heat around them.
Airflow is another aspect that cannot be ignored when it comes to 3D printing. With proper ventilation, fumes and particles will not build up thereby ensuring safety for both the machine itself as well as its operator. Controlled airflow may also help a lot in terms of better cooling down each printed layer leading smoother surface finish while at the same time reducing stringing and blobs hazards involved during this stage of printing process. Therefore, it is important to balance between managing airflow around a printer and regulating room temperature if we want our prints look good consistently.
Frequently Asked Questions (FAQs)
Q: What is 3D printing heat creep?
A: Heat creep is the process where heat from the hot-end of a 3D printer travels up the filament path, causing unwanted melting and clogging in the cold end.
Q: How does heat creep affect 3D printing?
A: Heat creep can cause the filament to prematurely soften or melt before reaching the hot-end, leading to clogs, poor print quality, and interruptions in the printing process.
Q: What are some common ways to avoid heat creep in 3D printing?
A: Some ways to avoid heat creep include upgrading the heatsink, adjusting fan speed to improve cooling, using a PTFE tube with a higher heat tolerance, and applying thermal paste to enhance heat transfer.
Q: Why is the heatsink important in preventing heat creep?
A: The heatsink helps dissipate heat away from the filament path, preventing heat creep by ensuring the filament remains cool until it reaches the hot-end.
Q: How can adjusting fan speed help prevent heat creep?
A: Proper fan speed can improve airflow toward the heat sink, aiding in more efficient cooling and reducing the temperature gradient that can lead to heat creep.
Q: What role does the PTFE tube play in managing heat creep?
A: A PTFE tube with high heat tolerance can prevent heat creep by maintaining a cool environment for the filament, thereby reducing the chances of premature melting.
Q: Can using thermal paste help reduce heat creep?
A: Yes, applying thermal paste between the heat sink and the hot end can enhance thermal conductivity, ensuring efficient heat dissipation which helps prevent heat to creep.
Q: What is the significance of the hot-end in relation to heat creep?
A: The hot-end is where the filament is melted for extrusion. Managing the temperature and ensuring efficient heat dissipation at the hot-end are critical to prevent heat creep and ensure smooth 3D printing processes.
Q: How can the choice of filament impact heat creep?
A: Different filaments have varying thermal properties. Using a filament that is less prone to heat creep easily, such as those with higher melting points, can reduce the likelihood of clogging and other heat-related issues.
Q: Are there any hardware upgrades to consider for reducing heat creep?
A: Upgrading to a more efficient heatsink, using high-quality thermal paste, and ensuring a well-maintained cooling fan are effective hardware upgrades to reduce temperatures and manage heat creep in 3D printers like Creality Ender models.


