
Ranging from classic to cutting-edge, hair coloring techniques multiply endlessly as one’s creativity and imagination try to find ways to beautify the hair. Since there are so many techniques, it can sometimes feel overwhelming trying to choose the best suited for your hair texture, lifestyle, and eventual look. This blog throws light on some popular hair color techniques, with a sturdy spotlight on the timeless approach with an almost naturally sun-kissed finish. And with those discussed, allow me to tell you about a few others too, contrasting their techniques and uses, which will help you find the one for your dream looks. If you have been coloring your hair forever or this will be your first year walking through the world of hair color, this will be the insight on which you will base your decision.
Understanding Color Techniques

Balayage
Balayage is a contemporary hair coloring elucidation in which the color is freehand-painted on the hair, leaving a natural sun-kissed effect. The freehand application provides each custom canvas, merging uniquely with the natural shade of your hair. Balayage selection avoids the use of foils so that the transition will be softer, trickling down gradually rather than in spots created by the foils. As the hair grows out, the regrowth is kept minimally visible, making this one a preferred coloring for people that want a low-maintenance look. Balayage is especially amazing when you want to add a bit more dimension and brightness to your hair, and works well for virtually any hair type or hair length.
Ombre
The roots are deliberately made to be darker than the tips of the hair in the ombre style, creating a gradient and somewhat dramatic appearance. The technique is often used with bold contrasts, especially when one seeks a dramatic transformation. Since it does not disturb the root colors, ombre style demands less upkeep and is capable of growing into its vegetation beauty all by itself. It goes anything from subtle detailing to loud-for-configuration, whatever one is in the mood for.
Highlights
Highlights are the more classical technique that lifts the color using foils with one to get a few degrees of darker color in patches. Highlights can be fine and subtle, called “baby lights,” or they can be chunky for a more dramatic effect. Highlights are just perfect for creating a frame around your face; they animate movement and lift the overall hair shade for a fresh look.
By knowing all these, choosing the right color technique for yourself can embrace your style, how much upkeep you want to put into it, and of course, prefer the visual effect. That way, you will have an aesthetic that you are proud to call your own.
What is Balayage?
Balayage is a hair coloring technique that basically involves hand-painting highlights onto the hair, creating this beautiful natural sun-kissed effect. The development of regrowth traces less in balayage than with conventional foil highlights, giving it the blend between low maintenance and high fashion. Being that it works for all hair types and lengths, the technique is very versatile in achieving a highly customized multidimensional effect. A very natural finish-they say, almost as if the color was just given to your hair by the sun.
Overview of Hair Color Techniques
When it comes to haircoloring, a variety of different types exist to suit everyone’s preferences and styles. From conventional highlights and lowlights to the new dawn of balayage and ombré, every method focuses on unique results. Highlights give contrast by the presence of lighter strands, while lowlights impart shades for depth. Balayage provides a natural, hand-crafted appearance, where the ombré goes away from that approach into the more gradated style from dark to light. Each sort of technique for hair coloring gets a purpose, whether it is for adding dimension, making bold statements, or creating a grounded and easy-to-wear look. Your win lies in your personal style, hair type, and maintenance preferences.
Differences Between Balayage and Ombré
Balayage and ombré look much alike but are two very different techniques with separate outcomes. Balayage refers to a hand-painted highlighting technique reserved for almost subtle sun-kissed effects that blend with your natural base color. It is suitable for any hair length and is kind on your conscience as a low-maintenance style with very little regrowth either noticed or bothering you. Ombré, on the other hand, are on the bolder side with a legitimate transition from dark roots to bright ends. This one is for your vocal statement. The stark divergence is contrasted by balayage, which offers a much more seamless and natural finish. Your choice, in a way, depends on whether you want that Dresden look so subtle it seems too cool to be real or a really loud gradient scream.
Popular Hair Coloring Techniques
Balayage and ombré are subtly different styles in the hair-coloring area, and this understanding will allow you to decide on the style that best fits your individual preference. Balayage offers a natural sun-kissed look and soft blending that is something for the individual agent to consider if they seek a low-maintenance option where regrowth does not paint stark contrast. Ombré, on the other hand, works with a high contrast, gradient look where the roots are distinctly darker than the ends, meant to make a loud statement. You may want to decide between the two styles based on whether you prefer a natural finish or something defined for your more eye-catching personality and lifestyle.
Exploring the Balayage Technique
For the best coloring option, though, I love the versatility and natural finish of balayage. It creates a softly blended sun-kissed effect that grows out gently and thus is just what low maintenance is all about. I like how it enhanced my hair’s natural movements and texture without being too demanding in touch-ups. For me, the best thing about these sun-kissed hues is the soft custom finish that allows me to represent my style at a minimal yet chic level.
Ombré Hair Coloring Explained
It is a technique that involves smooth hair color transition from a darker shade at the roots to a lighter shade at the ends. Unlike the much more natural-looking and painted kind of color work of balayage, ombré sets a bolder contrast between these two tones while still maintaining being a seamless gradient. The wonderful thing about this process is that it really lets you get crazy with the colors—like platinum blondes or pastels—and not drastically change the base color. Great way to get noticed without going full-head blonde and super low-maintenance since your roots will just grow out darker. Because ombré works for all hair types and lengths, it provides a definite, stylish punch tailored to your liking.
Introduction to Dip-Dyed Hair
Dip-dyed hair is such an awesome way to express your creativity! Unlike ombré, which features a gradual blend of colors, dip dye is all about high-contrast color blocking, with the tips dipped in a bold shade. I love that it gives the freedom to experiment with crazy colors like electric blues, blazing reds, or neon greens without affecting the rest of the hair. Plus, it’s pretty easy to maintain because you can just trim off the colored ends as they grow out. Whether you want a subtle splash of color or a major statement, dip-dyeing is the ultimate canvas for making a personalized look that screams you.
Choosing the Right Technique for Your Hair Type

In determining one’s best dip-dye method for the particular type of hair considered, one should consider the specific texture, styles, length, and condition. From the perspective of fine or thin hair, it should not involve heavyweight bleaching agents to avoid damage and keep the hair healthy. Thick coarse hair, on the other hand, can withstand an aggressive treatment and will require longer time to have an even application of color. For curls or waves, applying the color when stretched or straightened ensures it is the same from strand to strand. Always consult a professional stylist for optimum health of hair in customizing the technique for your particular needs.
Factors to Consider for Hair Painting Techniques
When considering hair painting technique, I focus on my hair type, texture, and overall condition to guarantee the best results. For fine hair, I choose gentle applications so as not to cause damage, whereas my thicker strands, longer, and denser mien might require more product with time for even coverage. Because my hair is wavy, I make sure it is stretched or straightened during the whole procedure for consistent application of color. To keep my hair in perfect glory, questions are always put forth to a professional stylist who can adjust the technique to my needs.
Low-Maintenance Options for Busy Lifestyles
For low-maintenance hair options for crazy-busy schedules, simple yet effective options are mostly considered. I go for the balayage or root smudging color treatments because they do grow out relatively well. Dry shampoo is my savior in between washes, helping to keep hair fresh and voluminous. Protective hairstyles in the form of buns and braids also save me a lot of styling time and keep my locks from getting damaged. Hair moisturizers and regular trims keep it healthy with minimal effort daily. So by simplifying my entire regime and going for time-saving products, I will always look cute and stylish without ever compromising my tight schedule.
Color Trends and Their Suitability for Different Hair Types
As far as hair color trends go, I want to focus on colors that complement my hair type and personal style. Light colors or highlights may actually add some dimension and the illusion of fullness to fine hair, whereas darker hues would be more appropriate for thick hair as they enhance its natural depth. Urge colors such as pastels or vivid shades require upkeep; therefore, they may work best on smoother hair for a sleek finish-although one with proper care can flaunt these colors, too. I always consider the health of my hair when choosing daring colors because some might be more harmful and might need post-treatments to keep their lustre and moisture. So much for looking cool. It’s all about trying to find a compromise between the two!
The Basics of Hair Painting Techniques

Hair painting provides limitless options to add dimension and depth to the view. Balayage is one painting method where the colorist hand-paints the hair for natural, sun-kissed looks with soft gradients-it is perfect for low-maintenance looks. Ombre is a solid and bolder transition that imprints dark roots and light ends with full striking contrasts. Contrarily, classic highlights are when hair is sectioned and color applied over it with foils for sharp streaks of brightness. Depending on your hair texture, surface health, and color outcome, the technique may vary. Because this is a painted look, hair has to receive continual nourishment through conditioning treatment and subsequent touch-up applications to grow their vibrancy and looks fresh and alive.
Tools and Products for Effective Hair Painting
To do effective hair painting, I recommend always investing in good tools and products to ensure the best results. Brushes are always dependent on the size range, ensuring accuracy and flexibility, while a plastic bowl would be suitable to ensure formulas’ integrity. For hair coloring products, I always go with professional colorants and lighteners since they tend to deliver consistent results with greater intensity. Never forget to protect yourself with gloves, and clips will come in handy when it is time to section hair for easier application. For the hair-care part of the painting, good nourishing conditioners and color-safe shampoos are a must, together with heat protectors to shield freshly styled hair from any undesired scars. It is the right set of tools and products that equals an excellent professional result and healthy, vibrant hair.
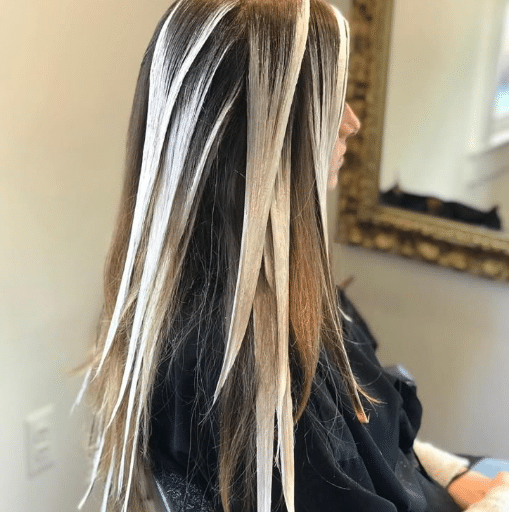
Step-by-Step Guide to Achieving Balayage
1. Tool Preparation and Workspace Setup
I make sure to have everything needed within reach before starting: bleach or lightener; a balayage paddle or board; a tinting brush; clips for sectioning; a comb. I also put protective coverings on all surfaces to keep my workspace clean and neat.
2. Section Hair
I start sectioning with clips to divide the hair into manageable chunks. This makes it easier to concentrate on the application and achieve a smooth blend.
3. Mix and Apply the Lightener
I mix the bleach or lightener according to the manufacturer’s instructions, aiming for a smooth consistency. I apply the lightener beginning mid-shaft, using sweeping motions freely. I feather up with the lightener toward the roots to allow for a soft gradient while concentrating on the ends for the best brightness.
4. Blend and Check Every Section
Using the balayage board or my very own hands, I blend the lightener carefully with the hair. This step is very crucial to making sure hard lines do not appear and to sustain this soft and flowy look that balayage is famous for.
5. Timer and Monitor
When the application time has begun, I allow the lightener to continue processing. I check the hair several times during this time to allow it to have reached the required level of lift without over-processing, which would damage the hair.
6. Rinse, Tone
After the lightener has developed, I rinse out the hair to remove the whole product. Then I apply toner to clear away those unwanted brassy tones and achieve the color purposely in mind.
7. Conditioning and Styling
After toning, it is advisable to go in with a deep conditioner to allow the hair to recover from all the moisture it lost. Next, I style the hair to show off the natural sun-kissed effects of the balayage.
Once these steps are followed very closely and with attention to detail, I can deliver an excellent professional look every time.
Common Mistakes to Avoid When Painting Hair
- Rushing through sectioning: Leads to uneven application and patchy results
- Applying too much color: Causes color bleeding and loses precise application
- Over-processing: Damages hair and compromises integrity
- Skipping strand tests: Can lead to unexpected and unwanted results
- Not monitoring processing time: Results in inconsistent color development
One common mistake is rushing through the sectioning process. One process leads to uneven application and patchy results. Another typical error consists of applying too much color, through which the color bleeds so that precise application is lost—less is more when you want to look natural. More processing also takes away from the look, because overprocessed hair is damaged and its integrity is compromised. Not doing a strand test or washing off the color halfway in because of an unexpected result are also very bad practices. So these are some mistakes that I avoid by taking my time, applying only the necessary amount of product, checking frequently while processing, and always testing for hair health and preparedness for coloring.
References
-
Hair Painting Methods – This source discusses popular hair painting techniques like free-hand, balayage, and ombré.
-
Hair Painting 101: What to Know – Byrdie provides an overview of hair painting, explaining the technique and its applications.
-
Hair Painting: Everything You Need to Know – This blog explains the process of hair painting and how it differs from traditional methods like foils.
Frequently Asked Questions (FAQ)
What is the hair painting technique in popular hair coloring?
The hair painting process or freehand painting, is one of the most stressful things to do confidently art of applying color to hair without the use of foils or emphasizing stripping. This process allows the stylist to create highlights that are more natural-looking and blend into the base color. It is particularly appreciated for sun-kissed highlights that bring depth and dimension to the hair in whichever type. By painting color on individual strands of hair, the stylist can provide a customized look that really complements the client’s natural hair color. It can be used for different looks, such as balayage or ombré.
How does the balayage technique differ from ombré hair coloring?
Balayage and ombré hair coloring are both hair painting techniques that create beautiful, blended results but look really different at the end. Essentially, balayage is a freehand painting of color on the hair to create gentle brightness, focusing mostly on tips and mid-lengths of hair, giving the hair a very natural appearance. Ombré expresses a stark change from dark to light, usually with a faintly noticeable line of demarcation. Because of the thin contrasts, the balayage option is one of low-maintenance; it grows out very well and clean, whereas ombré requires some upkeep to maintain the transition of colors. The effects of both techniques can be diversified depending on hair type and color, culminating in a beautiful and very much in-trend look.
What hair types are best suited for the balayage and hair painting techniques?
Balayage and hair painting techniques are pretty versatile and may be altered to accommodate any hair type: straight, wavy, or curly. With that said, these techniques work best on medium to long hair, which promises more room for natural-looking highlights with dimension. Another option is dark hair, which benefits from balayage because it adds depth and brightness without necessitating a full-on color change. The painting technique gives fine hair the illusion of being thicker, while thick hair looks more textured and dimensional. In essence, a stylist should tailor hair coloring to one’s hair features.
What are the basics of hair care after using hair painting techniques?
After hair painting techniques like balayage or ombré, keeping proper hair care is crucial for maintaining the vibrancy of colors and keeping your hair healthy. There should be shampoos and conditioners that are sulfate-free that protect color-treated hair from fading. Next, go ahead and use that heat protector each time before you’re styling. This protects your locks from getting damaged. Deep conditioning treatments are wonderful for keeping your hair moisturized so that it doesn’t get dry from the coloring. Try to avoid washing your hair too often since this helps the color last longer, and your gorgeous hair will look fabulous for more days!
Can hair painting techniques be combined with traditional coloring methods?
Certainly, hair painting techniques can be matched well with traditional coloring techniques for singular looks and beyond. For example, the stylist may use foils for only some sections while freehand balayage those lengths and ends for a multidimensional effect. It is a perfect blend, bringing in more intricacy for designing and color placement. While more technique-based hair painting can give a more natural transition appearance between base color and highlights. Whether you want to work with brown hair and give it new dimensions or jump right into some really hot color trends, a good stylist will guide you in making something beautiful.


