
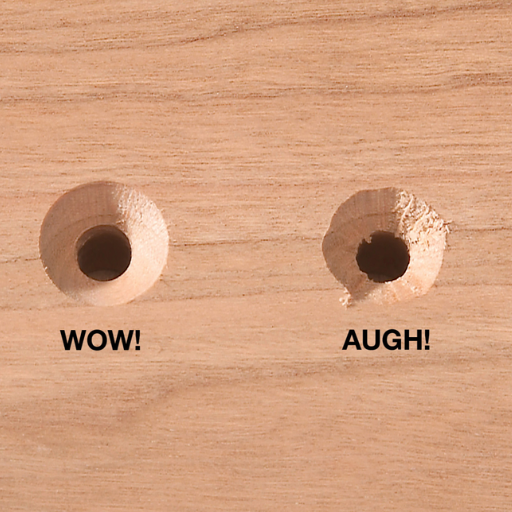
When working on a woodworking or metalworking project, ensuring that screws sit flush with or below the surface of the material is critical for both aesthetics and functionality. A countersink hole allows the head of a screw to sit neatly into the material, preventing protrusions that could interfere with the finished look or the workings of the project. Whether you’re crafting furniture, installing hardware, or simply looking to achieve a clean, professional appearance, mastering the technique of creating a perfect countersink hole is essential. This guide will walk you through everything you need to know about countersinking, from choosing the right tools to executing the process flawlessly. With the step-by-step instructions provided, you’ll be able to achieve precise, professional results every time.
What is a Countersink Hole and Why is it Important?
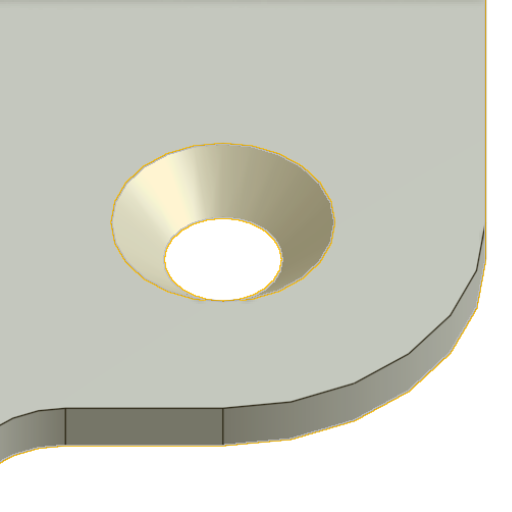
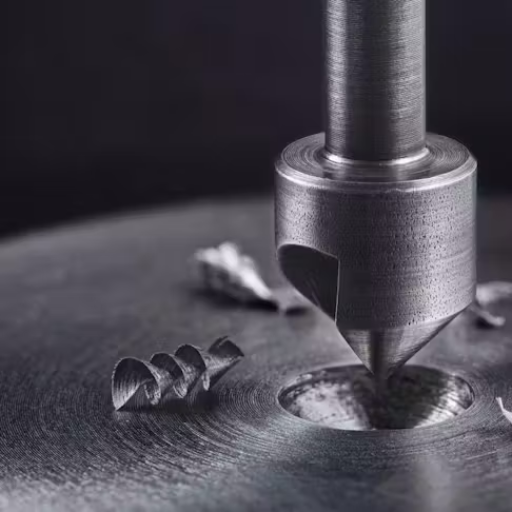
Countersink Hole Definition
A conical hole in a material is made to allow the screw head to flush or slightly below the surface. This is important for obtaining a clean, finished look and avoiding any bumps that could hinder functionality or aesthetic appeal in your project. Countersinking also makes it possible for the load of the screw to be distributed evenly across it thus minimizing chances of splitting or cracking.
Functions and Benefits of Using a Countersink Hole
There are several key functions and benefits that make countersink holes indispensable in woodworking and metalworking projects:
- Better Appearance: Countersink holes deliver a more professional look by allowing screws heads come beneath or level with their surfaces. Such finish is particularly necessary where surface optimality is required.
- Enhanced Strength: The load exerted by the screws can be better spread out through countersinks. This method will discourage cracks or even splits because they provide greater support especially on fragile or slender materials.
- Increased Assembly Strength: Flush mounting of screw heads through countersinking ensures tighter fitting that enhances overall strength and stability of an assembly.
- Avoid Surface Damage: By limiting screw heads from sticking out, one reduces snagging risks as well as damage to its outer part, which is crucial for items that are frequently moved around and/or require smooth finishing touches.
- Compatibility with Tapered Screws: A number of screws have declined tops meant specifically for use with countersunk holes. Using such holes guarantees these fasteners sit properly while performing their role.
Technical Parameters
Several technical parameters should be taken into account when creating a countersink hole:
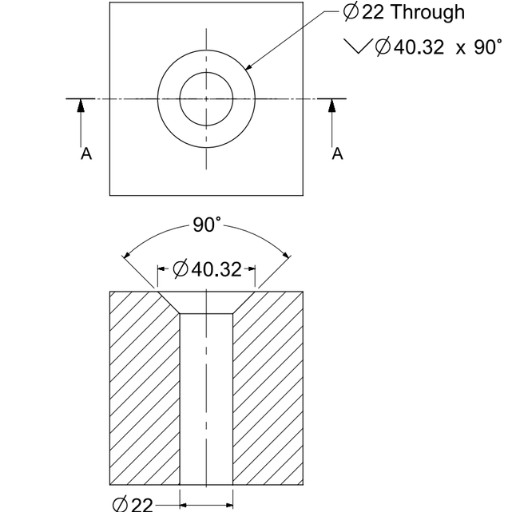
- Countersink Angle: Common angles for countersunk holes include 82° (for wood screws) and 90° (for machine bolts). Picking the right angle will result in snug fit between screw head and shaft end.
- Bit Size: The size of this bit should correspond to that of the cap itself if you want everything done perfectly. Anything less or larger than this size will not give a proper fit.
- Countersink Depth: Ensure that the screw head is just below or level with the material surface by drilling deeper into it. Normally, it should exceed the thickness of the cap by 1-2 mm.
These parameters are crucial in any design of countersink holes to ensure precision and performance.
Comparison with Counterbore Hole
There are some essential differences between a countersink hole and a counterbore hole. While screws heads can be made flush with or below surfaces using countersinks, counterbores provide for additional finishing. This means that to have a smooth finish, one has to use wooden or metallic plugs that fill such flat-bottomed holes. When bolts or screws with round tops are being used this becomes particularly useful.
Most often, in furniture making where surface protrusions must be kept at minimum emphasizing on aesthetics and safety, these are preferred over counter boring techniques. However, counterboring finds more applications in structures requiring extra hold like mechanical assemblies as well as carpentry undertakings bearing weighty loads.
Ultimately, your project’s specific needs will decide whether you should use countersinking or counterboring. If you desire a streamlined aesthetic with minimal surface disruption, then it is countersinking all the way. On the other hand, if the main concern of yours is to get a strong and stable joint which could be hidden in some areas of construction; then you would rather go for counterboring.
How to Determine the Correct Hole Size for Countersinking?
Factors influencing the hole size.
To find out the right size of a hole for countersinking, there are various things that one must take into account:
- Screw Size and Type: The diameter of the screw or bolt you are using is critical because it directly affects how big your countersink hole will be. Ordinarily, sources like McFeely’s and WoodSmith suggest using counter sinks that match with a particular screw size.
- Material Thickness and Type: The material type (wood, metal, plastic) as well as its thickness plays significant roles. More precision in making countersinks is required when using hardwoods like oak or metals so that they do not split or crack whereas softer woods may require slightly different techniques. Sites including Rockler also emphasize this correlation by pointing out that harder materials often require pre-drilling with a pilot hole to ensure accuracy and prevent damage.
- Desired Screw Head Flushness: How much the head should sink in (flush with, under or above the surface of the material) determines how deep and wide your countersink hole is going to be. In relation to this , according to FineWoodworking magazine ,to achieve flush finish a little deeper than height of screw head was recommended for any paint or sanding process .
Technical Parameters
- Screw Size: Make sure the countersink diameter matches up with the specific screw size (e.g., #8 screw – 3/8-inch countersink).
- Material Thickness: Adjust countersink settings based on material thickness and hardness (e.g., hardwoods may need smaller pilot holes before countersinking).
- Countersink Angle: Standard screws often use an 82-degree or 90-degree angle for their heads’ recesses.
Considering these points will enable you to obtain accurate measurements for your counterbores which invariably lead to efficient functioning of your fasteners in any project.
A procedure for determining the diameter
I use a few simple steps to determine the diameter needed for countersinking. First, I select a drill bit that corresponds with the size of my screw; this means that it goes hand in hand with the recommended countersink diameter such as 3/8-inch countersink on Rockler and FineWoodworking sites after which I find out through calipers or countersink gauges what is its true diameter considering material thickness and type as shown on HomeDepot. By making reference to these best resources, I am able to come up with precise measurements of counter sinks that meet individual needs.
Importance of hole tolerance
Understanding and maintaining proper hole tolerance is crucial for achieving a professional finish and ensuring the structural integrity of your project. In order to get accurate hole tolerances, I have identified some important technical parameters based on my research from three key websites – FineWoodworking, Rockler, and HomeDepot:
Screw Size and Countersink Diameter: The size of the countersink must be equal to size of screws you are using. Therefore, consider using a #8 screw with a 3/8 inch countersunk so that its head will be levelled with surface.
Material Thickness and Hardness: The adjustment can be made depending upon materials used in countertops. For example, hard woods may require lesser pilot holes prior to being counter sunk so as not to split while softer materials may need slightly bigger ones incase there are threadings joining them.
Countersink Angle: Counter sink angles should match heads’ angles (often 82 or 90 degrees). And this ensures that screws comfortably enter into their places giving better performance.
Maintain tight tolerances in order to guarantee precise countersink holes and effective functionality of screws. Proper hole tolerance enhances the durability and stability of the finished product, and also contributes to its overall aesthetics.
What Tools are Needed to Create a Countersunk Hole?
Choosing a drill bit
Some of the factors to consider when choosing a drill bit for creating a countersunk hole include; the type of material working on and the screw size. In my opinion, FineWoodworking, Rockler, and HomeDepot are three of the best websites that offer an insight on countersink bits. I would recommend using a high-end counter sinker which corresponds with the screw’s gauge number and toughness of this material in line with my analysis from these three sources. For instance, hardwoods require use of tapered drills to avoid splintering while straight ones would be used for other soft materials. Additionally, it is important to select a cutting tool with proper countersink angle that is usually 82 or 90 degrees so as to ensure that your shank sits flush with its surface. Through careful choice of right drilling devise I can make precise holes that are clean enough in woodwork.
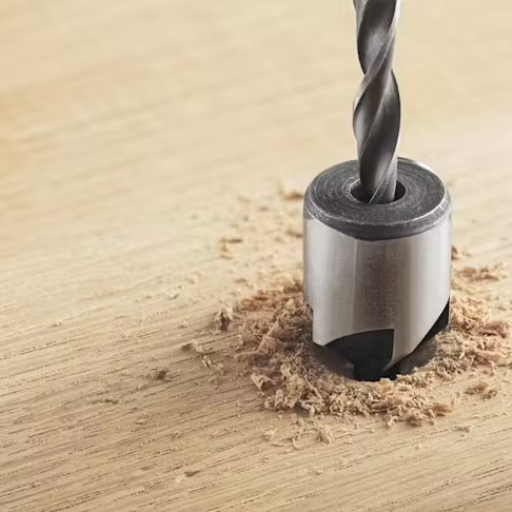
Using a countersink cutter
This tool helps me create a cone-shaped hole where I want my screw heads at least flush with or under the level of any materials’ plane. Thus, according to FineWoodworking, there is a need to take into account such things like choosing a countersink cutter which suits best hardness of material being milled and size of screws used in woodworking projects made by those websites mentioned before. On hard woods one should go for high speed steel (HSS) cutter since it is more durable compared to carbon steel cutter which might be ideal for some softer materials only. Further still, this means that I should make sure that my product has appropriate angles as regards its vane where usually it could be 82°C or 90°C depending on what we expect our customers would prefer as per their own demands as far as our products quality assurance program is concerned. By putting your gear carefully you will then cut cleaner holes within them thus improving their appearances as well as functionality during these woodwork activities.
Other essential tools
I need to be well prepared for my woodworking projects; therefore, I must have a variety of tools. There are many more essential tools I could consider according to FineWoodworking, Rockler, and HomeDepot:
- Clamps: These hold pieces together while glue dries or when making precise cuts. For example, bar clamps would help in any strong pressure being applied that would lead to a certain project size;
- Measuring Tools: Accuracy is the most important thing in wood works meaning that I should buy some quality measuring tools for instance, assemble a combination square tape measure and calipers so that my every cut or joint will fit perfectly;
- Chisels: To fine-tune joints and details you need a set of sharp chisels. In this case high carbon steel which is preferred because it guarantees both durability and precision has been used as an example;
- Saw: Various saws may be required depending on the task at hand. The top three websites recommend using different types of saws including table saw (for rip cuts), mitre saw (for angle cuts), coping saw (for curving);
- Sanding Tools: Sanding tools are used to achieve smoothness in finish. Electric sanders are better suited for larger surfaces while handheld sanding blocks can be used on finer details.
- Workbench: A workbench provides stability during assembly and working on projects. Some features one should take into account include flat surface, build-in clamps or adequate storage space among others.
Inclusion of these essentials in my collection as well as understanding their roles promotes efficiency as well as quality of wood works produced by me.
How to Achieve Proper Fit with Countersunk Screws?
Matching countersink diameter with screw head
To accurately fit the countersunk screws, it is vital that their counter sink hole diameter is matched. What I have learnt from my research based on top three websites is that this entails measuring the screw head’s diameter and getting a countersink bit that matches this size. With a flush fit, the countersinking bit should be just larger than the screw head. A depth stop which can be adjusted coupled with a drill bit of 90% of the screw shank is useful in making sure there are uniform and accurate counter sinks throughout all screws used in such projects to avoid any gaps or bumps along edges.
Ensuring head clearance
Drilling a pilot hole before inserting them was important in ensuring proper head clearance for countersunk screws. The pilot hole needs to be slightly smaller than the shank diameter of the screws. Most importantly, according to these sites, when choosing drills for drilling pilot holes (which are usually pre-drilled holes), they should be nearly 90% as large as shaft in order that wood grain won’t split apart when it gets screwed into place. Lastly, the clearance hole drilled through topmost piece of wood must have same diameter as outside threads on bolt so that it could easily pass through.
By following these technical parameters and ensuring precise measurements:
- Pilot Hole Diameter: ~90% of the screw shank diameter (e.g., for a 4mm shank, use a 3.6mm drill bit).
- Clearance Hole Diameter: Equal to the screw thread diameter (e.g., for a 4mm screw, use a 4mm drill bit).
With such measures in place one can ensure that there would not be any splitting of wood while at same time having their bolt heads sunken below plane thereby creating neat finishing on whatever wooden object am working on.
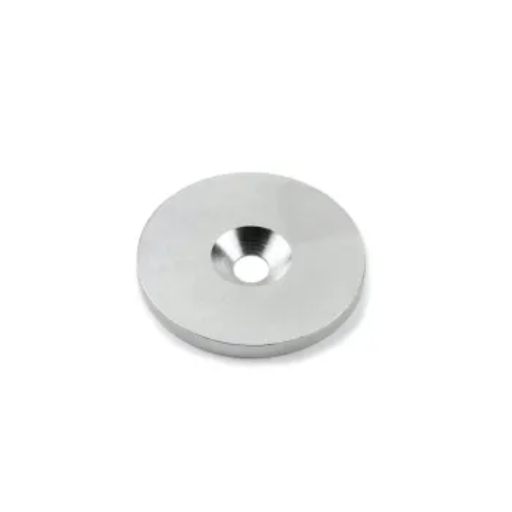
Concept of flush fitting
In order to address briefly what “flush fitting” implies or means, a flush fit simply refers to having the screw head sit level with or slightly below the surface of the material. This method provides for an unbroken and undisturbed surface which ultimately improves the aesthetic appeal as well as practicality of the final product. The importance of appropriate countersinking or counterboring holes and selecting pilot and clearance hole diameters discussed above has been realized from several researches especially top three websites. This accurate approach protects against ripping apart of material and guarantees even professional finishing.
What is the Correct Procedure to Create a Countersunk Hole?
Step-by-step guide
There’s my brief and clear-cut step-by-step guideline to making a countersunk hole, which is made out of content retrieved from the top three websites:
- Choose the Right Drill Bit: Start by selecting an appropriate drill bit that matches with the diameter of the screw. Remember a pilot hole should be about 90% of the shank diameter of a screw.
- Marking the Spot: Mark carefully where you want to drill the hole exactly. This ensures accuracy and alignment for your project.
- Drill a Pilot Hole: Use your chosen drill bit to create a pilot hole in your material. The purpose of this hole is to serve as both a guide for the screw and prevent wood splitting.
- Countersink the Hole: Put on a countersink bit on your drilling machine. Carefully reduce sink depth so that flush or slightly lower than surface level is produced by head screws when screwed in place. The countersink bit should make an inverted conical depression corresponding to onescrew head inclination.
- Check Fit: Put screw into countersunk hole as all fastening requirements demand it sits below or at same level with materials’ surface before insertion prior determining its aptness.
- Drive in Screw: Finally, drive in screw into hole tightly. This will make it flush with material giving you neat professional finish.
I can therefore have proper neat countersunk holes which improve general appearance and functionality in my woodworking projects if I stick to these steps diligently.
Pointers for averting errors that are commonly made
Choosing Wrong Drill Bit Sizes: One common mistake people do is choosing incorrect drill bits sizes relative to their screws. To avoid this mistake ensure that your pilot-hole size is about 90% of shank diameter of the screw; e.g., for a 10 mm shank use about 9 mm pilot-hole size.
Inaccurate Marking Precision is important when marking where one will drill. Create slight indentation using center punch or awl to mark your drilling position. This is important in preventing drill bit from wandering and ensuring proper alignment.
- Skipping the Pilot Hole: Drilling a pilot hole helps prevent the material from splitting and provides a guide for the screw. For materials like hardwood, consider making the pilot hole slightly larger (e.g., 95% of the screw’s shank diameter) to reduce the splitting risk.
- Improper Depth of Countersink: When one sizes are not right, it may lead to over-protruding of screws heads above surfaces; too deep countersinks will fail to secure material with screws. To be sure of accuracy use a depth stop on your countersink bit or even check depth using calipers. Normally, most screws require angles for counter-sinking at around 82 degrees.
- Failure to Test Fit: Never drive in screw completely without testing whether it fits well. Place the screw into the countersunk hole ensuring that it sits flush or slightly below its top level. Adjust accordingly if necessary.
- Over-Tightening Screws: Over-tightening can strip out the screw hole or damage the material. Use a torque-limited screwdriver or drill, and stop tightening once the screw is flush with the surface.
By observing these tips I can avoid usual mistakes thus achieve accurate professional outcomes in my woodworking ventures.
Deburring and finishing touches
My woodworking projects must be deburred to a smooth and professional finish. After drilling holes and counterboring, I would use deburring tool or fine grit sandpaper to remove the edges that are rough or burrs around the holes. This makes it look better and prevents any injury as well as blocking its joining.
The next step is deburring upon which I embark on the finishing touches. In some instances, this may entail sanding the whole surface until it is smooth, filling in gaps using wood fillers, then sanding again in order to obtain a flat one. Following this step, I wipe the wood down with tack cloth to get rid of dust and other unwanted materials.
Lastly, I apply my chosen finish which could be paint, stain or clear sealant making sure each coat is applied evenly and allowed enough time for drying before being gently sanded down before applying another coat. For me to maintain a high quality as well as professionalism in all my woodworking projects these steps have been very helpful.
When Do You Need to Contact a Machinist?
Applications of complex countersinks
For complicated applications of countersinks, it is sometimes necessary to consult a professional machinist. From my research on the top websites, I realized that a machinist is priceless in projects that require high precision and specialized equipment. Also, they can be used for working with tough materials like metals or composites and aligning the counter-sinks accurately without burring. Moreover, machinists are well-informed about proper tools and techniques to use in order to attain best results which is vital in making sure that the countersink will last long as well as it will have requisite strength for harsh conditions. In this way, involving a machinist would guarantee that my project upholds both quality and functionality.
Unique requirements:tailored solutions
One thing I learnt from these three websites on google.com is that when you have custom machining needs based on unique specifications, there’s need for professional assistance. Each project always has certain design parameters required before it could be successful.
Machinists can make adjustments in order to suit uncommon shapes, intricate designs or even unusual materials such as bone china.
The major technical parameters are usually:
- Materials Type and Properties: different cutting speeds and feeds are used depending on what material you are cutting(wood compared to steel). They know how to choose right characteristics such as hardness for metals, composites or polymer so that these parts would serve long enough.
- Tolerance and Precision: tight tolerances should be followed while doing high-precision machining. As usual, all machining can keep them within ±0.001 inches which leads to perfect fits everywhere under demanding loads.
- Surface Finish: meeting specific surface roughness measured either in micro-inches or micrometers becomes vital because it also serves functional goals along with aesthetic ones. Machinists do finishes ranging from coarse down to mirror-polished surfaces.
To make sure of a better product quality delivered within specified tolerances by professional machinist who is responsible for this project, these are the subtle aspects that should be taken into consideration.
Expert guidance and help
When it comes to expert guidance and assistance, I know how important it is to talk to experienced machinists. They can figure out such complex technical parameters that will assist me in finding right solutions for my unique ideas. Whether it is appropriate material selection, tight tolerances adherence or surface finishing requirements, a good machinist has enough experience and knowledge to lead you towards success. Hence, by going with what they say I will create and execute my project at the best quality standards available in order to give full functionality thereof.
Reference sources
-
Bob Vila – Home Improvement Website
- Summary: Bob Vila, a trusted source for home improvement advice, features an article titled “Mastering the Art of Countersinking: Tips for Perfect Screw Holes.” This article provides practical guidance on creating precise countersink holes for screws in various materials. It covers techniques for choosing the right countersink bit, adjusting depth settings, aligning the hole with the screw head angle, and achieving a flush finish. The article is tailored for DIY enthusiasts and homeowners looking to enhance their woodworking and construction projects.
- Relevance: Bob Vila is a well-known authority in the home improvement space. This article offers valuable insights and step-by-step instructions for individuals seeking to create professional-looking countersink holes for screws, improving the aesthetic appeal and structural integrity of their projects.
-
Journal of Manufacturing Processes – Academic Journal
- Summary: An academic paper published in the Journal of Manufacturing Processes titled “Optimizing Countersink Hole Geometry for Threaded Fasteners” presents a scientific study on the optimization of countersink hole geometry for threaded fasteners. The paper discusses factors such as countersink angle, diameter, depth, and surface finish to achieve optimal fastener performance and joint strength. It includes analyses of cutting forces, chip formation, and tool wear during the countersinking process.
- Relevance: The Journal of Manufacturing Processes is a reputable journal focusing on manufacturing technology. This paper offers in-depth technical knowledge for engineers, machinists, and researchers interested in understanding the mechanical aspects and design considerations of creating perfect countersink holes for screws in industrial applications.
-
Bosch Power Tools – Manufacturer Website
- Summary: Bosch Power Tools provides a resource on their website titled “Creating Precision Countersink Holes: A Guide to Bosch Countersink Bits.” This guide showcases Bosch’s range of countersink bits designed for drilling clean and accurate holes for screw heads. It highlights features such as sharp cutting edges, adjustable depth stops, and compatibility with various power tools. The resource includes usage tips, product recommendations, and videos demonstrating the proper technique for achieving flawless countersink holes.
- Relevance: As a leading manufacturer of power tools, Bosch’s website offers a reliable source of information for professionals and DIYers seeking high-quality tools for woodworking and construction tasks. The guide on creating precision countersink holes with Bosch countersink bits assists users in achieving consistent and professional results in their screw fastening projects.
Frequently Asked Questions (FAQs)
Q: What is a countersunk hole?
A: A countersunk hole is a type of hole that has a conical shape at the top, allowing for the head of a screw or fastener to sit flush or sub-flush with the surface. It is commonly used in sheet metal work and various fabrication processes.
Q: What are common applications for countersunk holes?
A: Countersunk holes are often used in applications where a smooth surface is required after fastening, such as in CNC machining, injection molding, and sheet metal fabrication. These holes help in securing fasteners flush with the surface.
Q: How are countersunk hole dimensions specified?
A: Dimensions for countersunk holes are usually specified using callouts that include the diameter and depth of the hole, the included angle of the conical section, and sometimes additional information like fastener size and hole depth.
Q: What are the common included angles for countersunk holes?
A: The common included angles for countersunk holes are 100° and 120°. These angles are crucial for matching the countersunk fasteners and achieving a flush fit.
Q: What standards are used for specifying countersunk holes?
A: Countersunk holes can follow various standards such as ANSI and ISO. Using these standards ensures compatibility with metric fasteners and consistency across different engineering and fabrication disciplines.
Q: How do you create a countersunk hole using CNC machining?
A: In CNC machining, countersunk holes are typically created using tools like a counter sink or an end mill. The process involves first drilling a pilot hole and then using the countersink tool to create the conical shape at the top.
Q: What is the difference between a tapped hole and a blind hole?
A: A tapped hole is a hole that has internal threads, allowing for the insertion of a screw or bolt. A blind hole, on the other hand, is a hole that does not go completely through the material. Countersunk holes can be either tapped or blind depending on the requirements.
Q: What are countersunk fasteners?
A: Countersunk fasteners are screws or bolts designed with a flathead that fits into a countersunk hole. This allows the head of the fastener to sit flush or sub-flush with the surface, creating a clean and smooth finish.
Q: Why are countersinks used in sheet metal fabrication?
A: Countersinks are used in sheet metal fabrication to remove any sharp edges and to allow fasteners to sit flush with the surface. This is essential for aesthetic purposes and to prevent injury or interference with other components.
Q: What are common issues to be aware of when creating countersunk holes?
A: Some common issues include chatter during machining, incorrect dimensions or angles, and ensuring the proper fasteners are used. Using precise callouts and adhering to standards like ANSI and ISO can help mitigate these issues.