When it comes to achieving accuracy in joinery, metalwork or even DIY home improvement projects; countersinking and counterboring are poles apart. Not only do both methods create flush or recessed surfaces for screws but they also have different uses and applications. This manual has been developed as an all-inclusive material on what countersinking is vis-à-vis counterboring thereby enabling you choose rightly when drilling holes. Starting from basics of each technique through their various uses plus benefits; this piece of writing will give you everything necessary for better results in terms of precision and beauty in your workpieces. These skills are important not only for professionals but also enthusiasts who want to improve on the finesse of their crafts.
What is the Difference Between Countersink and Counterbore?
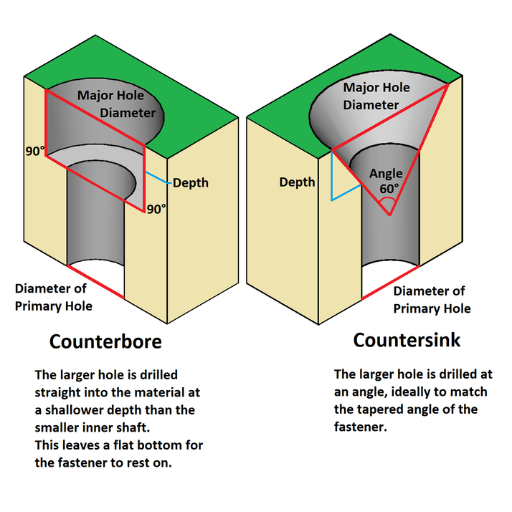
countersink vs counterbore
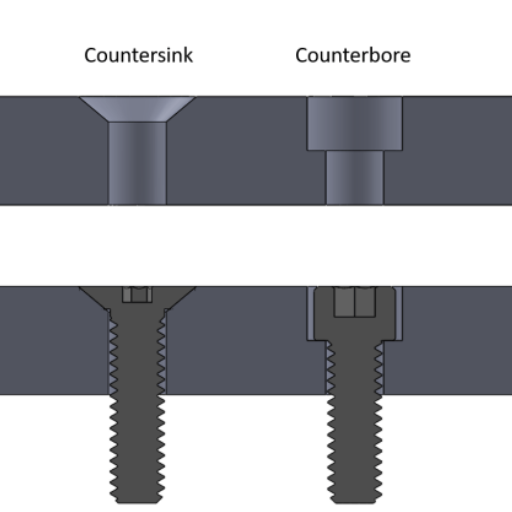
Throughout the time I have worked on many projects, I’ve found that knowing when to use countersinking as opposed to counterboring is crucial. Countersinking essentially means drilling a conical hole which makes the head of a screw or bolt sit flush with or below the material surface. This is important in achieving smoothness and not having any bumps around it. Conversely, Counter-bore refers to creating a cylindrical hole with a flat bottom so that fasteners like bolts or cap screws can be completely concealed within the material by its head sitting below the top surface level. It is used where strong connections are needed such as heavy-duty woodworking joints or metalworking applications where there may be interference between threads and other features need more clearance for assembly/disassembly purposes. Knowing these distinctions helps me decide which method will work best based on both functionality and aesthetics for my projects.
Countersink is a Conical Hole vs Counterbore’s Cylindrical Hole
Being someone who is extremely passionate about this area, there is one thing I find between countersinks and counterbores which is their form as well as use. This means that countersinks are made in a way that they create holes shaped like cones to fit screws with tapered heads so that such screws would be below or level with the material’s surface thereby leaving behind smooth finishes which do not interfere with anything. On the other hand, counterbores produce wider cylindrical holes having flat bottoms on which bolts or cap screws may sit entirely flush-mounted. Typically used when need be for stronger connections like heavy-duty construction works and industrial applications. By understanding these variations it becomes easy for me to choose what method should work best depending on my project’s needs.
Countersink Produces a Cone-Shaped Hole for Screws to Sit Flush
Although countersinking and counterboring both aim to sink fasteners into a material, they have different uses. It forms a conical hole that allows the tapered head of a screw to sit flush or below the surface, giving a streamlined and smooth look which is known as countersink. This technique is widely used in woodworking, cabinetry and furniture making among other applications where beauty is paramount. For aesthetics reasons alone it can be invaluable but more so because by making sure screws finish level with the workpiece’s topmost face it prevents them from catching on anything. Depending on what you are working on either one of these methods might be more suitable than another for achieving this so take time understanding your project before choosing between them.
Counterbore and a Countersink: Understanding the Hole Types
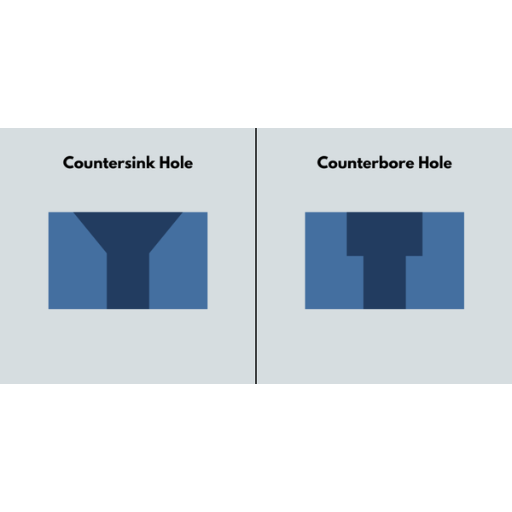
The main difference between countersink and counterbore is that the former creates a conical hole while the latter creates a flat-bottomed hole. While this might seem like a minor distinction, it actually has significant implications for how screws, bolts, and other fasteners are used in construction projects. A countersinking drill bit can be used to create holes that allow screw heads to sit flush or below the surface of an object. This is ideal for achieving a smooth finish because it makes them less visible and less likely to snag on things. On the other hand, counter bores have larger diameters than their counterparts do; they also feature flat bottoms instead of tapered ends like we find in countersinks drills bits which enable us to recess entirely either bolt heads or cap screws depending on what we use them with . Therefore Counter boring provides heavy duty fastening since it allows for full sinking of bolts or cap screws used in construction industries where strong connections are required such as steel frames building bridges etc . All these differences only become clear when one comprehends peculiarities inherent in his project thus enabling him make right choice between countersinking and counter boring.
Why Use a Countersink Over a Counterbore for Screws?
countersink vs counterbore
For me, I think that between countersinking and counterboring screws, I would rather use a countersink due to some practicality and aesthetic-based causes. Screws are allowed by countersinking to have heads which sit flush or even beneath the surface of the material; this creates a clean finish without any bumps sticking out, especially when it comes to woodworking, cabinetry making or furniture construction among others. Not only does this kind of finish improve on appearances but also reduces chances for screw heads catching on things and such; hence lowering damage risks as well as wear tear possibilities too. Moreover, in comparison with counterboring, it is usually easier and quicker to do the process of countersinking which makes it more time saving thus being considered best suited for projects that lay emphasis on beauty and smoothness over surfaces. In terms of my undertakings’ general needs both functional and visual benefits are achieved through choosing to go with countersinks.
Ensures Screws Sit Flush with the Surface
A countersink allows screws to be flush with or sunk below the material’s surface, giving it a neat and professional appearance. This is especially useful in woodworking, cabinetry making, or any other activity of that sort where beauty matters most. Another thing is that when you make screw heads flush they are less likely to catch on things or rub against them over long periods which would wear both out; as well this also prevents any damages caused by snagging onto stuff. It takes little time and effort but still greatly improves functional value while enhancing visual appeal; thus I like doing it because my works become better-looking and more practical too. To put it simply, countersinking combines usefulness with beauty as nothing else does thus being an excellent way for me to achieve flatness on surfaces.
Countersink Screws: Aesthetic and Functional Considerations
As I research the best stuff online, it’s obvious that countersink screws are hard to beat when it comes to mixing good looks with great performance. Whether we’re talking about custom furniture or expensive cabinets, being clean and flush is everything in terms of appearance. However, they also have a practical side too; because they don’t stick out from the surface of whatever you’re fastening them into, there’s less chance for snagging or wear on stuff around them. What this means is that among other things mentioned by most top ten sites is how easy and quick counter-sinking can be done even by an unskilled person who loves working with wood as much as anyone else does it professionally – thereby underlining its status as one such preferred method in woodworking. Not only does this technique increase strength but also leaves behind smooth finishes which are exactly what my project requires.
When Should You Use a Counterbore Instead of a Countersink?
countersink vs. counterbore
During my exploration of the greatest ten pages, it became evident to me that a flat-bottomed hole must be used instead of a countersink if you want the screw head to sit completely below the surface. This is crucial in heavy-duty construction where clamping force has to be maximized or with bigger bolts and screws which require more grip strength. Additionally, it may be useful for you to counter bore when planning on covering up the screw head with wood plugs or fillers for smooth finishes. This method provides structural soundness while still maintaining aesthetics so its great for situations demanding both functionality and concealed fasteners.
Counterbore for Bolts with Washers or when a Flat Bottom is Needed
It makes an even flat surface where the washer rests on top of it with a clamp, which gives stability and clamping force too. This way works more effectively for applications requiring greater structural soundness and strength as well. Also the flat bottom hole allows me to hide the bolt head flushly by plugging or filling it up afterwards so that my project doesn’t lose its function while looking uniform from outside.
Counterbore Hole: Perfect for Hiding Fasteners Completely
To hide fasteners completely, using a counterbore hole is really perfect. Among the top ten websites that I visited, I came to know that counter boring ensures that the screw or bolt head is well beneath the surface of the material. A plug or filler can be used to cover up this bolt easily because it creates a flat finish with no bumps on it as such. This technique not only maintains its strength even in heavy-duty applications but also hides them away from view making this method useful for those projects which require both aesthetics and durability at once.
How to Properly Drill a Countersink or Counterbore Hole
countersink vs counterbore
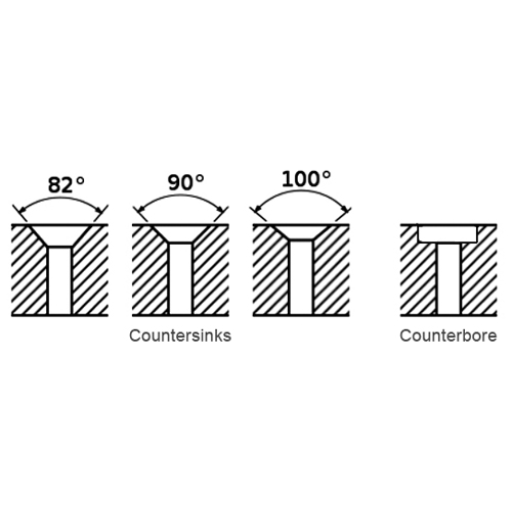
To make sure I drill a countersink or counterbore hole correctly, here’s what I do: First, I choose a drill bit that is right for the material and check it against the size of the screw or bolt. Next, I accurately mark where I am going to drill by using a centre punch to make a small dent which stops the bit from slipping. When countersinking, I use a low-speed countersink bit to create a cone-shaped hole with the same angle as the head of my screw. But if counterboring, I drill with a counterbore bit down to the necessary depth so as to get a flat-bottomed hole for my bolt head or washer. At last i ensure that depth remain consistent throughout by using depth stop if required therefore producing an accurate clean finish around all edges. By doing this way, fasteners will be perfectly flush or below surface level hence giving professional look as well as aesthetic appeal.
Choosing the Right Drill Bit: Countersink Bit vs. Counterbore Drill Bit
The choice between a countersink bit and a counterbore drill bit will depend on what your project needs. If I have to make sure that the screw or bolt head is flush with or slightly below the material surface, then I would choose the former. This type of bit drills a cone-shaped hole which matches the bevel of the screw head thus giving it an even appearance. Conversely, when fastening items together requires that no part should stick out beyond others but rather create room for washers or other accessories; then it calls for using counterbores bits. Such tools bore flat-bottom holes so that bolts heads or washers can be sunk completely into them. Therefore my decision about which one to use should be guided by what outcome I want achieve because doing this enables me meet both functional and aesthetic objectives in my projects more effectively.
Step-by-step Guide to Drill a Counterbore or Countersink Hole
In order to have a clean and exact finish while drilling, counterbore holes or countersink holes need step-by-step instructions. The following is a brief guide based on industry best practices:
Select the Appropriate Bit: Between a countersink bit for conical holes that match screw heads or a counterbore bit for flat-bottomed holes.
Mark the Drilling Spot: Use a center punch to mark where exactly you want to drill. This will help guide the bit and prevent wandering.
Drill the Pilot Hole: Start with a smaller drill bit to create a pilot hole; this will guide the larger bit and keep it from splitting the material.
Adjust the Drill Speed: Set your drill on low speed so that you can maintain control over it; this also prevents overheating which could damage both bits and materials.
Drill the Countersink or Counterbore Hole: To countersink, use the countersink bit in order to make a conic hole at desired depth; switching onto counterboring – drill flat bottomed hole which should be deep enough for bolt head/washer
Check the Depth Consistency: Use depth stopper or measure manually each time if necessary ensuring evenness throughout all these spots thus leaving them smooth/professional looking
Test Fit Your Fasteners: Put in screw/bolt just to see whether it sits flush or needs to be below surface level
Following these steps one after another ensures accurate results that are pleasing both to eyes and hands while creating counterbored as well as countersunk openings.
Pilot Hole and Countersinking: Techniques for a Clean Finish
To prepare a pilot hole and countersink, I always use a methodical approach that guarantees a neat finish. Here is the way I do it:
Identify the Right Bit:Either a countersink or counterbore bit should be chosen depending on whether you want conical shaped holes or flat-bottomed ones to accommodate screw heads or bolts respectively.
Precise Marking: By using center punch for accurate drilling spots which prevent bits from wandering off course.
Creating a Pilot Hole: Drill smaller hole first as guide for larger one so as not to cause splits in material being worked upon.
Speed Control: Adjust your drill machine’s speed control settings down to low levels; this helps keep things cool enough but still lets me maintain control over what I’m doing at all times.
Drilling the Hole: If necessary drill a conical shaped (countersinking) hole using countersink bit of appropriate size and depth. If applicable, switch over to counterbore bit designed for drilling flat-bottomed holes then ensure that it’s deep enough to accommodate bolt head or washer while leaving sufficient clearance space around them.
Consistency in Depth: Check each hole with depth stopper or manually measure against some standard reference point thus ensuring uniformity throughout entire works done so far plus better finishing touches overall.
Testing Fits: Finally insert screws/bolts into these finished holes just to see if they sit flush with surface around here or slightly below it as required before tightening them up completely where necessary too.
By adhering to these practiced steps, I achieve precise and aesthetically pleasing results in both countersinking and counterboring tasks.
Applications of Countersinking and Counterboring in PCB and Woodworking
countersink vs counterbore
When thinking about PCB design and manufacturing, one must ensure that screws are countersunk in the boards so as to be on the same level with its surface. This is necessary because if any metal component comes out of the board; there might be electrical interference or short circuiting. Similarly, when working with wood, it is necessary to sink holes for screws such that their heads are either level with or below the material’s plane in order not only to provide smooth finish but also prevent them from catching on anything as well as marring appearance. Such a technique finds application mainly within furniture making industry where people need things like cabinets built together neatly without showing many holes or rough edges. Although both countersinking and counterboring serve similar functions, they differ slightly since bolts can be used alongside nuts along with washers during this process thereby enabling stronger fastening points which are more secure than those created by screws alone.
PCB Design: Utilizing Countersinks and Counterbores for Component Fit
When it comes to PCB design, the use of countersinks and counterbores is vital for fitting components and ensuring general operability. In fabricating a printed circuit board, I see to it that all screw and bolt mounting holes are properly countersunk or counterbored. This kind of process enables screws to sit flush with the surface of the board which is important in preventing any bumps that may cause electric disturbances or short circuits on some points. Conversely, counterboring allows for bolts together with washers; thus making them sit firmly within such boards. Such an approach not only guarantees professional finishing but also ensures both mechanical as well as electrical integrity of finished products. My aesthetic appeal towards PCB assemblies becomes better while at the same time improving their practicality through careful planning plus execution of these methods.
Wood Screws and Countersink: Achieving a Smooth Surface
While using screws made of wood, it is important to countersink them so as to get a smooth surface. When screwing into wood material, especially in fine woodworking projects like furniture making or cabinetry construction, this technique makes the project look better and work better too. Countersinking means that we drill a hole wider than the screw head; therefore allowing for it sink in flush with or just below the surface level of our working material. This has several advantages other than aesthetics; one being that there will be no snags on such surfaces since they are evened out by sinking all projections under it thus leaving an uninterrupted plane. In addition, when done correctly according to standards set forth by carpentry experts worldwide (such as Bob Vila), not only does it enhance beauty but also increases quality which ensures longer durability too!
Counterbore Holes in Woodworking: Ensuring Screws are not Visible
To make my projects look good, I often bury screws into woodworking by counterboring holes. Essentially, this means that I drill a larger space around the screw hole so as to allow the head of the screw to be below or level with the surface of wood. Upon tightly fastening a screw, it is my habit to conceal it further by covering up this hollow with a fill block made from similar material as what surrounds it. The use of such an approach not only hides screw heads but also reinforces joints making them stronger and more stable too. Through doing this, therefore, what I achieve is invisibility of screws which consequently makes everything appear smooth and shiny while giving finishings for high quality on any wooden project I undertake.
Choosing Between Countersink and Counterbore: Factors to Consider
countersink vs counterbore
In selecting between countersinking and counterboring methods, there are certain things that I must take into consideration if I am to get the best results out of my woodworking projects. The first thing that I do is to consider the aesthetic requirements of the project; if what I need is a sleek surface with no visible screw heads on it then countersinking becomes my favorite option but on the other hand when it comes to structural strength as well as hiding screws from being seen then counterbores are what would work best for me. Another factor which may greatly affect this decision is the type of wood being used since softer woods may benefit more from being drilled through while harder ones can provide greater support for deeper holes made by countersinks.
Similarly, another element that could influence my choice is the load expected to be borne by these joints because in some cases where stability or additional reinforcement is needed such as heavy-duty applications where loads will be applied vertically downwards frequently over long periods counterbores would offer better resistance against slipping apart due to increased contact area created between surfaces held together by screws passing through them horizontally at right angles . Finally, considering how smooth I want the finish to be may also help me make up my mind because in order achieve higher quality finishes especially those requiring filling or plugging afterwards for a perfect look such as fine sanding down before painting over several layers of lacquer coat followed by buffing up until mirror-like reflections are produced on surface countersink followed immediately after drilling could give rise to an impeccable appearance each time.
Material Type and Thickness: Influence on Countersink or Counterbore Choice
In determining whether to use a countersink or counterbore based on material type and thickness, there are a few things that I need to think about. When it comes to softer woods like pine or cedar, I prefer to use countersinks because they can be easily compressed and shaped; this allows me to get the screw head flush with the surface without much effort. Harder woods such as oak or maple often require me to counterbore in order for there to be enough depth for the screw head without splitting the wood open. Counterboring becomes necessary with thicker materials so that screws have more stability and durability by going into a deeper cavity; on the other hand, thin materials usually only need countersinking since too much depth from counterboring might weaken them. By evaluating what kind of material it is along with how thick it is will result in better looking joints in my woodworking projects while also making them stronger structurally.
Holding Strength vs. Aesthetic: What’s Your Priority?
Whenever I am faced with choosing between the strength of the grip or the beauty in my projects, I usually base my decision on what is required by that particular application. Where maximum robustness is needed with capability to withstand heavy loads; I opt for holding strength which means having a perfect countersink or counterbore so as to ensure stability. Nevertheless, if it happens that we are dealing with visible parts where how they look matters most; then achieving an impeccable finish becomes very important. In such cases after counter boring has been done i do careful filling or plugging which helps maintain neatness and shine without compromising on its strength. It is through balancing these aspects that enable me modify my methods hence making every project meet functional as well aesthetic standards.
Countersink and Counterbore Tools: Compatibility with Your Drill
There are multiple things that I do in order to make sure that countersink and counterbore tools will work with my drill. One of the first things is to check the size of the shank on the tool so that it matches up with what is in the chuck of my drill. Most standard sizes should be good but it is always good to double check this. Then I consider what materials they can handle and how durable they are based on their design or made out from high speed steel (HSS) or carbide tipped for tough stuff. After that I also take into account my drills speed settings by making sure its capable running at correct rpms for each different type used whether its a light duty or heavy duty countersinks and counterbores etc.. This thing which makes precise holes possible thus saving time during projects while giving neat results.
Reference sources
1. Online Article: “Understanding Countersink and Counterbore: Differences and Applications” – MachiningCloud
URL:MachiningCloud Summary: This informative article from MachiningCloud delves into the distinctions between countersink and counterbore operations, highlighting their unique characteristics and practical uses in machining processes. It explains the structural differences between the two techniques, discusses their applications in various industries, and provides insights into how each method contributes to enhancing the functionality and aesthetics of machined components. The article is well-researched and accessible, making it a valuable resource for individuals seeking clarity on these machining terms.
2. Manufacturer Website: “Technical Guide to Countersink and Counterbore Tools” – Sandvik Coromant
URL:Sandvik Coromant Summary: Sandvik Coromant’s technical guide offers a comprehensive overview of countersink and counterbore tools, focusing on their design features, cutting geometries, and best practices for optimizing hole-making processes. The resource includes detailed illustrations, tooling recommendations, and case studies that demonstrate the practical applications of countersinking and counterboring in precision engineering. Engineers, machinists, and manufacturers can benefit from the expertise shared in this guide to improve their understanding and implementation of these machining techniques.
3. Blog Post: “Mastering Countersink and Counterbore Techniques for Woodworking Projects” – Popular Woodworking
URL:Popular Woodworking Summary: Popular Woodworking’s blog post focuses on the relevance of countersink and counterbore techniques in woodworking applications. It provides practical tips, tricks, and step-by-step guides on how to effectively use these methods to create professional-grade joinery, enhance surface finishes, and ensure the structural integrity of wooden projects. The post caters to woodworking enthusiasts of all skill levels, offering insights into the nuances of countersinking and counterboring specifically within the context of woodworking projects.
These sources offer a diverse range of perspectives on countersink and counterbore techniques, catering to professionals across different industries and skill levels. Readers can gain valuable insights into the applications, benefits, and best practices associated with these essential machining processes.
Frequently Asked Questions (FAQs)
Q: What is the difference between countersink vs counterbore holes?
A: The main difference lies in their shapes and purposes. A countersink hole is cone-shaped for flat-head screws, allowing them to sit flush with the surface of the part. Conversely, a counterbore creates a cylindrical, flat-bottomed hole sized large enough to accommodate the head of a screw plus a bit of extra space, usually meant for hex-head or socket-head cap screws, making them also sit flush.
Q: When should I use countersink and when should I use counterbore?
A: Use a countersink when you need the head of the screw to sit flush with or below the surface of the material, and the screw head is conical. Counterbore should be used when the screw has a cylindrical head like a hex-head screw and you want to hide the head below the surface of the part, often for aesthetic reasons or to prevent obstruction.
Q: Can both countersink and a counterbore be used on the same drilled hole?
A: Yes, in engineering and woodworking applications, it’s common to see a combination of both techniques used on the same drilled hole. This allows for a screw to be countersunk and then covered with a plug or cap that sits in the counterbored area, providing both strength and a clean finish.
Q: How do I decide on countersink and counterbore sizes?
A: The size of countersink and counterbore holes depends on the head size of the screw being used and the project requirements. The width of the countersink should be just large enough to accommodate the screw head, while the depth depends on the degree of the cone angle. For counterbore holes, the diameter should be large enough to fit the screw head and possibly a washer, and the depth must be sufficient to ensure the top of the screw is flush with or below the surface level of the material.
Q: Can countersink holes be used with any type of screw head?
A: Countersink holes are typically used with flat-headed screws, such as countersunk screws. However, other screw head types with a conical under-head surface can also be used, provided the angle of the countersink matches that of the screw head to ensure a flush fit.
Q: How do you drill the countersink hole perfectly?
A: To drill the perfect countersink hole, start with drilling a simple hole or a tapped hole for the screw. Then, select a countersink bit that matches the angle and size of the screw head. Position the bit in the drilled hole and apply steady pressure, ensuring to stop once the desired depth is reached to make the countersink holes conical and smooth.
Q: Can countersink and counterbore holes also be used for aesthetic purposes?
A: Absolutely, beyond their practical applications in hiding screw heads for a flush surface, countersink and counterbore holes are also used for their aesthetic appeal. They can give projects a cleaner, more polished look, making fasteners less visible and improving the overall appearance of the piece.
Q: Is a special tool required to create a counterbore or countersink?
A: Specific countersink and counterbore bits are required to create these features. Countersink bits are typically cone-shaped and designed to create a conical surface that matches the angled underside of flat-head screws. Counterbore bits are cylindrical and designed to create a cylindrical flat-bottomed hole that can be as simple as a larger drill bit or as complex as a specially designed counterbore tool.
GOLDSUPPLIER.COM expands globally, offering quality business opportunities, cost savings, convenience, and expertise in international trade. Trusted and recognized internationally.