Halloween is often perceived as a festive occasion no less than an overpowering display of glorious makeup arts or intricate designs. However, this guide seeks to redress this notion by exploring subtle but classy creative designs for Halloween. While embracing the spirit of gothic art and julmemeism, these designs are rich in narrative visuals and dynamic in technique. These designs can be worn to either lavish settings or when you want to highlight seasonal charm. While defining the depth of minimalistic style featuring autumn-inspired elegant solid colors or vintage floral cutouts for the more extravagant. The designs are a perfect fit for anyone looking to enhance manicure art.
What are the top classy Halloween nail trends for 2024?
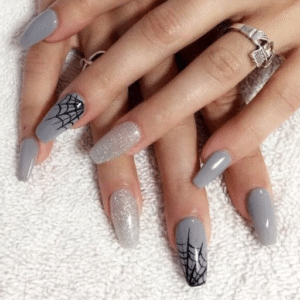
Sophisticated Alicia Aura nails that have Halloween themes.
Alicia Aura nails decorated with Halloween themes is great to consider. Choosing moody seasonal colors such as deep purple dark grey and rich orange is great .One can include a web of spiders while adding micro glitter that encourages sophistication for instance. The best solution to fuse together the halo look of aura nails and the slight elements of Halloween is to ensure it maintains elegance and can be worn at different occasions.
Decorate your spider web and acrylic nails with a touch of minimalism
For your activewear or casual wear, i would recommend spider web and acrylic nails decorated in such a way that keeps your balance between dull and fashionable. The dull somewhat dark or nude backdrop can be achieved by adorning your nails with either black, gray or even nude color. To create a contrast i would recommend using either silver or white outlining your spider web. The best part about minimalism is that you can easily maintain sophisticated nails after using either a matte or glossy polish.
Ghostly accents on an elegant black French tip manicured nails
For glossy black French tips with slight accents, it is important to begin with an even base coat to strengthen and protect your nails. Then, use black nail polish to create the French tips that we previously mentioned. The ghostly accents can be made with white nail polish, a fine detailing brush, or a dotting tool that allows you to create unique designs within the nail bed. Finally, seal it with a glossy topcoat to complete the styling and protect the tip. This look is classic, easily adaptable and suitable for a manicure focused on Halloween.
How can I create a chic Halloween manicure at home?
Essential tools and polishes for DIY Halloween nail art
The initial detail that you need to start the Halloween nail art I suggest to stock up on a few nail polishes and tools to make the work amuch easier. It is must to have a good quality base coat as it would protect my nail and provide a smooth surface to begin with. A reliable black or white would go with the design so would grey or metallic so while applying polish I simply use a detailing brush for the hard to reach areas. A pair of tweezers, nail art stickers or stencils aid in adjusting embellishments to the desired places. The osteoporitic endorsement is my last step as I love to apply a glossy or a matte topcoat without any beautifying once the desired design has been achieved.
Step-by-step guide to achieving perfect French tips with a spooky flair
1.Prepare Your Nails
Clean, shaped nails form the basis of most nails therefore they should be the first thing done along with applying a base coat to help beautify the nails. This ensures that the nail polish goes on smoothly, looking stylish while adding durability to the design.
2.Paint the Base Color
The base color of the applies coat is key in determining whether the design come out nice or not, so choosing the right color is essential and in this case starting with sheer black, white or nude can assist the overall design one wishes to go with, during this stage one is advised to allow the coat to dry fully.
3.Create the French Tip Design
To achieve the French tip, I will use the brush and nail guides to paint the tips with a deep color like black or dark red. If the desire is to enhance the design, I can also cut them in jagged ways or add a touch of dripping paint in order to create a ghostly effect.
4.Add Halloween Details
When the tips are fully dried, I implement designs of witches and bats or spider’s web with stencils, stickers or finely detailed brush. I then use dotting tools to form stars and add detail like small eyes.
5.Seal the Design
I use a glossy topcoat when I want the look to be Christmassy and bright, and a matte coat if I want the appearance to be dull and ghostly. Sealing a design is really important as not only does it keeps the design safe, but also makes it more durable.
How To Maintain Halloween Nail Art Work For A Longer Time
To make sure my Halloween nail art stays well and is used for the whole season, I make sure my nails are in good condition. I am guaranteed to scrub and buff my nail to get every oil and dirt out of the nails making it ready for polish, so the polish sticks on perfectly. I ensure to put in a good base to start off that makes my design not only good but helps in keeping away stains as well. Maintaining my designs preserving them with a topcoat is equally important as it protects the design and increases its lifespan greatly. Finally, I am extra careful about my daily chores for instance when washing the dishes, I use gloves, minimizing the moisture and chemicals that weaken the manicure.
What are some unique Halloween nail ideas that aren’t too over-the-top?
Elegant Nail Art Using Pumpkin Inspirations
If you want a sophisticated look, I would say a pumpkin-inspired nail art is the right place to go. Start with a neutral beige or a soft taupe to have a difficult canvas and wrap up with a muted orange shade to create minimalistic shapes or to paint rounded lines that resemble a pumpkin. You can also add a hint of metallic gold or a copper detailing aiming to be subtle yet eye catching. It manages to provide a minimalistic approach and theme for the spooky season being Halloween in this case, Which is undoubtedly delightful in itself.
Bat Silhouettes – A Naked and Sparse Approach
A popular trend of bats overshadowing Halloween is creating bat silhouette designs. Now, if the thing does appeal you, try to design simple yet elegant bat shapes painted in matte black or a deep gray. For a clearer approach and to manage refinement, stencils or simple decals do the job pretty well. This style helps in achieving the desired essence of Halloween being subtle and prominent by placing the bats towards the edges or corners of the silhouette.
Halloween color themes mix with real gradient works harmoniously
I suggest using a gradual transition to mix darker shades of orange, purple and black and it will help you achieve a real sophisticated gradient in uniform blending. Adding metal details such as gold or silver can be advantageous in the design as well. Gradients may be used in the background, in the typeface, or in other minor elements so that all of them combine as well as look elegant at the same time.
How can I incorporate Halloween elements into a professional-looking manicure?
Designs with slight spider web patterns over neutral colors.
In order to keep professional standards, I think one can begin with a neutral foundation which can be a beige, taupe or a faint gray. Then, spider web nail designs can be made either in black or in silver metallic colors while using a fine-detail brush for black or silver metallic colored spider web designs. Limit the patterns to minimal application by applying them on one or two accent nails per hand so as not to overpower the overall design while ensuring that the nails still retain their beauty.
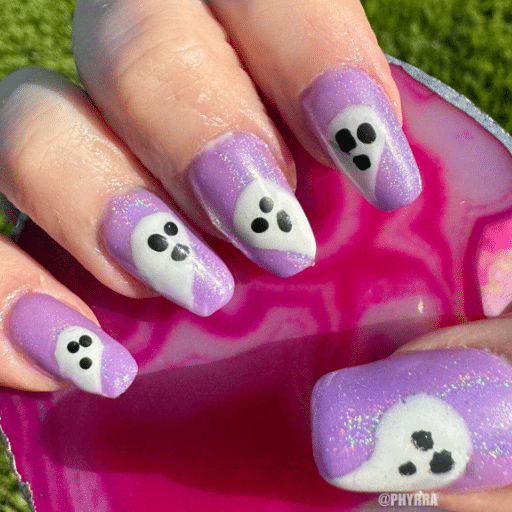
Stylistic ghost French tips for a terrifying appearance
As for ghost French tips the stylistic guidelines are which color should I start with? I would do a sheer or milky foundation first then it will give the nails an almost magical transparent finish. Make a splash by making subtle French tips in gray or white French manicures while making sure the edges are smooth and well defined so the viewer doesn’t get irritated when looking at the fingers. To spice things up further, use a light annoyingly black veil or a fog color or even detail that looks and feels like smoke. The technique provides a simple designed approach while keeping it appealing to the eye.
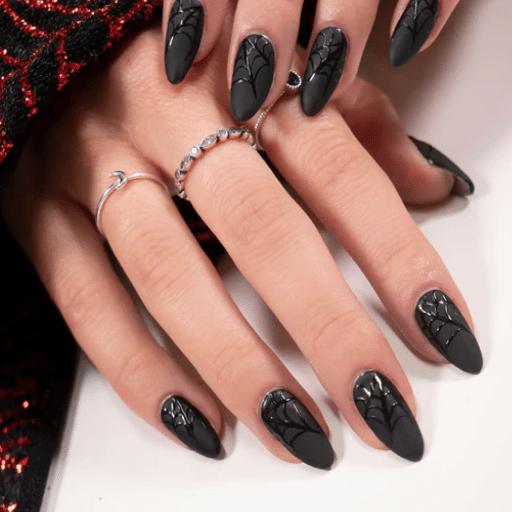
Matte black nails adorned with glossy Halloween designs
The process begins with a well-applicating nail polish, as this design requires you to first apply two- to three odd layers of quality matte black nail polish, making it entirely opaque. Once the layers are done, you can begin applying gloss designs, making use of polishes that contain constructive designs consisting of glossy coating bats, spider webs, or pumpkins. It is important to wait for the previous layer or coat to dry completely for consistency reasons, as allowing the layers to dry properly is vital. When you achieve that contrast of a dominant matte nail polish against the tones of a think or high shine coat, it adds a new flair to the overall look rendering it perfect. To make the glossy designs last longer, a UV or LED curing is ideal.
1.Matte Black Base:
- Nail Polish Type: Brands such as OPI or Essie are better as they have a matte formula.
- Application Layers: A regular coat demanding two to three layers.
- Drying Time Per Layer: Two minutes if you are to air dry them, but 30 seconds will suffice if you dry them via an LED lamp.
2.Glossy Designs:
- Top Coat Type: Preferably a high shine, gel or finishing polish.
- Application Tool: Use a fine art brush or stamping kit .
- Curing Process (if gel polish is used): 30-60 seconds under a 48W LED lamp or 2 minutes under UV light.
3.Increased Lifespan:
- For better durability, use a top clear gel coat over the completed design and make sure to use a matte coat for the base only and glossy ones for the motifs.
- In order for the gel to set appropriately, it is best to let it sit for up to a day without being submerged in any water or touching any harsh chemicals.
This design attempts at a perfect equilibrium in terms of being ostentatious and minimalist and hence makes a great choice for Halloween themed nail art.
What are the best color combinations for classy Halloween nails in 2024?

Chic black and orange styling
Black and orange are some of the classic Halloween colors however when combined in a strategic manner they can achieve a very elegant finish. I suggest going for things like matte black nails with an orange shine at the tips, or alternatively, paintings orange with black outlines. You could also introduce some gold or bronze highlights, so the style can pop a little bit more. These combinations are just on the right side of festive while remaining `classy and chic`, classy in the way its done.
Chic purple and green ensembles
With respect to purple and green dressing up as a combination, I would recommend going towards cocktail or jewel tones as this can prevent an exaggerated look. For deep emerald green, it is best paired with colors such as soft lavenders or rich shades of plums. These combinations can be enjoyed as they are or even layered with various textures such as silk or velvet for fashion: throws and cushions can also work to give subtle yet necessary ‘pop’. A metallic touch with gold or silver can do wonders too appearance wise.
Halloween nail designs with stylish metallic touch
There is no restriction! Metallic accents have the potential of sparkling every Halloween look making it sophisticated yet spooky. I suggest one may paint stripes, spider webs, or geometric patterns yielding metallic areas in the warm tones. These can be nicely placed against blacks or deeper burgundy’s. Also, foils or use of chrome powder on nails can produce an interesting high-shine and depth effect. Such contemporary, varied finishes achieve the right Halloween look that is in fashion.
How can I make my Halloween nails last through all the festivities?
Long-lasting nail prep techniques for Halloween designs
To begin with, assemble your Halloween nails by first cleaning and shaping them, while pushing back the cuticle and buffing the nail to provide a good base for the polish. If you want your nails to look fresh and neat for the entire event, be sure to first buff and clean them thoroughly before applying a decent base coat or polish. Additionally, do not forget to apply a top coat and seal all the edges such that no chipping occurs at the edges. Letting your nails be put under the UV or LED lamp ensures a stronger coat, as does using gel polish or no-wipe top coat. Lastly, the design can be kept intact by putting on gloves while doing the dishes or cleaning to avoid soaking them in water for too long.
Best top coats for intricate Halloween nail art preservation
When it comes to intricate Halloween nail art preservation, it is crucial to select a no-wipe gel top coat instead as it serves more of its purpose and yields better results. Seche Vite, Essie Gel Couture Top Coat, Sally Hansen Miracle Gel Top Coat as some of the best in the market. Seche Vite offers a glossy and fast-drying solution and emphasizes on the importance of detail owned by the design. The essie gel couture top coat gives you the protective topcoat effect of a UV lamp without forcing you to use one while Sally Hansen Miracle Gel keeps the detailing intact whilst helping with smoothing out the nail art and making it last much longer. All the options mentioned above prevent chipping and fading while ensuring your nail art looks brighter and stave off degradation.
Touch up tricks to preserve the enchanting Halloween manicure
In the event that my Halloween manicure starts chiseling, I suggest holding a nail art brush or a small toothpick so you could do some minor touch ups. Manicures should go hand in hand and this can be easily done by wearing gloves whenever one has to do any cleaning. If your nail has suffered minor scratches or has dents, use matching nail polish and paint over it or apply a real thin layer of top coat nail polish and it will get sealed all nice and good. Moreover, if a person were to apply a coat of top nail polish every couple of days that would also help maintain the shine and ensure the breathtaking design of the nail art does not chip off so easily.
What are some quick and easy classy Halloween nail ideas for last-minute plans?

Graceful Halloween press on nails design
If you are fond of press nails that showcase little elegance on special occasions such as Halloween, consider sets such as matte black with gold, spiderweb patterns, or classic French tips in bewitching colors such as orange instead of the usual white. Not only do they take less time to wear on once but also facilitate a sophisticated look for the cocktail without putting in hours of effort into look designing. KISS, Impress, and Static have affordable range of best press nails for an elegant or funky last minute plan that would also be perfect for Halloween season.
Effective polish for quick and easy Halloween themed nails
In addition, I’d suggest you use quick dry polishes made by OPI, Sally Hansen and Essie as they are efficient for last minute decorations. Not only do they come in vibrant shades such as orange, red, and black which is perfect for Halloween nails design, but they also dry in a few minutes making the now extended task of nail painting simpler. On top of that, the polishes are resistant to fraying and chipping, and in conjunction with a fast setting top layer, they will last a long time without severe effects on their overall gloss and brightness.
Easy nail stickers and decals for instant Halloween glam
Use nail stickers and decals that will make things easier and help your nails exhibit the Halloween spirit if you lack the time to design such nails. Allure, Byrdie, Glamour and other trusted sources advise brands such as Olive & June, ManiMe and Dashing Diva to start with their easy-to-use and durable products.
Olive & June Halloween Nail Art Stickers
- Features: The stickers are designed with issues of spookiness in mind, as one can easily find pumpkins, bats, ghosts and other spooky images among the prints.
- Application: These nail stickers can easily apply to both natural nails and polished or acrylic nails, and you can seal it off with any clear top coat too.
- Justification: Olive & June has semi-adhesive ultra-thin stickers that have high adhesion so after nail application, the end result on the nail appears flat and smooth with no risk of lifting.
ManiMe Halloween Decals
- Features: ManiMe’s holographic fit and glow-in-the-dark nail decals can be designed according to the shape of the client’s nails.
- Application: The stickers are custom-made decals for precise fits based on the measurements of your nails taken in a digital scan; the stickers are made out of non-toxic composite materials.
- Justification: They also guarantee no bubbling as their nails are custom-made to fit the client’s nails and they are safe to wear as the products are non-toxic.
Dashing Diva Gloss Gel Strips
- Appeal: Nailing stickers with gel-like quality which automatically comes with preformed Halloween setting graphics such as skeletons, broad—dripped blood, and a spider with metallic sheen.
- Application: These stickers can last up to fourteen days and do not need any heating or any other means of application. One just has to make sure to stick the stickers on a well-prepped nail bed, doused away the excess stickers with a file, and if necessary, apply a UV top coat.
- Rationale: The built in gel polish ingredient provides an effect which enables to create a high depth image to its shine, making them salon quality as well as their wide lasting formula seals the deal presenting them ideal for seasonal gatherings.
These options will enable you to attain the desired effect of detailed Halloween nail art in minutes thus making them an efficient and fashionable option for your manicure needs.
Reference sources
Frequently Asked Questions (FAQs)
Q: What are some popular classy Halloween nail designs?
A: Some popular classy Halloween nail designs include spider web nails, bat nails, skeleton nails, ghost nails, and blood drip nails. These designs offer a perfect balance of spooky and sophisticated for the Halloween season.
Q: How can I create a simple yet elegant Halloween mani?
A: For a simple yet elegant Halloween mani, try classic black tips or a mix and match approach with neutral nails and accent nails featuring subtle Halloween motifs like tiny bats or ghosts. These designs are perfect for those who want a more understated Halloween look.
Q: What are some trendy Halloween nail colors for 2024?
A: Trendy Halloween nail colors for 2024 include classic black, orange, green, and deep red. For a more glamorous look, you can incorporate metallic shades like gold or silver.
Q: How can I create spider web nails at home?
A: To create spider web nails at home, start with a light base color, then use a thin brush or nail art pen to draw intersecting lines resembling a web. Add a small black spider for extra detail. This design works well as an accent nail or across all nails for a full spiderweb effect.
Q: What are some cute Halloween nail ideas that aren’t too spooky?
A: For cute Halloween nails that aren’t too spooky, consider designs like candy corn-inspired nails, pumpkin nails, or ghost nail designs with friendly faces. These options offer a festive look without being overly frightening.
Q: How can I make my Halloween nails last through parties and events?
A: To make your Halloween nails last through parties and events, start with a good base coat, use high-quality nail polish, and finish with a durable top coat. Consider using Halloween press-on nails for a long-lasting, professional look that’s easy to apply and remove.
Q: What are some classy Halloween nail ideas for short nails?
A: Classy Halloween nail ideas for short nails include minimalist designs like single accent nails with small Halloween motifs, ombre effects using Halloween colors, or simple patterns like stripes or dots in black and orange. These designs can create a festive look without overwhelming shorter nails.
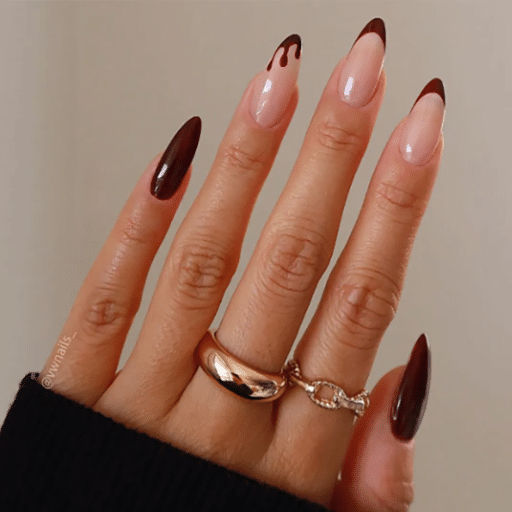
Q: How can I incorporate blood drip nails into a sophisticated Halloween look?
A: To incorporate blood drip nails into a sophisticated Halloween look, try a French manicure with red tips that “drip” down the nail. Alternatively, use a deep red polish on the entire nail and add black drips from the cuticle for a reverse blood drip effect. These designs offer a classy take on the classic horror element.


