The holiday season is the best occasion to make your fingers shine with the Christmas spirit using nail art. From simple, classy patterns to more sophisticated, flamboyant designs, festive nail art is a look for everyone. In this article, we have put together the best 10 Christmas nail ideas for 2024 so that you will not go unnoticed anywhere you go. You can choose from timeless suggestions like red and gold accents and fashionable minimalism, which provides a comprehensive alternative to seasonal, average-looking nails. Be prepared to witness a wide range of options incorporating seasonal charm with state-of-the-art nail art designs that set the stage for your holiday looks like no other.
What are the hottest Christmas nail design trends for 2024?

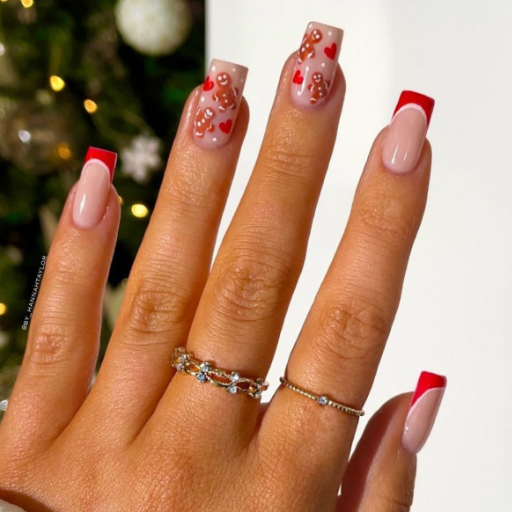
Sleek Christmas nail art styles to opt for when you want to look sophisticated
I advise sticking to classic yet elegant styles that will never go out of fashion for Christmas nail art designs. If you’re looking for a Christmas-themed French manicure instead of the usual white tips, try gold or silver to elevate your look. Jewel tones, especially deep red, emerald green, and navy blue, with intricate and shimmery metallic embellishments, are also great choices for this holiday season. To embellish even more, a few meticulous snowflakes or star patterns would add festivity without overpowering the designs. Such ideas have contemporary appeal while also integrating traditional festive colors for a clean and sophisticated look.
Creative Christmas nails ideas that leave your personality shining!
For a Holliday-focused vibe, I would say you can give it a try with pretty and bright stylings such as Christmas lights, candy cane patterns, and even reindeer faces. One can also try the mix and match approach where you could put some colorful balls and snowflakes with glitter, or even tack on a nifty Santa’s hat, The best festive colors are bright red, green, gold and silver which goes well with touches of sparkle as it compliments the happy theme. It goes without saying that these styles are quite flattering, certainly attention-grabbing, and are ideal for the joyous period.
Sleek and Clean Grainy Patterns Christmas Nails Polishes
For the nail polish lovers such as myself I can just say honestly for the minimalist Christmas nails designs try to pair neutral or other light shades such as beige or soft pink along with small Christmas decorations. For small, cute painted decorations, a snowflake, a small silver stripe, or a cute-looking holly pattern could easily make your pale polish look more versatile and appealing for Christmas. There are also negative space designs where you could use clear polish and add little red and green color which tends to create a elegant and subtle design. You can pull off these minimal designs while showing off your Christmas spirit without going overboard.
How can I create a Christmas tree-inspired nail art design?

A stepwise approach to creating a nail art tutorial of a Christmas Tree design
1. Nail Preparation
First, remove grime or grease by thoroughly cleaning your nails. Trim and file your nails so that they are the required length. Buff your nails to achieve a smooth finish that provides an even surface. To bolster the endurance and adherence of the design, apply a base coat.
2. Experiment With Colors
Selecting a base color such as white or light pastel is the best option for the Christmas tree polish designs to exhibit clearly. Apply two reasonably thin layers of the base coat polish to thoroughly cover the nail bed, allowing each layer to dry before proceeding.
3. Forming A Christmas Tree Design
Using a fine nail art brush or striping tape, draw a triangle shape representing a tree on the nail, and fill the triangle with green polish. Ensure the base layer is dry before proceeding to this step.
4.D ecorating the Tree
Using red, gold, or silver nail polish, carefully decorate the tree by dotting small specks on the triangle. To attain accuracy, use a dotting tool, a bobby pin, or a toothpick. Final touches can be a glimmering polish of tinsel or lights.
5. Place a Star on the Christmas Tree
Glue a star atop the tree using a gem, a nail art sticker, or metallic nail polish. Be certain that the star is secure and placed in the center.
6. Preserve the Creation
After all the decorations are done and the intricate details are dry, apply a finishing coat to provide a glossy look. Furthermore, I must mention that this helps protect the nail art and gives it an elegant finish.
Therefore, this technique provides a safe and impressive Christmas tree outlook that wrist-friendly home mani artists can easily design.
Top Press-On Nails for Christmas: Get the Perfect Festive Manicure
With the holiday season upon us, there’s no better time to upgrade your nail game with festive press-on nails! These easy-to-apply nails are perfect for busy holiday schedules, giving you beautiful designs in no time. Here are some of the best Christmas-themed press-on nails to get you ready for the celebrations:

- BTArtbox Christmas Press-On Nails – Natural & Reusable
- Description: These elegant press-on nails from BTArtbox feature a natural nude base with festive gold accents and starlit designs, making them a perfect choice for both Christmas and New Year’s celebrations.
- Features:
- Reusable and durable, offering long-lasting wear.
- Elegant gold star and line patterns for a chic and festive look.
- Easy application with adhesive tabs included, so you can achieve salon-quality nails in minutes.
- Ideal For: Those who want a subtle, sophisticated Christmas design that can also transition into New Year’s Eve.
Click the link to buy the same nail stickers immediately.

MABKJLF Christmas Medium Press - MABKJLF Christmas Medium Press-On Nails – Snowflake Designs
- Description: Embrace the magic of the winter season with these medium-length press-on nails from MABKJLF, featuring intricate snowflake patterns and soft wintery shades of blue, white, and silver.
- Features:
- Medium length for a natural yet stylish look.
- Delicate snowflake and frosty designs to bring the chill of winter to your fingertips.
- Easy application with pre-applied adhesive.
- Ideal For: Those who want a charming, winter wonderland vibe to their nails for Christmas parties or casual holiday gatherings.
Click the link to buy the same nail stickers immediately.
BTArtbox Press-On Nails - BTArtbox Press-On Nails – Short Length for Valentine’s Day (Perfect for Christmas Too!)
- Description: While designed with Valentine’s Day in mind, this short set of press-on nails from BTArtbox is a great fit for anyone who loves simple, clean designs with a touch of Christmas cheer. The subtle pink base and gold accents make it festive without being overly bold.
- Features:
- Short, comfortable length for everyday wear.
- Elegant, understated design with a soft pink base and gold detailing.
- Non-damaging, easy to apply and remove.
- Ideal For: Those who prefer a more minimalist style for the holidays but still want to add a little holiday sparkle.
Click the link to buy the same nail stickers immediately.
Scenery Snowflakes Christmas Press - Scenery Snowflakes Christmas Press-On Nails – Winter Wonderland Design
- Description: These press-on nails are the ultimate winter wonderland nails, with beautifully detailed snowflake designs and a serene, frosty blue and white color palette. Perfect for a snowy Christmas look!
- Features:
- Beautiful snowflake patterns that make it feel like a holiday in the snow.
- High-quality, long-lasting adhesive for a secure fit.
- Beautifully packaged for gift-giving or a treat for yourself.
- Ideal For: Anyone who loves the beauty of snowy landscapes and wants to wear it on their nails this Christmas season.


Best types of green nail polish perfect for a Christmas tree-inspired manicure
With my observations there are three types of green nail polish that are most ideal for Christmas tree nails. Essie nail polish off Tropic is ideal because the color is a very dark green, which seems to be more natural than evergreen trees. OPI Nail Lacquer Stay Off the Lawn! It provides a shade of green that is lush, elegant, and well done, especially when used during X-mas. Zoya Professional Lacquer in Wyatt is another great Christmas nail polish, as it boasts a forest green color and is long-lasting. These brands capture the season’s beauty and guarantee good quality manicures.
Designing festive Christmas tree nails incorporating glitter and sparkle
There are many ideas for beginning to mix glitter and sparkle in a Christmas tree nail design, including applying good polish over the ideal green base colors. An ideal product to recommend is the Essie Luxeffects Set In Stones, which has a good silvery glitter, allowing one to achieve a more wintery look. For appropriate accuracy in the application, I would suggest lightly dabbing the tips of the “fake nails” or toppers and the corners using a brush with fine bristles throughout to evenly distribute the polish.
Applying a shimmery blue coat such as the China Glaze Fairy Dust, the polish would deepen the base colors and allow adding more texture to the design without overpowering the overall colors used. However, while doing this, certain technical parameters should always be considered to achieve a smooth finish. By applying a quick-drying top coat like Seche Vite Dry Fast Top Coat, it would provide a professional, clean, long-lasting, and soft, glittery result. Thus, the design is ideal for a Christmas tree nail as it is unique and professional.
What are some creative ways to use red and green in Christmas nails?

Red and Green Usage on Nail Art for Christmas
When combining red and green for classic Christmas nail art, I particularly look forward to having a ‘good balance’ among the designs. One of my preferred techniques is starting on a red base and accentuating it with green stripes, polka dots, or even holly leaves. I also have a striping brush set at an angle of 0.4 mm that is quite helpful during final detail work since it provides controlled lines. Another question would be whether the red or green nail polish would be pigmented enough and the answer is yes because I make sure to buy polishes that do not leave streaks even on two coats.
I could also use metallic green foils or even red glitter in the design for added dimension. Glitter that has a particle size of 0.2 mm is ideal for attaching glitter on nails because it is small enough for a smooth texture and for it to be able to stick on the nails. If embellishments need to go on the design, then a UV or LED curing top coat would be best since it adds an extra layer and shine while protecting the nails underneath. It is worth noting that when the technical parameters are appropriately followed, the end results are often desirable, both visually and over the long term.
Dark green nail art ideas for a straightforward Christmas manicure
I would suggest dark matte green nails for a contemporary Christmas manicure while pairing them up with simple designs such as gold or silver that enhance the rich shade of green even more. Simple metallic stripes, dots, or even a single nail with glitter will do the charms of keeping the look both festive and elegant. Another option in style is matte finishes, which helps make the dark green appear even more sophisticated. A little bit of white or pastel tones with minute marble styles and snowflakes will add a creative touch to the dark green nails. The combination offers a perfect blend of modern style combined with traditional features. That’s just fit for Christmas.
Red and white nail art designs for a more candy cane-themed artwork
For a candy cane inspired look, red and white nail designs are perfect complimenting the beauty of the candy. Stripes in false red and white paints can help the nails better match the figure of a typical candy. Traditional stripes in a diagonal direction or a mix of swirls cut the nail lines of the paint and add glitter to the design. Make use of red and white dots and a few matte polishes in addition to some gloss finish to the design – this will bring creativity while still projecting a holiday theme. Only ensure that the lines and edges are well-defined.
How can I incorporate snowflakes into my Christmas nail art?

Methods for doing winter nails by snowflaking on nails
When starting to create awesome and fragile snowflake designs on nails, I mostly import fine-tipped nail art brushes or precision dotting tools to provide symmetry. The best tool if I want it to be a little podmatic is regular white nail polish, nail art gel, or a polish which is slightly colored. A stamping tool with snowflake designs and patterns is also a good way to get constant shapes. Other technical parameters that I include are a very firm hand when performing brushwork and ensuring that the base coat has cured fully before applying the polish to avoid smudging. For a more dimensional addition, using ultra-fine glittering or rhinestones at the center of the snowflakes can spice up the design while the finishing looks neat. Covering the design with a top coat is important, as it will lock in all the details and protect the nails.
Snowflake nail art ideas if you wish to create aesthetic nail art whiles conducting winter themed manicures.
Intricate snowflake designs are some of my go-to choices any time winter comes, and this is because, with the tools I have, I can create the most seamless artworks that blend beautifully with the nails. First things first though, Preparing the nail is one of the most important steps. A cured gel ensures there are no rough surfaces and this also makes it easy to apply the design without any mishaps. For the intricate details I prefer using a micro brush, this allows me to create the snowflakes in no time and ensures that the shape is well balanced and symmetrical. Moreover, I use extremely fine glitters or iridescent rhinestones to add texture but do not overdo it as I find it can cut help cut down the elegant look of the design.
- Base Preparation: Although I find any type of good Polish works, a gel works best as it gives a nice base coat for the nail and essentially allows adding a lot more texture onto the nail.
- Line Detailing: The edges need to be clean and well-shaped; therefore, using a good quality brush while considering the size of your tip is important.
- Enhancements: Proper Tools and precision brings everything together, using a safe amount of glitter or rhinestones with a Puper girl makes everything look perfectly stunning.
- Top Coat Application: Finally, once everything is in its place, a trustworthy, high, shiny long long-lasting varnish is used to protect the design from any future damage.
Integrating snowflakes with other aspects in festive nail designs
Integrating snowflakes with other aspects in festive nail designs requires the integrating of supporting elements like holly, ornaments , or stars, maintaining harmonious color including shades, icy blue, red and silver. Plan the arrangement of the elements, making snowflakes the most prominent but surround them with non-dominant details to avoid confusion. Incorporate complex edges and soft features to form a nice combination of both styles.
What are some festive French tip nail ideas for Christmas?
Green French tips on nails for a classic christmas style
The go-to christmas style for French manicures is green acrylic for tips nails. I’d say to achieve a simplistic yet festive look, just use a light greenish tone for the tips for the nails. This design can be further improved by incorporating small white or gold dots at the edges or a slight glittering effect to add sophistication. Having the green tips along with a sheer pink or light nude base will balance everything and make it well put together keeping the festive theme in mind.
Adding some blue glitter nail polish to French tips for that extra festive effect
While making a french tip for nail art, one french manicure idea involves applying one or more coat of blue glitter polish to the ends of the tips of your nail. Blue, silver or rose gold would work perfectly while applying accents together with the base. Add a sheen to your French tip by first applying a layer of light nude or clear base followed by little to no glitter, finishing with a glossy top coat, sealing the look. This style might seem basic, but simple is best, especially during the festive season.
French tip designs inspired by the candy cane
When attempting French tip designs inspired by candy canes, first apply a light nude or sheer white polish followed by some drying. A light base will make the design simple to achieve. After that- using a striping brush or nail art tape, draw diagonal stripes across the tips of your nails at equal angles. The candy-cane-like pattern can be achieved by switching between dark red polish and the clearest white polish for the lines of the pattern. The lines have to be neat for this design since it celebrates this style.
1. Selection of base coat:
- Make sure to apply a light nude or clear coat of polish to help in covering up the nail and ensure a stronger hold. Massage it through since it will assist in reducing breakage and hold the polish of the design.
- It is best to use a base coat from either, OPI, or Essie, as they are commonly recognized for having a long-lasting effect.
2. Tools for the stripe technique:
- For the best effects, Angle or stripe a tool such as a set of fine detailed “nail art brushes” working diagonally along the user’s nails for a striking effect. This will allow for greater definition in each stroke.
- To ensure accurate spacing, Thin art tape can assist in determining the area that needs to be striped.
3. Polish Types:
- Red Polish:
- Select a richly pigmented true red aiming at opacity so you need to apply it just once. Using shades like OPI Big Apple Red is common practice while creating drastic celebrative designs.
- White Polish:
- For a crisp candy cane look, use Essie Blanc or any opaque white polish that stands out clearly against the red and the base coat.
4. Top Coat Application:
- To protect the design and to make it long-lasting and shiny , apply gel-like super glossy polishes as a final touch. Seche Vite Dry Fast Top Coat is also known to work very well for this purpose.
Follow the set rules and work with the necessary tools and polishes. You will definitely look festive but professional at the same time and your design will be complemented by the candy cane theme perfectly.
How can I create Christmas nail art on short nails?

Short nails Christmas design for the enhanced look
Short nails and Christmas art collide perfectly when the artist enjoys simplifying things and going with Christmas-themed items such as minimal Christmas trees, tiny gift boxes, and snowflakes. As for me, I also use glitter vertically to give the illusion of longer nails. Dark colored palettes such as red and green are my go-to for the season so are the nail stickers to add finer details. Everything gets topped off with a high gloss top coat to seal everything in place making every nail art pop even with shorter nails.
How to decorate short nails so they don’t appear dull and bare
To make short nails festive and stylish, I focus on clean nail prep because it makes sure that the nail for designs is straightened. I opt to go with those seasons colors that are overpowering and grab notice such as dark red or metallic golds, or sparkling greens. Moreover, simple things like adding glitter to one nail or putting a tiny holiday decoration on one nail, are nice additions that don’t clutter the nail. To finish, I like using negative space designs, snowflakes, or even geometric shapes lately painted in metallic polish. Lastly, a gel top; besides enhancing the shine, adds to the durability of the design and ensures that it remains so through the holiday.
Christmas nail art for short, natural nails
My favorite design for Christmas nails on short and natural nails would include simple yet creative and striking designs. Always in vogue are Christmas red nails with shine and gloss to them. One can also choose to go for a more ostentatious look by adding a fair amount of callbacks, ornaments or even snowflakes. However, short nails can look quite enthralling with tiny designs of Christmas-themed trees, ornaments, or even stars. While these don’t overcrowd the nail art but add to the charm of the nail art festive seasonously.
What are some unique Christmas nail art ideas beyond traditional designs?

The best way to celebrate the festive spirit is with classy nail art: Mistletoe.
Mistletoe-inspired nail art is a work of art that marries playfulness and elegance, definitely a must try for the winter holidays. To achieve this design, begin by applying a base layer in soft beige or light pink color and then apply mistletoe artwork to highlight on it. With a nail art brush or dotting tool, create intricate green leaves using gel polish that can be applied with precision. For additional detail, add small white or red dots to line the edges, which resemble the mistletoe berries.
Consulting professional nail art literature, the techniques necessary to achieve this design are precise brush strokes with optimal pressure and proper polish application technique using quick drying polishes. Finally, for a long lasting finish, apply a UV protective top coat especially when using gel polishes, this step enables the design to be protected from chips for up-to a fortnight. In its totality, this design is simple yet elegant, making it ideal for nail art lovers and professionals who wish to embrace the festive season in all its glory.
Coffin nails with Christmas-themed designs
As I finish the coffin nails, I paint them in Christmas colors like red and green, along with golden glitter that adds bling to the long shape. I also employ fine-detail brushes to create a snowflake, candy cane, or even a Christmas tree to have a much more detailed and professional look on the nails. Furthermore, I do not forget to add a good topcoat to strengthen and shine the nails and guarantee that the artwork stays intact without chipping for a few days. I am particular when it comes to the tools and materials needed in performing detailed nail arts, hence I use gel polishes and other tools that are indicated in the recommendations from the nails and cosmetics authorities.
Suggestions for Christmas Nail Art
When it comes to Christmas manicures, I suggest accent nail ideas that do not take away the full attention from the primary nail art but blend seamlessly with the theme. For example, if gold or silver can be applied on one innocent nail, the look will still be shiny and classy but with a little festive edge to it. Other suggestions could be painting one of the nails with a Christmas landscape; a reindeer on one finger and a snowman on another, or a sleeker do would be putting on metallic foil. Also, I have seen some nails that have an accent matte finish pry onto a gloss finishing and it looks stunning. However, it is of utmost importance that the accent nail blends well with the colors used for the primary manicure.
Reference sources
Frequently Asked Questions (FAQs)

Q: What are some popular Christmas nail designs?
A: Popular Christmas nail designs include candy cane stripes, mistletoe patterns, snowflakes, Christmas trees, and glitter Christmas nails. Red, green, and white Christmas color schemes and festive elements like reindeer, snowmen, and Santa Claus motifs are common.
Q: How can I create candy cane nails?
A: To create candy cane nails, start with a white base coat. Once dry, use red nail polish or a thin brush to paint diagonal stripes. Seal with a clear top coat for a glossy finish. This design works well on both long and short nails.
Q: What are some winter nails ideas that aren’t specifically Christmas-themed?
A: Winter nails can include icy blue shades, silver glitter, snowflake patterns, or white french tips. You can also try a gradient of cool tones or add rhinestones for a frosty, glamorous look that works throughout winter.
Q: How can I incorporate Christmas green and red into my nail design?
A: You can create an alternating pattern with Christmas green and red nails, or try a festive french manicure with red tips and green accents. Another option is to use one color as a base and add details in the other color, such as red holly berries on a green background.
Q: Are there any simple Christmas nail designs for short nails?
A: Yes, simple Christmas nail designs for short nails include solid colors with a single accent nail, minimal snowflake or star patterns, or a glitter gradient. For a chic, understated look, you can also try a festive red or green base with subtle gold or silver dots.
Q: How can I make my Christmas nails last longer?
A: To make your Christmas nails last longer, start with a good base coat, use quality nail polish, and seal with a durable top coat. Consider using gel polish or soft gel for extended wear. Avoid exposing your nails to hot water for long periods and use gloves when doing household chores.
Q: What are some trendy Christmas nail art ideas?
A: Trendy Christmas nail art ideas include swirl designs, negative space patterns, matte finishes with glossy details, and ombre effects. You can also try incorporating nail rhinestones or gemstones for added sparkle. Minimalist designs with a festive twist are also popular for a modern Christmas look.
Q: How can I create glitter Christmas nails?
A: To create glitter Christmas nails, apply a full coverage glitter polish, or use a glitter top coat over a solid color. Try a glitter accent nail or create a glitter gradient for a more subtle look. You can also use loose glitter with a clear top coat for a custom sparkly effect.
Q: Are press-on nails a good option for Christmas nail designs?
A: Press-on nails are an excellent option for Christmas nail designs. They come in various festive patterns and can quickly and easily achieve intricate designs without visiting a nail salon. Press-on nails are also great for those who want to change their look frequently during the holiday season.
Q: How can I incorporate rhinestones or gemstones into my Christmas nail design?
A: To incorporate rhinestones or gemstones into your Christmas nail design, you can create a border along the cuticle, add them as accents to painted designs, or use them to create patterns like snowflakes or Christmas trees. Apply them with nail glue or gently press them into wet polish. Remember to seal with a top coat for longevity.