
3D printing has changed many industries, and the culinary world is not left out. One of the most interesting advancements is the ability to make intricate chocolate designs with a 3D printer. This post investigates the point where technology and confectionery collide; it gives an insight into how chocolate craftsmanship is being transformed by 3D printers. Starting from the basics of how 3D chocolate printing works up to the creative opportunities that this opens for artists as well as home bakers alike; we will be looking at tools, techniques, and trends that are shaping this sweet frontier. Whether you’re a tech geek or professional chocolatier or just someone who loves desserts – this article has got something for everyone.
How Does a 3D Chocolate Printer Work?
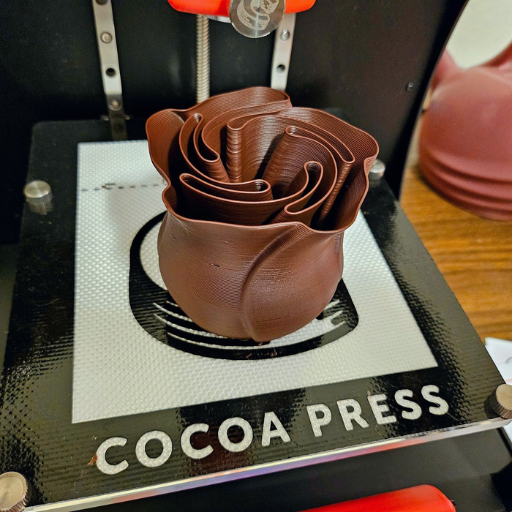
Image source: https://www.theverge.com/
To understand how a 3D chocolate printer works, it might be helpful to think of how traditional 3D printers operate. The process starts with a digital design that gets translated into printer instructions. In the case of chocolate printing, tempering is considered as “ink”. Thereafter, it is loaded into an extruder made specifically for this purpose which heats and keeps it at the right temperature for printing. The printer then deposits melted chocolate in a controlled way onto each layer before solidifying them as they cool down again. This meticulous layer-by-layer technique enables us to create very detailed and complicated structures that would otherwise be impossible manually.
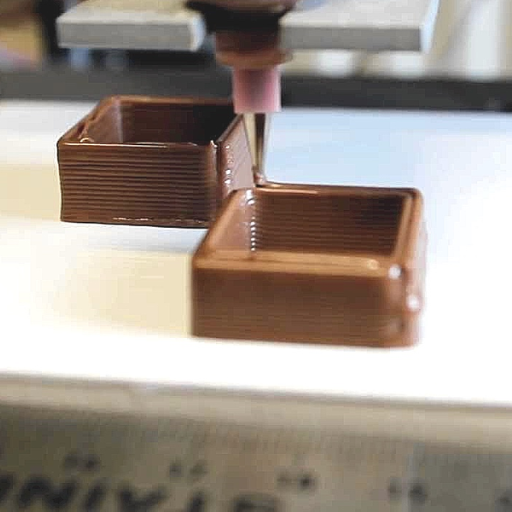
3D Printer Mechanism for Chocolate
The 3D chocolate printer mechanism is an example of a complex system that combines precision engineering and culinary science. The process usually involves the extruder, temperature control system and build platform. The extruder is designed to work with tempered chocolate by heating it to the right temperature for easy flow and uniformity in consistency. It is important to control temperatures within certain limits so that this material does not crystallize or become grainy during printing operations. In addition, there must be a base where layers of chocolates are placed known as the build platform.
A digital design file which may be created through CAD software acts as a blueprint for these printers. This design gets sliced into thin layers which are then followed by the machine when depositing chocolate on them accordingly. When each layer gets printed, it cools down thereby solidifying thus forming stable structures. More advanced models can also vary speed together with flow rate of extruders hence enabling realization of intricate designs that are more detailed than before possible.Through this technology, everything becomes customizable starting from candies up to eatable arts thereby transforming confectionary traditions into innovative environments.
Cocoa Press Technology
In the chocolate making process, cocoa press technology acts as a middleman between harvested cocoa beans and cocoa powder plus cocoa butter. This begins with fermenting and drying them out before roasting for flavor development takes place. Next, the beans are winnowed so that only nibs remain after removing shells around them. These nibs are ground into a thick liquid known as the cocoa mass which contains both solid parts of chocolate and fats called cocoa butter.
A hydraulic machine known as the cocoa press applies huge amounts of force on this viscous substance thereby separating useful fat from dry matter components. Extracted fats can be utilized during production of chocolates to ensure they have smoothness and ability melt while solids are crushed down into baking powder or drink mixes like hot chocolate etcetera. Efficiency has been improved through advancements made in these machines hence more output produced per unit time while maintaining high quality standards required by different confectionery industries.
3D Printing Chocolate: Step-by-Step Process
- Creating the Design: The first step in 3D printing chocolate is to design a digital model of what you want to make. You usually use CAD (computer aided design) software for this, among others.
- Dividing the Design: At this point the model is ready for slicing, and slicing software does exactly that to it – cuts it into horizontal layers. In this way, it tells the printer how each layer of the 3D object should look like.
- Getting the Chocolate Ready: High-quality chocolate that has been tempered (heated and cooled repeatedly so as to stabilize its fat crystals and give it smoothness) is placed in an extruder. Tempering also helps to achieve proper glossiness and texture.
- Printing Layers: A printer then deposits one layer after another, starting from bottom up; but before adding next level, each one must be cooled down until solidification occurs lest structure collapses.
- Tweaking Parameters: Some advanced printers allow adjusting such parameters as speed at which material should be extruded out or heated up during printing process; these changes serve two purposes – they ensure accuracy of reproduced item details and help create required finish where necessary.
-
Finishing Touches: Once everything has been printed out, additional decorations if any are added on; after which final product can either be consumed or presented elsewhere together with packaging materials used during production.
What Are the Best 3D Chocolate Printers in the Market?

The following machines are some of the best options in the world of three-dimensional chocolate printing due to their performance, accuracy, and user-friendly nature.
- Choc Edge Choc Creator V2.0 Plus: This printer is famous for its precision and versatility that allow professional chocolatiers to make complex designs. The device works with different chocolates ensuring a good finish as well as details.
- Procusini 4.0: Easy to use; this printer offers a complete 3D food printing experience hence suitable for both professionals and hobbyists. It comes with preloaded templates and has Wi-Fi connectivity which ensures smooth and fast printings.
- mycusini 2.0: Mycusini 2.0 is small-sized and inexpensive hence designed for personal use only. It is packed with a range of designs that one can choose from while still being simple enough to operate so that it can be used at home or in small kitchens where people make chocolates on a smaller scale.
- Flow Choc: When it comes to industrial applications, then this machine was made specifically for large numbers of items printed at once using chocolate as material. Its strong structure together with high speed makes sure confectionery manufacturers are not disappointed by their choice when selecting Flow Choc among other machines available on the market today.
- ChefJet Pro: Although ChefJet Pro is primarily used for printing sugar, it also supports printing chocolate edible materials. The reason why many people like this machine is because of its ability to produce high-resolution prints which can be used in creating complex sculptures meant for presentation during high-end culinary events where chefs showcase their artistry skills through food preparation methods involving printing candies or other foods using such devices like ChefJet Pro among others available today on the market.
Top Cocoa Press 3D Chocolate Printers
To find the best 3D chocolate printers from the top cocoa press manufacturers, the latest reviews on major websites suggest that there are some models that stand out above others:
- Cocoa Press 3D Food Printer: This printer is famous for its accuracy and simplicity. It has an easy-to-use interface which gives a smooth user experience, and it can work with different kinds of chocolates hence allowing for great design flexibility.
- WiibooxSweetin Chocolate 3D Printer: This model is rated highly by many reviewers because of its strong performance and superior functionalities. It offers high levels of detail and is therefore suitable for both professional chefs as well as amateurs with artistic goals in mind.
- Createbot 3D Food Printer: The Createbot is known to be reliable and capable of producing prints with excellent quality. Most frequently mentioned among top reviews, this machine makes a good choice for anyone looking to venture into 3d printing using chocolate materials due to its user-friendly nature alongside great workmanship.
Comparing 3D Chocolate Printer Brands
The top three 3D chocolate printer models compared often across major review sites give a good idea of the market.
- Cocoa Press 3D Food Printer is unique because of its accuracy, adaptability, and friendly interface. It can work with different types of chocolates which means that there is a wide range of design options for beginners as well as professionals.
- WiibooxSweetin Chocolate 3D Printer receives compliments for being powerful and having advanced features. This model is perfect for someone who wants professional results since it provides high levels of details.
- Createbot 3D Food Printer wins points frequently due to its reliability and great craftmanship. People prefer this gadget because it produces high-quality prints, and has an easy-to-use design which can be operated by beginners in confectionery arts or advanced users.
These printers are loved because they do an exceptional job when it comes to performance; also their ease-of-use cannot be ignored not forgetting about the intricate designs they create which sets a bar too high within 3D chocolate printing industry.
Reviewing Popular Models Like the Mini 3D Printers Tina 2
Tina 2, the Mini 3D Printer has been widely noticed due to its small size and many functions that it can perform. It is a beginner-friendly printer that has easy-to-understand commands and a simple interface. It was built compactly but with strength, therefore it gives reliable service over time and works with different types of filaments which makes it suitable for various projects . Many evaluations from different websites always talk about its silence when working, high quality prints produced and low cost that is required thus making this device very attractive to hobbyists or schools etc. The overall impression about this printer is that it combines accessibility with capability thereby becoming one among other leaders in the world of mini printers for three dimensional objects.
Can I Make Custom Chocolate Designs?
Certainly, utilizing 3D printers for chocolate will let you create customized designs. These printers use digital models and different types of chocolate to make intricate and unique designs. You can get professional-quality results with the right printer that suits your needs.
Creating Custom Chocolate with 3D Printers
To make custom chocolate designs with a 3D printer, you will need a digital model of what you want to print. Some software allows these printers to work right off the design file or convert it into printable instructions. The materials used in this process are usually chocolates which can be melted down then extruded through nozzles like other filaments on regular 3D printers. The temperature controls must be maintained at exact levels for accuracy during printing; sources suggest starting simple before advancing skills too fast while using multi-color models were easier according to one user’s review on Amazon.com – “I love my top rated dual nozzle high temp range 3d food printer.” To accommodate different kinds of chocolates, top machines also support multiple extrusion heads and adjustable temperature controls among other features. In other words, practising some more will enable one produce excellent quality custom made items that are ideal either as presents or for display purposes at professional shows.
Using Chocolate Molds and 3D Models
Using chocolate molds and 3D models is a fun way to make custom chocolate designs even if you don’t have a 3D printer for chocolate. Here’s how:
- Choose Your Design: Begin by choosing or creating a three-dimensional model of the design you want. There are many pre-made models available on sites like Thingiverse or MyMiniFactory, but you can also use computer-aided design software (CAD) to make your own.
- Print Your Mold: Use a regular 3D printer to print out a mold for the chocolate. PLA or PETG are common materials that can be used because they’re non-toxic and safe for food contact. Make sure that it has been sanded down smooth so that there will be more detail in the finished product.
- Prepare the Chocolate: Take care when melting your chocolate so as not to ruin its temper — this will give it shine and snap. Different types (dark/milk/white) require different temperatures when melting or cooling.
- Cast the Chocolate: Once melted and tempered correctly, pour or pipe some of it into your newly created shape made with additive manufacturing technology; tap gently on all sides until all air bubbles rise up through liquid then let cool completely until solidified.
- Demold and Finish: Carefully take out cooled hardened objects from their molds; trim any excess material away before adding optional garnishes such as dust powder gold leaf/metallic colours mixed with cocoa butter paint/edible glitter etcetera.
The process lets you produce highly detailed and personalized chocolates appropriate for any occasion or function – fusing accuracy associated with three-dimensional modelling while employing easily accessible supplies plus methods.
Tips for Intricate Designs in 3D Chocolate Printing
- Fine-Tune Your 3D Model: Your CAD software should have high-resolution settings for optimal details. Look out for minute elements that may complicate your design.
- Choose the Right Mold Material: Some materials can capture intricate designs better than others, such as food-safe silicone. It is flexible and will release delicate patterns easily without breaking them.
- Maintain Proper Temperatures: Detailed chocolate designs require accurate tempering. Use a thermometer to keep your chocolate at the right temperature depending on its type.
- Use Smoother Finishing Techniques: Polish or coat the mold with food-safe substances after printing to achieve an ultra-smooth surface. This will help in transferring finer chocolate details.
- Employ Steady Pouring and Setting: Air pockets are avoided during pouring or piping of chocolates into molds by doing it continuously. Consistent cooling should be done where hardening happens uniformly thereby giving clear definition of complex features.
These guidelines will enable you to increase accuracy as well as professionalism in confectionery making through 3D printed chocolates.
What Materials Are Used in 3D Printing Chocolate?
In 3D printing of chocolate, the main material used is usually high-quality chocolate which can be dark, milk or white. The chocolate has to be properly tempered for the right printing consistency and adequate solidification in its final state. Moreover, complex patterns are often made by using food safe moulds and filaments so as to get a sharp clean result. Molds made from food-safe silicone are widely preferred because they are flexible enough to reproduce intricate features accurately.
Types of Chocolate Suitable for 3D Printing
When talking about 3D printing chocolate, there are some types that are better suited than others. These include dark, milk and white varieties.
- To start with, it is worth mentioning that not all chocolates have the same properties when it comes to 3D printing. Dark chocolate has a higher content of cocoa which gives it more stability and firmness – perfect for intricate designs or those with many details on them. Also this kind of chocolate contains less sugar so accurate prints can be achieved easier.
- Next up we have milk chocolate. It has a smoother texture and sweeter taste compared to dark varieties which makes it very popular for use in this industry as well. The reason behind its high demand is simple – if you want your creations to be firm but still malleable enough during printing process (so they won’t lose their shape), then you should choose milk option without any doubts.
- White chocolate is another type often chosen by people who work with 3D printers regularly because even though being softer than both dark and milk ones, fine details can still be achieved after proper tempering etcetera.. This variety mainly consists of cocoa butter only!
However, regardless of what kind one decides upon using while engaging into three dimensional printing activity involving edibles such as candies etc., correct tempering stage must never be overlooked at any cost whatsoever.
Chocolate Printer Filament and Extruders
To achieve the best results when printing chocolate in 3D, specialized filaments and extruders are a must. The filament that is used in chocolate printers is usually made of tempered chocolate which can be dark, milk or white. It is important to make sure that the filament is safe for consumption and good quality so that it can taste nice and print accurately.
Extruders for 3D printing with chocolate need to be able to control temperature precisely enough to keep it melted but not burn it. They may also have a cooling system which rapidly solidifies the chocolate being deposited thus ensuring that whatever is being printed remains stable. More advanced versions might even come with adjustable nozzles which allow different levels of detail – from thicker lines right down to very fine ones – thereby making possible wider range of printed designs.
Innovations in Chocolate 3D Printing Materials
3D printing materials for chocolate have seen significant advancements in recent times which have improved the quality and variety of what can be printed. One use is putting high-precision tempering machines during the printing process so that the chocolate remains in an optimal state for intricate prints. Another is mixing cocoa with other edible materials to create composite chocolates that not only enhance mechanical properties but also introduce new flavors or textures.
Apart from this, studies are now being conducted on how functional ingredients like vitamins or probiotics could be added into chocolate filaments thereby transforming printed chocolates into functional food items rather than just pieces of art. These improvements enable more complex designs, custom nutrition, and wider range of uses from culinary arts to bespoke confectionery products.
Is It Possible to Use a DIY Kit for 3D Printing Chocolate?
Certainly, a 3D-printing chocolate DIY kit is possible to use, but there are important things to know. In most cases, such kits include a modified extruder, which can handle the peculiarities of chocolate. They may require some assembly and calibration for better performance as well. Moreover, it is necessary to control temperature precisely because burning or wrong solidification of chocolate occurs at certain temperatures only. Although being cost-effective and informative in terms of the science behind confectionery making methods like this one may be more complicated than buying already assembled commercial printers and will need extra effort from you together with some technical skills too.
Understanding DIY Kit Components
Typically, self-made kits for 3d printed chocolates are stocked with different specialized parts which make sure that the printing process is successful. The usual components include an extruder that has been modified to suit the properties of chocolate such as viscosity and melting point, temperature control system to keep chocolate within right consistency and sometimes molds or templates may be provided to assist in guiding the printing process. The extruder should handle melted chocolate well by controlling its flow rate so that it can be deposited continuously without any interruption. This means that there should be no clogging up of the tubes during printing because if this happens then it will result into failure of creating an object layer by layer. Considering the fact that burning or wrong solidification might occur; thus temperature control becomes very important where chocolate should be maintained at narrow range while printing. Moreover, cooling fans could also be included in some kits alongside enclosures which help in keeping printed chocolates intact during their solidification stage.Assembling these parts accurately and calibrating them properly is necessary if one wants to achieve good outcomes using do-it-yourself 3D printer for chocolate making kit.
Assembling Your Own Chocolate 3D Printer
In order to amass a chocolate 3D printer of one’s own, be sure to unpack every item in the DIY kit with caution. The base structure and frame should come first; they must be fastened securely. Then comes the modified extruder that is made for use with chocolate due to its viscosity. Follow the instructions that come with the kit so as to calibrate it well enough that melted chocolate flows evenly through it. Most temperature control systems have a heating mechanism and sensor so as to keep the chocolate at optimum consistency. Depending on what you have been given by your supplier(s), cooling fans might need setting up or enclosures for making sure that solidification happens correctly, if necessary at all since some kits do not require these additional components. Carefully follow assembly guidelines given in a manual provided alongside the product package ensuring correct alignment and calibration of each part used during this process otherwise known as ‘assembling’. After putting all pieces together, perform test printing activity aimed at adjusting settings until desired results are achieved while also allowing for any necessary alterations to be made thereafter if required according to various scenarios which may arise eventually among other things of similar nature.
Maintenance Tips for DIY Chocolate Printers
To maintain your DIY chocolate printer is highly necessary if you want it to perform well and last long. Here are some of the most important tips for maintaining a DIY chocolate printer:
- Cleanliness: Clean the extruder and other components which come into contact with chocolate after every use thoroughly. Residues may harden and block the system causing errors in its operations. Use warm water with food safe cleaning agents so as not to spoil them.
- Temperature Monitoring: Regularly check your temperature control system for accuracy by recalibrating it where necessary. This is because chocolates need specific ranges of temperatures within which they can be printed at their best quality otherwise any deviation might affect the print out negatively.
- Lubrication: Ensure that all moving parts such as rails, bearings or extruder mechanism are kept well lubricated; this reduces friction between them thereby making sure everything moves smoothly while printing and also extends life spans of various printer parts.
- Examine components: From time to time inspect each part closely looking for signs indicating weariness or damage caused through long usage hours; if found replace immediately before breaking down during printing process.
- Software Updates: Always have an updated firmware installed on your device together with latest versions of models’ designing software used when slicing objects into layers ready for 3d printing; developers often improve performance abilities through releasing new patches designed specifically towards dealing with bugs encountered by users during previous releases.
Observance of these maintenance tips will make your DIY chocolate printer remain in good shape therefore enabling continuous creation of tasty delicate designs using it.
Frequently Asked Questions (FAQs)
Q: What exactly is 3D printed chocolate?
A: 3D printed chocolate involves using a specialized 3D printer to create intricate chocolate designs. Unlike traditional chocolate making, 3D printing allows for high levels of customization by depositing molten chocolate layer by layer.
Q: How does a 3D printer work for chocolate?
A: A 3D printer designed for chocolate uses a print head that extrudes molten chocolate onto a platform, following a digital design. The chocolate core within the machine is kept at a high temp for optimal flow and precision, and the process often involves cooling each layer to maintain structure.
Q: Is a 3D chocolate printer suitable for kids and beginners?
A: Yes, there are models specifically designed as a printer for kids and beginners. These models are generally easy to operate and come with features like a touchscreen interface and safety mechanisms to prevent accidents.
Q: What kind of 3D printer filament is used for chocolate printing?
A: Unlike traditional 3D printers that use materials like PETG or PLA filament 1.75mm bundle, chocolate 3D printers use a special chocolate core as their ‘filament’. This allows for the creation of edible prints.
Q: Can I use my existing 3D printer for chocolate?
A: While some DIY 3D enthusiasts have modified their FDM 3D printers, it’s generally recommended to use a machine specifically designed for chocolate due to the different material properties and high temp requirements. Brands like the Cocoa Press machine are engineered specifically for chocolate.
Q: How do I load the chocolate into the 3D printer?
A: Most chocolate 3D printers come with detailed instructions on how to load the chocolate. Typically, you would insert the chocolate into a specialized reservoir, often in the form of small chocolate pellets or bars. The machine then melts the chocolate to the right consistency for printing.
Q: What are the main advantages of 3D printing chocolate?
A: 3D printing chocolate offers unparalleled customization and precision, allowing you to create intricate designs and custom molds that would be difficult or impossible to achieve with traditional methods. The process also allows for easy cleanup.
Q: How do I maintain and clean a chocolate 3D printer?
A: Chocolate 3D printers are generally designed to be easy to clean. Most models feature removable parts, which can be detached and washed separately. It’s important to follow the manufacturer’s guidelines to ensure the longevity of your printer.
Q: Which 3D printer brands offer chocolate printing machines?
A: Some of the notable brands that offer chocolate 3D printers include Choc Edge and the Cocoa Press machine. These brands provide machines that are specifically tailored for the unique requirements of chocolate printing.
Q: Where can I buy a 3D chocolate printer?
A: You can purchase 3D chocolate printers from various online retailers including amazon.com. Make sure to read reviews and check the specifications to ensure that the model you choose fits your needs.


